标签:des style blog http io ar color 使用 sp
是否在程序运行时使用单元测试是衡量一个程序员素质的一个重要指标。使用单元测试既可以让我检查程序逻辑的正确性还可以让我们减少程序测试的BUG,便于调试可以提高我们写程序的效率。以前我们做单元测试的时候使用的都是JUnit,只需要引入相关的jar包即可。可是我们在使用Spring的时候是不是也可以使用单元测试呢,答案是肯定的。Spring自己整合了JUint,极大的方便了我们的程序开发。
如果我们想要使用Spring提供的单元测试功能,我们除了引入Spring的相关环境我们还需要引入spring单元测试的jar包,使用maven配置是
<dependency>
    <groupId>org.springframework</groupId>
      <artifactId>spring-test</artifactId>
      <version>3.2.10.RELEASE</version>
</dependency></span>
我们紧接着上次的实验结果,上次我们是通过FactoryBean的方式来加载Spring的环境并且实现了注入功能,那我们能不能直接通过单元测试的方式来实现的,看下面的例子:
import org.junit.Test;
import org.junit.runner.RunWith;
import org.springframework.test.context.ContextConfiguration;
import org.springframework.test.context.junit4.SpringJUnit4ClassRunner;
import service.Hello;


import javax.annotation.Resource;


@RunWith(SpringJUnit4ClassRunner.class)
@ContextConfiguration({"classpath:applicationContext.xml"})
public class TestDemo2 {

    @Resource
    Hello hello;

    @Test
    public void testHello(){
        hello.sayHello();
        hello.sayGoodbye();
    }
}
运行结果:
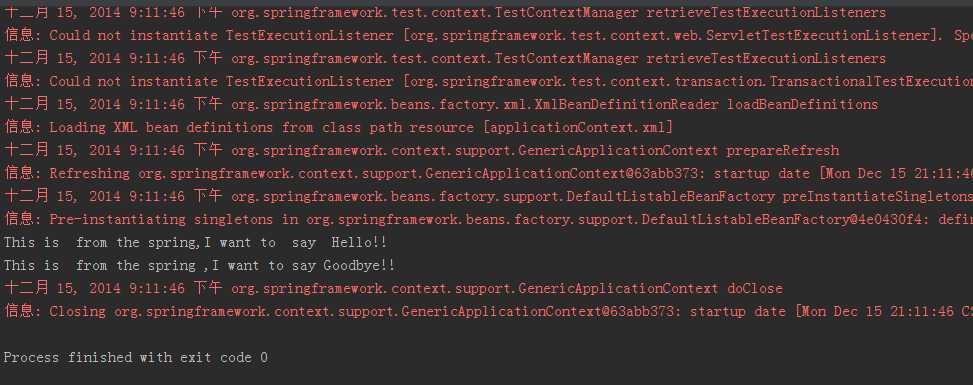
通过上面的单元测试我们直接测试了我们Service类的功能了。
@RunWith(SpringJUnit4ClassRunner.class)//指定测试用例的运行器,这里是指定了
@ContextConfiguration({"classpath:applicationContext.xml"})//将spring配置加载进来,可以加载多个,使用数组,可是是classpath路径也可以是File文件路径@Resource//注入相应的类,注入到Spring的IOC容器中然后就可以直接使用了。(按类型注入)
@Autowied//注入相应的类,功能和@Resource是一样的


@Test//标记这是一个单元测试方法,每个单元测试方法上面都需要加上此注解


除了上面几个注解,Spring单元测试中很多很用的注解下面一次介绍,


@Before//在每个测试用例方法之前都会执行,位置在方法的上面


@After//在每个测试用例方法之后都会执行,位置在方法的上面

如果我们测试单元中涉及到事务处理我们是否有办法解决或者是提供支持呢,Spring的单元测试提供了对这些功能的支持。主要是通过以下几个注解来实现的:
@Transactional //对所有的测试方法都使用事务,并在测试完成后回滚事务,这个注解的功能和所处的位置有关系,如果@Transactional所处的位置在类的上面那么就是说对多有的单元测试方法都会使用事务,但是如果是在某一个测试方法的上面那么就只对这个方法才会使用事务,方法执行完毕后默认是进行事务回滚的。


@Rollback(false) //这里设置为false,就让事务不回滚 。如果们在添加了事务支持后不想要事务回滚我们只需要在相应的位置处添加上这个注解即可。如果true表示事务回滚,默认是true。
上面的注解功能基本上可以满足我们的需求了,如果我们不知道@ContextConfiguration注解的功能,我们应该采用上面方式来注入Spring的配置呢。看下面的两个测试例子:UnitTestBase.java
import org.junit.After;
import org.junit.Before;
import org.springframework.beans.BeansException;
import org.springframework.context.support.ClassPathXmlApplicationContext;
import org.springframework.util.StringUtils;

public class UnitTestBase {

    private ClassPathXmlApplicationContext context;

    private String springXmlpath;

    public UnitTestBase() {}

    public UnitTestBase(String springXmlpath) {
        this.springXmlpath = springXmlpath;
    }

    @Before
    public void before() {
        if (StringUtils.isEmpty(springXmlpath)) {
            springXmlpath = "classpath*:applicationContext.xml";
        }
        try {
            context = new ClassPathXmlApplicationContext(springXmlpath.split("[,\\s]+"));
            context.start();
        } catch (BeansException e) {
            e.printStackTrace();
        }
    }

    @After
    public void after() {
        context.destroy();
    }

    @SuppressWarnings("unchecked")
    protected <T extends Object> T getBean(String beanId) {
        try {
            return (T)context.getBean(beanId);
        } catch (BeansException e) {
            e.printStackTrace();
            return null;
        }
    }

    protected <T extends Object> T getBean(Class<T> clazz) {
        try {
            return context.getBean(clazz);
        } catch (BeansException e) {
            e.printStackTrace();
            return null;
        }
    }

}
import org.junit.Test;
import org.junit.runner.RunWith;
import  org.springframework.test.context.junit4.SpringJUnit4ClassRunner;


import com.imooc.ioc.interfaces.OneInterface;
import com.imooc.test.base.UnitTestBase;

@RunWith(SpringJUnit4ClassRunner.class)
public class TestSpringUnit extends UnitTestBase {

    public TestSpringUnit() {
        super("classpath*:applicationContext.xml");
    }

    @Test
    public void testSay() {
        Hello hello = super.getBean("hello");
        hello.sayHello();
    }

}
由此可见我们这样可以对测试单元进行简单的封装,将一些需要的校验放到@Before中去。通过工具类提供的getBean接口一样可以获取到我们需要的Bean,只是他只是对Spring的FactoryBean进行了一层封装而已。在开发中我们应该直接使用第一种就可以了。
为了程序的健壮性也是最自己代码的负责人我们需要更多的使用单元测试,这是一个很好地习惯。在使用Spring整合的单元测试时多使用注解可以提交工作效率。
标签:des style blog http io ar color 使用 sp
原文地址:http://www.cnblogs.com/zhangminghui/p/4165992.html