标签:
grunt官网:http://www.gruntjs.org/
一、安装grunt
先安装node,在http://www.nodejs.org/可以下载安装包直接安装。在命令行下运行:
npm install -g grunt-cli
即可安装grunt。
二、创建项目
创建web项目:my-project-name,项目目录如下:
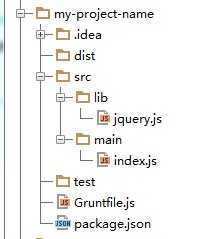
在项目根目录下新建Gruntfile.js和package.json文件。示例如下:
/* package.json */
{
    "name": "my-project-name",
    "version": "1.0.0",
    "description": "this is nodejs demo",
    "main": "index.js",
    "scripts": {
        "test": "echo \"Error: no test specified\" && exit 1"
    },
    "devDependencies": {
        "grunt": "^0.4.5",
        "grunt-contrib-concat": "^0.5.0",
        "grunt-contrib-jshint": "~0.6.0",
        "grunt-contrib-nodeunit": "~0.2.0",
        "grunt-contrib-uglify": "~0.2.2"
    },
    "author": "yuki",
    "license": "ISC"
}
/* Gruntfile.js */
module.exports = function(grunt){
    grunt.initConfig({
        pkg: grunt.file.readJSON(‘package.json‘),
        concat: {
            options: {
                separator: ‘;‘
            },
            dist: {
                src: [‘src/**/*.js‘],
                dest: ‘dist/<%= pkg.name %>.js‘
            }
        },
        uglify: {
            options: {
                banner: ‘/*! <%= pkg.name %> <%= grunt.template.today("dd-mm-yyyy") %> */\n‘
            },
            dist: {
                files: {
                    ‘dist/<%= pkg.name %>.min.js‘: [‘<%= concat.dist.dest %>‘]
                }
            }
        },
        jshint: {
            files: [‘gruntfile.js‘, ‘src/**/*.js‘, ‘test/**/*.js‘],
            options: {
                //这里是覆盖JSHint默认配置的选项
                globals: {
                    jQuery: true,
                    console: true,
                    module: true,
                    document: true
                }
            }
        }
    });

    grunt.loadNpmTasks(‘grunt-contrib-uglify‘);
    grunt.loadNpmTasks(‘grunt-contrib-jshint‘);
    grunt.loadNpmTasks(‘grunt-contrib-concat‘);

    grunt.registerTask(‘test‘, [‘jshint‘, ‘concat‘]);
    grunt.registerTask(‘default‘, [‘jshint‘,‘concat‘, ‘uglify‘]);
};
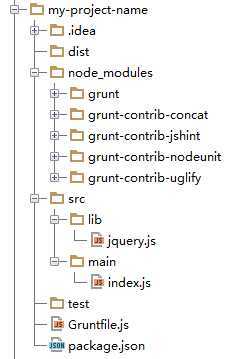
三、进入项目目录下,安装grunt,并运行命令:
npm install
安装项目所依赖的包,项目下会生成node_models目录,如下所示:
运行命令:grunt,将执行‘default‘ task。

标签:
原文地址:http://www.cnblogs.com/linxuehan/p/4180806.html