标签:
提到“命令”,我们应该想到命令的发出者,命令的接受者,命令的内容,准备工作,完成任务,回报工作。。。与事件中的发送者,接受者,消息,处理,处理,处理一一对应,如果是单纯的几个对应关系,的确用事件是能够代替的,不过,命令相对事件有其自己的特点的。比如,古时候,如果两个部落发动战争,经常在出军之前,做了充分的准备,才可能一声令下,冲啊!相反,如果没有准备好的话,一定会限制,军队不能随意出军,所以命令具有限制性。除此之外,命令一旦下达是不经常更改的。如在软件里面,一般Ctr+C命令是复制,没有哪个软件用这个命令表示粘贴的呢?所以说命令具有普遍性,除此之外,命令有自己的元素,这让程序员定义命令的时间,有章可依,所以命令更具有规范性。上面的特点纯属个人理解,可能这些性质不是非常严格。除此之外,很多网友对命令的使用褒贬不一,此文重在理解命令,所以上面特点仅供用于理解命令。
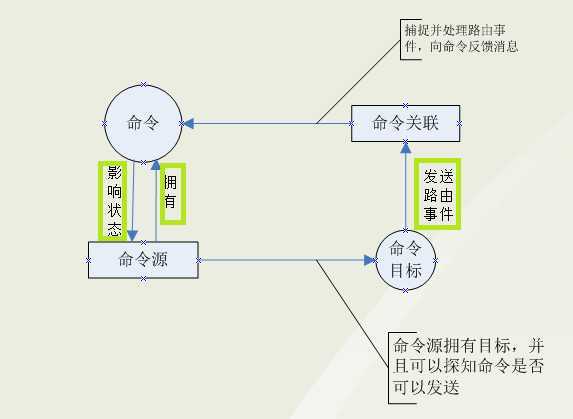
由上面的介绍,应该可以猜出个大概了。下面直接给出其组成元素:
相对事件的元素来说,命令元素之间的关系还是会复杂一些,具体的关系会通过命令的使用来说明。下面先简单介绍一下自定义命令的步骤。
a、创建命令类
如果命令没有涉及到业务逻辑的话,一般使用WPF类库的RoutedCommand类即可,如果要声明相对逻辑复杂一些的类,可以实现RouteCommand类的继承或者是ICommand的接口。
b、声明命令实例
由于命令的普遍性,一般情况下程序中某类命令只需要一个命令实例即可(单件模式)。
c、指明命令的源
通常是可以点击的控件,命令还有个好处就是,没有准备好的命令,这个控件不可用。如果把命令看做炮弹,那么命令源相当于火炮,这个火炮还是防走火的。
d、指明命令的目标
目标是命令的作用对象。如果指定了目标,无论是否有焦点,都会受到这个命令。如果没有指定目标的话,拥有焦点的对象默认为命令目标。还有一个要注意的是设置目标是通过命名的源来设置的。格式为:命令源控件.CommandTarget = 目标控件;
e、设置命令关联
关于设置命令关联还是在实例中好好的体会一下吧。下面就通过一个例子来说明。
下面的例子实现的是点击按钮时,清除文本框里面的内容。由于代码注释写的比较详细,直接给代码,然后具体再解释:
XAML代码:
<Window x:Class="Chapter_07.MainWindow"
        xmlns="http://schemas.microsoft.com/winfx/2006/xaml/presentation"
        xmlns:x="http://schemas.microsoft.com/winfx/2006/xaml"
       Background="LightBlue" Title="MainWindow" Height="230" Width="260">
    <StackPanel x:Name="stackPanel">
        <Grid x:Name="grid" Margin="10">
            <Button x:Name="button1" Content="Clear Commend"  Height="50" Margin="0,10,0,440"/>
            <TextBox x:Name="textBoxA" Margin="0,65,0,325" />
        </Grid>
    </StackPanel>
</Window>
后台代码:
using System;
using System.Collections.Generic;
using System.Linq;
using System.Text;
using System.Threading.Tasks;
using System.Windows;
using System.Windows.Controls;
using System.Windows.Data;
using System.Windows.Documents;
using System.Windows.Input;
using System.Windows.Media;
using System.Windows.Media.Imaging;
using System.Windows.Navigation;
using System.Windows.Shapes;

namespace Chapter_07
{
    /// <summary>
    /// MainWindow.xaml 的交互逻辑
    /// </summary>
    public partial class MainWindow : Window
    {
        public MainWindow()
        {
            InitializeComponent();

            //初始化命令
            InitializeCommand();
        }

        //声明并定义命令
        private RoutedCommand clearCmd = new RoutedCommand("Clear",typeof(MainWindow));

        //初始化命令方法
        private void InitializeCommand()
        {
            //把命令赋值给命令源,并指定快捷键
            this.button1.Command = this.clearCmd;
            this.clearCmd.InputGestures.Add(new KeyGesture(Key.C,ModifierKeys.Alt));
            //为命令设置目标
            this.button1.CommandTarget = this.textBoxA;

            //创建命令关联
            CommandBinding cb = new CommandBinding();
            //指定关联的命令
            cb.Command = this.clearCmd;
            //确定此命令是否可以在其当前状态下执行
            cb.CanExecute += cb_CanExecute;
            //调用此命令
            cb.Executed += cb_Executed;

            //把命令关联到外围控件上
            this.stackPanel.CommandBindings.Add(cb);
        }

        //执行命令,要做的事情
        void cb_Executed(object sender, ExecutedRoutedEventArgs e)
        {
            this.textBoxA.Clear();
            e.Handled = true;
        }

        //在执行命令之前,检查命令是否可以执行对应的处理器
        void cb_CanExecute(object sender, CanExecuteRoutedEventArgs e)
        {
            if (string.IsNullOrEmpty(this.textBoxA.Text))
            {
                e.CanExecute = false;
            }
            else
            {
                e.CanExecute = true;
            }
            e.Handled = true;
        }
    }
}
效果是:文本框没有输入内容的话,按钮是不可用的,当文本框里面有文字的话,按钮可用,点击按钮清除文本框内容。效果如图1:

图1
通过效果图,应该基本上了解路由命令的,我在看书的时间,想起了一个问题,为什么叫路由命令,应该是与路由事件有关,后来又翻了一遍书,发现路由事件在下面图中有提及到,在上面的代码中,站在高处的元素StackPanel作为CommandBinding的载体(由于路由事件的传播是在可视树上传播的,所以CommandBinding的载体一定为命令目标的外围控件上面),CommandBinding来指定监听命令是否准备好的事件和命令的处理事件,然后告诉命令,由于命令源拥有命令的实例,命令源就会根据命令接到的信息,作出相应的反应,在此处,命令只是捕捉信息和通知命令源,真正其作用的是CommandBinding指定的处理器。
图2
在WPF中微软提供了一些便捷的命令库: ApplicationCommands、MediaCommands、ComponentCommands、NavigationCommands 和EditingCommands。下面通过一个例子来说明调用ApplicationCommands的Copy命令。点击按钮,把文本框内容拷贝到另外一个文本框里面。
XAML代码如下:
<Window x:Class="Chapter_07.Window1"
        xmlns="http://schemas.microsoft.com/winfx/2006/xaml/presentation"
        xmlns:x="http://schemas.microsoft.com/winfx/2006/xaml"
        Title="Window1" Height="300" Width="300" Background="Azure">
    <StackPanel x:Name="stackpanel">
        <TextBox x:Name="txt1" Margin="10" />
        <TextBox x:Name="txt2" Margin="10" />
        <Button x:Name="button1" Content="按钮一" Height="50" Margin="10" Command="ApplicationCommands.Copy"/>
    </StackPanel>
    <Window.CommandBindings>
        <CommandBinding Command="Copy" CanExecute="Copy_CanExecute" Executed="Copy_Executed"/>
    </Window.CommandBindings>
</Window>
后台代码:
using System;
using System.Collections.Generic;
using System.Linq;
using System.Text;
using System.Threading.Tasks;
using System.Windows;
using System.Windows.Controls;
using System.Windows.Data;
using System.Windows.Documents;
using System.Windows.Input;
using System.Windows.Media;
using System.Windows.Media.Imaging;
using System.Windows.Shapes;

namespace Chapter_07
{
    /// <summary>
    /// Window1.xaml 的交互逻辑
    /// </summary>
    public partial class Window1 : Window
    {
        public Window1()
        {
            InitializeComponent();
        }

        private void Copy_Executed(object sender, ExecutedRoutedEventArgs e)
        {
            this.txt2.Text = this.txt1.Text;
        }

        private void Copy_CanExecute(object sender, CanExecuteRoutedEventArgs e)
        {
            //检查是否能发出命令
             e.CanExecute = !string.IsNullOrEmpty(this.txt1.Text);
            e.Handled = false;
        }
    }
}
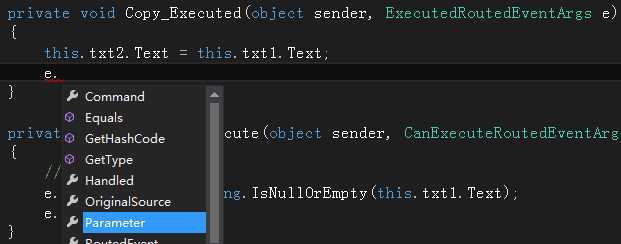
上面的例子是把Window作为CommandBinding的载体,而且是在XAML中实现的,注意与在后台代码上的区别,简单的一个Copy功能就实现了。虽然说微软提供了WPF类库,但是处理函数还是要我们自己去写的。还有一点要注意的是:可以用转到定义查看ApplicationCommands类与其类里面的属性,他们都是静态的,所以都以单件模式出现。如果有两个命令源,同使用一个“命令”,那么应该怎么区别?原来命令源除了含有Command属性,还含有CommandParmeter属性,用来区分不同的命令源。在处理的时间,根据e.Parameter(如图3)来获取是哪个源发出的命令,来采取相应的命令。关于其他的WPF类库如果有用到的话再查msdn了。

图3
在小试命令的例子中,记录了自定义RoutedCommand,路由命令中真正做事情的是CommandBinding。下面主要记录一下自定义直接实现ICommand接口的命令。在介绍之前,先看一下ICommand接口的原型:
其中第一个事件为,当命令可执行状态发生改变时,可以激化此事件来通知其他对象。另外两个方法在上面已经用过同名的,在此不做重复说明。下面开始实现一个自定义直接实现ICommand接口的命令,同样实现点击源控件,清除目标控件的内容:
a.准备工作:
    //为了使目标控件,含有Clear()方法,所以在此一个定义接口
    public interface IView
    {
        void Clear();
    }

    //定义命令
    public class ClearCommand : ICommand
    {
        public event EventHandler CanExecuteChanged;

        public bool CanExecute(object parameter)
        {
            throw new System.NotImplementedException();
        }

        public void Execute(object parameter)
        {
            IView view = parameter as IView;
            if (view != null)
            {
                view.Clear();
            }
        }
    }

    //自定义命令源
    public class MyCommandSource : System.Windows.Controls.UserControl, ICommandSource
    {
        public ICommand Command { get; set; }

        public object CommandParameter { get; set; }

        public IInputElement CommandTarget { get; set; }

        //重写点击处理函数,注意由于事件的优先级不同,如果命令源是button的话,下面的函数不起作用
        protected override void OnMouseLeftButtonDown(MouseButtonEventArgs e)
        {
            base.OnMouseLeftButtonDown(e);

            if (this.CommandTarget != null)
            {
                this.Command.Execute(this.CommandTarget);
            }
        }
    }
b.制作一个userControl控件。
 XAML
XAML MiniView.cs
c.制作自定义命令界面。
<Window x:Class="Chapter_07.DefineCommand"
        xmlns="http://schemas.microsoft.com/winfx/2006/xaml/presentation"
        xmlns:x="http://schemas.microsoft.com/winfx/2006/xaml"
        xmlns:local="clr-namespace:Chapter_07"
        Title="DefineCommand" Height="300" Width="300">
    <StackPanel>
        <local:MyCommandSource x:Name="ctrClear" Margin="10">
            <TextBlock Text="清除" FontSize="16" TextAlignment="Center" Background="LightGreen" Width="80"/>
        </local:MyCommandSource>
        <local:MiniView x:Name="miniView"/>
    </StackPanel>
</Window>
using System;
using System.Collections.Generic;
using System.Linq;
using System.Text;
using System.Threading.Tasks;
using System.Windows;
using System.Windows.Controls;
using System.Windows.Data;
using System.Windows.Documents;
using System.Windows.Input;
using System.Windows.Media;
using System.Windows.Media.Imaging;
using System.Windows.Shapes;

namespace Chapter_07
{
    /// <summary>
    /// DefineCommand.xaml 的交互逻辑
    /// </summary>
    public partial class DefineCommand : Window
    {
        public DefineCommand()
        {
            InitializeComponent();
            //下面的声明命令方式,仅作为练习使用,由于命令
            //具有"全局性",所以一般声明在静态全局的地方,供全局使用
            ClearCommand clearCmd = new ClearCommand();
            this.ctrClear.Command = clearCmd;
            this.ctrClear.CommandTarget = this.miniView;
        }
    }
}
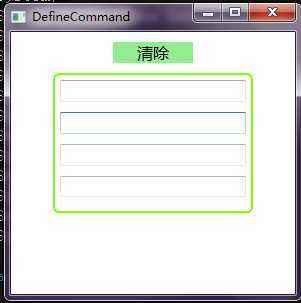
终于黏贴完了,弱弱的看一下效果吧!

图4
本例纯属笔记,但是涉及到的东西还是比较多的,包括接口、自定义控件以及命令的几个组成元素,对于菜鸟的自己,如果细心的看几遍还是能小有所获的。
标签:
原文地址:http://www.cnblogs.com/dairuiqing/p/4189314.html