标签:


代码
Activity01
package com.lxt008;

import android.app.Activity;
import android.app.Notification;
import android.app.NotificationManager;
import android.app.PendingIntent;
import android.content.Intent;
import android.os.Bundle;
import android.view.View;
import android.widget.Button;

public class Activity01 extends Activity
{
    Button                m_Button1, m_Button2, m_Button3, m_Button4;

    //声明通知(消息)管理器
    NotificationManager    m_NotificationManager;
    Intent                m_Intent;
    PendingIntent        m_PendingIntent;
    //声明Notification对象
    Notification        m_Notification;


    /** Called when the activity is first created. */
    @Override
    public void onCreate(Bundle savedInstanceState)
    {
        super.onCreate(savedInstanceState);
        setContentView(R.layout.main);
        //初始化NotificationManager对象
        m_NotificationManager = (NotificationManager) getSystemService(NOTIFICATION_SERVICE);

        //获取4个按钮对象
        m_Button1 = (Button) findViewById(R.id.Button01);
        m_Button2 = (Button) findViewById(R.id.Button02);
        m_Button3 = (Button) findViewById(R.id.Button03);
        m_Button4 = (Button) findViewById(R.id.Button04);

        //点击通知时转移内容
        m_Intent = new Intent(Activity01.this, Activity02.class);
        //主要是设置点击通知时显示内容的类
        m_PendingIntent = PendingIntent.getActivity(Activity01.this, 0, m_Intent, 0);
        //构造Notification对象
        m_Notification = new Notification();

        m_Button1.setOnClickListener(new Button.OnClickListener() {
            public void onClick(View v)
            {
                //设置通知在状态栏显示的图标
                m_Notification.icon = R.drawable.img1;
                //当我们点击通知时显示的内容
                m_Notification.tickerText = "Button1通知内容...........";
                //通知时发出默认的声音
                m_Notification.defaults = Notification.DEFAULT_SOUND;
                //设置通知显示的参数
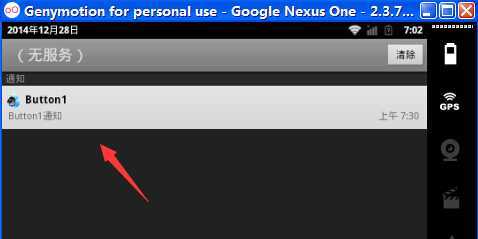
                m_Notification.setLatestEventInfo(Activity01.this, "Button1", "Button1通知", m_PendingIntent);
                //可以理解为执行这个通知
                m_NotificationManager.notify(0, m_Notification);
            }
        });

        m_Button2.setOnClickListener(new Button.OnClickListener() {
            public void onClick(View v)
            {

                m_Notification.icon = R.drawable.img2;
                m_Notification.tickerText = "Button2通知内容...........";
                //通知时震动
                m_Notification.defaults = Notification.DEFAULT_VIBRATE;
                m_Notification.setLatestEventInfo(Activity01.this, "Button2", "Button2通知", m_PendingIntent);
                m_NotificationManager.notify(0, m_Notification);
            }
        });

        m_Button3.setOnClickListener(new Button.OnClickListener() {
            public void onClick(View v)
            {
                m_Notification.icon = R.drawable.img3;
                m_Notification.tickerText = "Button3通知内容...........";
                //通知时屏幕发亮
                m_Notification.defaults = Notification.DEFAULT_LIGHTS;
                m_Notification.setLatestEventInfo(Activity01.this, "Button3", "Button3通知", m_PendingIntent);
                m_NotificationManager.notify(0, m_Notification);
            }
        });

        m_Button4.setOnClickListener(new Button.OnClickListener() {
            public void onClick(View v)
            {
                m_Notification.icon = R.drawable.img4;
                m_Notification.tickerText = "Button4通知内容..........";
                //通知时既震动又屏幕发亮还有默认的声音
                m_Notification.defaults = Notification.DEFAULT_ALL;
                m_Notification.setLatestEventInfo(Activity01.this, "Button4", "Button4通知", m_PendingIntent);
                m_NotificationManager.notify(0, m_Notification);
            }
        });
    }
}
Activity02
package com.lxt008;

import android.app.Activity;
import android.os.Bundle;

public class Activity02 extends Activity
{
    public void onCreate(Bundle savedInstanceState)
    {
        super.onCreate(savedInstanceState);
        //这里直接限制一个TextView
        setContentView(R.layout.main2);
    }
}
布局文件
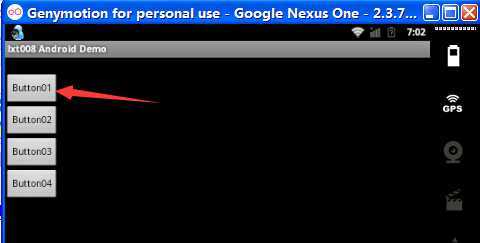
main
<?xml version="1.0" encoding="utf-8"?>
<LinearLayout
    xmlns:android="http://schemas.android.com/apk/res/android"
    android:orientation="vertical"
    android:layout_width="fill_parent"
    android:layout_height="fill_parent"
    >
    <TextView
        android:layout_width="fill_parent"
        android:layout_height="wrap_content"
        android:layout_weight="0"
        android:paddingBottom="4dip"
        />
    <Button
        android:id="@+id/Button01"
        android:layout_width="wrap_content"
        android:layout_height="wrap_content"
        android:text="Button01"
        >
        <requestFocus/>
    </Button>
    <Button
        android:id="@+id/Button02"
        android:layout_width="wrap_content"
        android:layout_height="wrap_content"
        android:text="Button02"
        >
    </Button>
    <Button
        android:id="@+id/Button03"
        android:layout_width="wrap_content"
        android:layout_height="wrap_content"
        android:text="Button03"
        >
    </Button>
    <Button
        android:id="@+id/Button04"
        android:layout_width="wrap_content"
        android:layout_height="wrap_content"
        android:text="Button04"
        >
    </Button>
</LinearLayout>
main2
<?xml version="1.0" encoding="utf-8"?>
<LinearLayout xmlns:android="http://schemas.android.com/apk/res/android"
    android:orientation="vertical"
    android:layout_width="fill_parent"
    android:layout_height="fill_parent"
    >
    <TextView
    android:layout_width="fill_parent"
    android:layout_height="wrap_content"
    android:text="谢谢使用!"
    />
</LinearLayout>
标签:
原文地址:http://www.cnblogs.com/spadd/p/4190049.html