标签:
service 四大组件之一,开启后可以一直运行在系统后台。至于其他概念性问题我就不说了,直接操作把 具体内容在代码注释中有
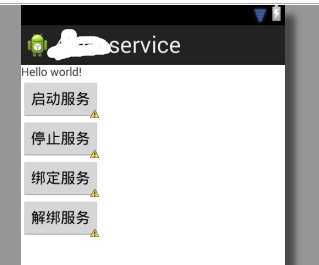
先看下效果图

上布局文件把
 1 <LinearLayout xmlns:android="http://schemas.android.com/apk/res/android"
 2     xmlns:tools="http://schemas.android.com/tools"
 3     android:layout_width="match_parent"
 4     android:layout_height="match_parent"
 5     android:orientation="vertical"
 6     tools:context=".MainActivity" >
 7
 8     <TextView
 9         android:id="@+id/textView1"
10         android:layout_width="wrap_content"
11         android:layout_height="wrap_content"
12         android:text="@string/hello_world" />
13
14     <Button
15         android:id="@+id/button1"
16         android:layout_width="wrap_content"
17         android:layout_height="wrap_content"
18         android:text="启动服务"
19         android:onClick="startService" />
20
21     <Button
22         android:id="@+id/button2"
23         android:layout_width="wrap_content"
24         android:layout_height="wrap_content"
25          android:text="停止服务"
26         android:onClick="stopService" />
27
28     <Button
29         android:id="@+id/button3"
30         android:layout_width="wrap_content"
31         android:layout_height="wrap_content"
32          android:text="绑定服务"
33         android:onClick="bindService" />
34
35     <Button
36         android:id="@+id/button4"
37         android:layout_width="wrap_content"
38         android:layout_height="wrap_content"
39         android:text="解绑服务"
40         android:onClick="unbindService" />
41
42 </LinearLayout>
重点看java代码把
package com.zw.service;

import android.os.Bundle;
import android.os.IBinder;
import android.app.Activity;
import android.content.ComponentName;
import android.content.Context;
import android.content.Intent;
import android.content.ServiceConnection;
import android.view.Menu;
import android.view.View;

public class MainActivity extends Activity {

	private Intent intent;
	private MyServiceCon conn = new MyServiceCon();
	@Override
	protected void onCreate(Bundle savedInstanceState) {
		super.onCreate(savedInstanceState);
		setContentView(R.layout.activity_main);
		intent = new Intent("com.zw.service.MyService");
//		Intent intent = new Intent(this,MyService.class);
	}
	public void startService(View v){
		startService(intent);
	}

	public void stopService(View v){
		stopService(intent);
	}

	//绑定服务
	public void bindService(View v){
		bindService(intent, conn, Context.BIND_AUTO_CREATE);
	}

	public void unbindService(View v){
		unbindService(conn);
	}
	//
	class MyServiceCon implements ServiceConnection{

		@Override
		public void onServiceConnected(ComponentName name, IBinder service) {
			//绑定完成后回调方法(Activity) 和 Service 的连接

		}

		@Override
		public void onServiceDisconnected(ComponentName name) {
			//服务解绑就调
		}

	}
}
service类
package com.zw.service;

import android.app.Service;
import android.content.Intent;
import android.os.IBinder;

public class MyService extends Service {

	@Override
	public void onCreate() {
		// TODO Auto-generated method stub
		super.onCreate();
		System.out.println("MyService-----onCreate");
	}
	@Override
	public void onStart(Intent intent, int startId) {
		// TODO Auto-generated method stub
		super.onStart(intent, startId);
		System.out.println("MyService-----onStart");
	}

	@Override
	public IBinder onBind(Intent arg0) {
		System.out.println("MyService-----onBind");
		return null;
	}

	@Override
	public boolean onUnbind(Intent intent) {
		System.out.println("MyService-----onUnbind");
		return super.onUnbind(intent);
	}
	@Override
	public void onDestroy() {
		// TODO Auto-generated method stub
		System.out.println("MyService-----onDestroy");
		super.onDestroy();
	}
}
接下来要说的是在清单文件中配置service
  <service android:name="com.zw.service.MyService">
            <intent-filter >
                <action android:name="com.zw.service.MyService"/>
            </intent-filter>
        </service>
好了 效果图自己运行看看把
标签:
原文地址:http://www.cnblogs.com/Striver-zw/p/4191460.html