标签:
前言:
(一)里面简单学习了Binding的基础、源、路径、如何控制Binding的方向及数据更新、使用DataContext作为Binding的源等
使用集合对象作为列表控件的ItemSource
WPF列表式控件派生自ItemControl类,自然继承了ItemSource这个属性。
例如:ListBox条目容器ListBoxItem,ComboBox条目容器ComboBoxItem。
ItemSource里存着一条条数据,想要显示出来必须借助条目容器。Binging就是用来联系条目容器和数据的。
只要我们为一个ItemsControl设置一个ItemsSource属性值,ItemsControl对象就会自动迭代其中的数据元素,为每个数据元素准备一条条目容器,
并使用Binding在条目容器和数据元素之间建立联系。
例子:UI代码如下:
 <StackPanel x:Name="stackPanel" Background="LightBlue">
        <TextBlock Text="Student ID:" FontWeight="Bold" Margin="5"/>
        <TextBox x:Name="textboxId" Margin="5"/>
        <TextBlock Text="Student List:" FontWeight="Bold" Margin="5"/>
        <ListBox x:Name="listBoxStudents" Height="110" Margin="5">
            <ListBox.ItemTemplate>
                <DataTemplate>
                    <StackPanel Orientation="Horizontal">
                        <TextBlock Text="{Binding Path=Id}" Width="30"/>
                        <TextBlock Text="{Binding Path=Name}" Width="60"/>
                        <TextBlock Text="{Binding Path=Age}" Width="30"/>
                    </StackPanel>
                </DataTemplate>
            </ListBox.ItemTemplate>
        </ListBox>
    </StackPanel>
C#代码如下:
 public DC()
        {
            InitializeComponent();
            List<Student1> stuList = new List<Student1>()
            {
                new Student1(){Id=0,Name="Tim",Age=23},
                new Student1(){Id=1,Name="Tom",Age=24},
                new Student1(){Id=2,Name="Aom",Age=24},
                new Student1(){Id=3,Name="Bom",Age=24},
                new Student1(){Id=4,Name="Vom",Age=24},
                new Student1(){Id=5,Name="Tom",Age=24},
                new Student1(){Id=6,Name="Tom",Age=24},
            };
            this.listBoxStudents.ItemsSource = stuList;
            this.listBoxStudents.DisplayMemberPath = "Name";
            Binding binding = new Binding("SelectedItem.Id") { Source = this.listBoxStudents };
            this.textboxId.SetBinding(TextBox.TextProperty, binding);
        }
使用Xml数据作为Binding的源
.Net Framework提供了两套处理XML数据的类库:
符合DOM标准的类库。特点:中规中矩,功能强大,但也背负了太多XML传统和复杂。
以LINQ为基础的类库。特点:可以使用LINQ进行查询和操作,方便快捷。
线性集合例子:
UI代码如下:
 <StackPanel Background="LightBlue">
        <ListView x:Name="listViewStudents" Height="130" Margin="5">
            <ListView.View>
                <GridView>
                    <GridViewColumn Header="Id" Width="80"
                                     DisplayMemberBinding="{Binding XPath=@Id}"/>
                    <GridViewColumn Header="Name" Width="120"
                                     DisplayMemberBinding="{Binding XPath=Name}"/>
                </GridView>
            </ListView.View>
        </ListView>
        <Button Content="Load" Margin="5,0" Click="Button_Click_1" Height="25"/>
    </StackPanel>
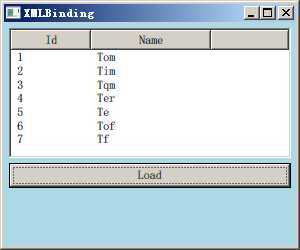
Xml代码如下:
<?xml version="1.0" encoding="utf-8" ?>
<StudentList>
  <Student Id="1">
    <Name>Tom</Name>
  </Student>
  <Student Id="2">
    <Name>Tim</Name>
  </Student>
  <Student Id="3">
    <Name>Tqm</Name>
  </Student>
  <Student Id="4">
    <Name>Ter</Name>
  </Student>
  <Student Id="5">
    <Name>Te</Name>
  </Student>
  <Student Id="6">
    <Name>Tof</Name>
  </Student>
  <Student Id="7">
    <Name>Tf</Name>
  </Student>
</StudentList>
Button的Click处理事件代码如下:
private void Button_Click_1(object sender, RoutedEventArgs e)
        {
            XmlDocument doc = new XmlDocument();
            doc.Load(@"D:\WORK\Program\7.5\Demo\WPF12.23\RamData.xml");
            XmlDataProvider xdp = new XmlDataProvider();
            xdp.Document = doc;
            xdp.XPath = @"/StudentList/Sudent";
            this.listViewStudents.DataContext = xdp;
            this.listViewStudents.SetBinding(ListView.ItemsSourceProperty, new Binding());
        }
效果图:
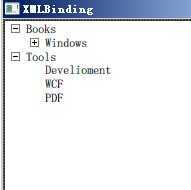
XML语言可方便的表示树型数据结构,下面的例子是用TreeView控件来显示有若干层目录的文件系统。
这次把XML数据和XmlDataProvider对象直接写在了Xaml代码里,代码中用到了HierarchicalDataTemplate类。
这个类具有ItemsSource属性,由这种Template展示的数据是可以拥有子级集合的。代码如下:
<Window.Resources>
        <XmlDataProvider x:Key="xdp" XPath="FileSystem/Folder">
            <x:XData>
                <FileSystem xmlns="">
                    <Folder Name="Books">
                        <Folder Name="Windows">
                            <Folder Name="WPF"/>
                            <Folder Name="WCF"/>
                            <Folder Name="PDF"/>
                        </Folder>
                    </Folder>
                    <Folder Name="Tools">
                        <Folder Name="Develioment"/>
                        <Folder Name="WCF"/>
                        <Folder Name="PDF"/>
                    </Folder>
                </FileSystem>
            </x:XData>
        </XmlDataProvider>
    </Window.Resources>
    <Grid>
        <TreeView ItemsSource="{Binding Source={StaticResource xdp}}">
            <TreeView.ItemTemplate>
                <HierarchicalDataTemplate ItemsSource="{Binding XPath=Folder}">
                    <TextBlock Text="{Binding XPath=@Name}"/>
                </HierarchicalDataTemplate>
            </TreeView.ItemTemplate>
        </TreeView>
    </Grid>
效果如图:
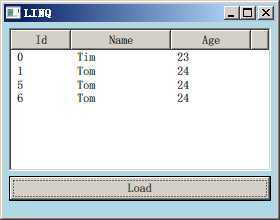
使用LINQ检索结果作为Binding的源
LINQ查询结果为IEnumerable<T>类型对象,而IEnumerable<T>又派生自IEnumerable,所以他可以作为列表控件的ItemsSource来使用。
先创建一个Student类
设计UI用于Button被点击时显示Student集合类型对象。
<StackPanel Background="LightBlue">
        <ListView x:Name="listViewStudents" Height="143" Margin="5">
            <ListView.View>
                <GridView>
                    <GridViewColumn Header="Id" Width="60"
                                    DisplayMemberBinding="{Binding Id}"/>
                    <GridViewColumn Header="Name" Width="100"
                                    DisplayMemberBinding="{Binding Name}"/>
                    <GridViewColumn Header="Age" Width="80"
                                    DisplayMemberBinding="{Binding Age}"/>
                </GridView>
            </ListView.View>
        </ListView>
        <Button Content="Load" Click="Button_Click_1" Margin="5,0" Height="25"/>
 </StackPanel>
要从一个已经填充好的List<Student>中检索出所有名字已字母‘T’开头的学生,代码如下:
 List<Student2> stuList = new List<Student2>()
            {
                new Student2(){Id=0,Name="Tim",Age=23},
                new Student2(){Id=1,Name="Tom",Age=24},
                new Student2(){Id=2,Name="Aom",Age=24},
                new Student2(){Id=3,Name="Bom",Age=24},
                new Student2(){Id=4,Name="Vom",Age=24},
                new Student2(){Id=5,Name="Tom",Age=24},
                new Student2(){Id=6,Name="Tom",Age=24},
            };
            this.listViewStudents.ItemsSource = from stu in stuList where stu.Name.StartsWith("T") select stu;
效果如图:
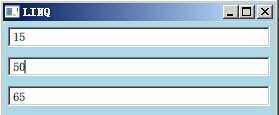
使用ObjectDataProvider对象作为Binding的Source
ObjectDataprovider顾名思义就是把对象作为数据源提供给Binding。
前面还提到XmlDataProvider,也就是把XML数据作为数据源供给Binding。2个的父类都是DataSourceProvider抽象类。
现有一个Calu的类,具有计算加减乘除的方法:
 class Calu
    {
        public string Add(string a, string b)
        {
            double x = 0, y = 0, z = 0;
            if (double.TryParse(a, out x) && double.TryParse(b, out y))
            {
                z = x + y;
                return z.ToString();
            }
            return "input error";
        }
    }
这个例子需要实现的功能是在前2个TextBox输入数字后,第3个TextBox显示数字和。代码如下:
 public LINQ()
        {
            InitializeComponent();
            Setbinding();
        }
private void Setbinding()
        {
            ObjectDataProvider odp = new ObjectDataProvider();
            odp.ObjectInstance = new Calu();
            odp.MethodName = "Add";
            odp.MethodParameters.Add("0");
            odp.MethodParameters.Add("0");
            Binding bdToArg1 = new Binding("MethodParameters[0]")
            {
                Source = odp,
                BindsDirectlyToSource = true,
                UpdateSourceTrigger = UpdateSourceTrigger.PropertyChanged
            };
            Binding bdToArg2 = new Binding("MethodParameters[1]")
            {
                Source = odp,
                BindsDirectlyToSource = true,
                UpdateSourceTrigger = UpdateSourceTrigger.PropertyChanged
            };
            Binding bdResult = new Binding(".") { Source = odp };
            this.textBoxArg1.SetBinding(TextBox.TextProperty, bdToArg1);
            this.textBoxArg2.SetBinding(TextBox.TextProperty, bdToArg2);
            this.textBoxResult.SetBinding(TextBox.TextProperty, bdResult);
        }
效果:
使用Binding的RelativeSource
RelativeSource属性的数据类型为RelativeSource类,通过这个类的静态和非静态属性我们可以控制它搜索相对数据源的方式。
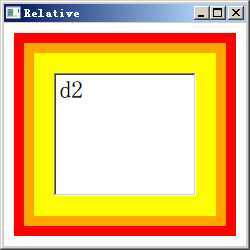
下面这段代码是多层布局控件内放置一个TextBox:
<Grid x:Name="g1" Background="Red" Margin="10">
        <DockPanel x:Name="d1" Background="Orange" Margin="10">
            <Grid x:Name="g2" Background="Yellow" Margin="10">
                <DockPanel x:Name="d2" Margin="10">
                    <TextBox x:Name="textBox1" Margin="10" FontSize="24"/>
                </DockPanel>
            </Grid>
        </DockPanel>
    </Grid>
把TextBox的Text属性关联到Name属性上。构造器里的代码如下:
  public Relative()
        {
            InitializeComponent();
            RelativeSource rs = new RelativeSource(RelativeSourceMode.FindAncestor);
            rs.AncestorLevel = 1;
            rs.AncestorType=typeof(DockPanel);
            Binding binding = new Binding("Name") { RelativeSource=rs};
            this.textBox1.SetBinding(TextBox.TextProperty, binding);
        }
效果图:
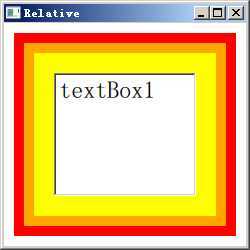
关联自身Name属性,代码为:
 RelativeSource rs = new RelativeSource();
            rs.Mode = RelativeSourceMode.Self;
            Binding binding = new Binding("Name") { RelativeSource=rs};
            this.textBox1.SetBinding(TextBox.TextProperty, binding);
效果:
Binding对数据的转换与校验
ValidationRule类是个抽象类,在使用的时候要创建他的派生类并实现它的Validate方法。
Validate方法的返回值是ValidationResult类型对象,如果校验通过就把IsValid属性设为true,反之设为false并为ErrorContent属性设置合适的消息内容。
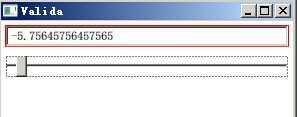
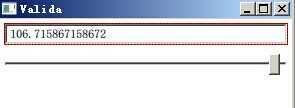
下面这个程序是在UI上绘制一个TextBox和Slider,然后在后台C#代码里使用Binding关联起来,以Slider为源,TextBox为目标。
Slider的取值范围是0-100,我们要验证TextBox里的值是否为0-100.XAML代码如下:
<StackPanel>
        <TextBox x:Name="textBox1" Margin="5"/>
        <Slider x:Name="slider1" Minimum="0" Maximum="100" Margin="5"/>
    </StackPanel>
准备一个ValidationRule的派生类:
 public class RangeValidationRule : ValidationRule
    {
        public override ValidationResult Validate(object value, System.Globalization.CultureInfo cultureInfo)
        {
            double d = 0;
            if (double.TryParse(value.ToString(), out d))
            {
                if (d >= 0 && d <= 100)
                {
                    return new ValidationResult(true, null);
                }
            }
            return new ValidationResult(false, "数据有误");
            throw new NotImplementedException();
        }
    }
在构造器里建立Binding:
 public Valida()
        {
            InitializeComponent();
            Binding binding = new Binding("Value") { Source=this.slider1};
            binding.UpdateSourceTrigger = UpdateSourceTrigger.PropertyChanged;
            RangeValidationRule rvr = new RangeValidationRule();
            rvr.ValidatesOnTargetUpdated = true;
            binding.ValidationRules.Add(rvr);
            binding.NotifyOnValidationError = true;
            this.textBox1.SetBinding(TextBox.TextProperty, binding);

            this.textBox1.AddHandler(Validation.ErrorEvent,new RoutedEventHandler(this.VilidationError));
        }
效果:
Binding的数据转换
Binding还有一种机制成为数据转换(Data Convert)。
当Source端Path所关联的数据与Target目标数据类型不一,可以添加数据转换器(Data Converter)。
下面是一个Data Converter的综合实例,程序用途是向玩家显示飞机的状态。
首先创建几个自定义数据类型:
  //种类
    public enum Category
    {
        Bomber,Fighter
    }
    //状态
    public enum State
    {
        Available,Locked,Unkuown
    }
    //飞机
    public class Plane
    {
        public Category Category { get; set; }
        public String Name { get; set; }
        public State State { get; set; }
    }
飞机的State属性在UI被映射成CheckBox。所以我们要提供Converter,
将Category类型转换成String类型,State类型和Bool类型的双向转换。代码如下:
 public class CategoryToSourceConverter : IValueConverter
    {
        //将Catagory类型转换为Uri
        public object Convert(object value, Type targetType, object parameter,CultureInfo culture)
        {
            Category c = (Category)value;
            switch (c)
            {
                case Category.Bomber: return @"\Icons\Bomber.png";
                case Category.Fighter: return @"\Icons\Fighter.png";
                default: return null;
            }
        }
        //不被调用
        public object ConvertBack(object value, Type targetType, object parameter,CultureInfo culture)
        {
            throw new NotImplementedException();
        }
    }
    public class StateToNullableBoolConverter : IValueConverter
    {
        //将State转换为bool
        public object Convert(object value, Type targetType, object parameter, CultureInfo culture)
        {
            State s = (State)value;
            switch (s)
            {
                case State.Available: return false;
                case State.Locked: return true;
                case State.Unkuown:
                default: return null;
            }
        }
        //将bool转换为State
        public object ConvertBack(object value, Type targetType, object parameter, CultureInfo culture)
        {
            bool? nb = (bool?)value;
            switch (nb)
            {
                case true: return State.Available;
                case false: return State.Locked;
                case null:
                default: return State.Unkuown;
            }
        }
    }
下面看看怎么在XAML里消费这2个Converter,代码如下:
 <Window.Resources>
        <local:CategoryToSourceConverter x:Key="cts"/>
        <local:StateToNullableBoolConverter x:Key="stnb"/>
    </Window.Resources>
    <StackPanel Background="LightBlue">
        <ListBox x:Name="listBoxPlane" Height="160" Margin=" 5">
            <ListBox.ItemTemplate>
                <DataTemplate>
                    <StackPanel Orientation="Horizontal">
                        <Image Width="20" Height="20" Source="{Binding Path=Category,Converter={StaticResource cts}}"/>
                        <TextBlock Text="{Binding Path=Name}" Width="60" Margin="80,0"/>
                        <CheckBox IsThreeState="True" IsChecked="{Binding Path=State,Converter={StaticResource stnb}}"/>
                    </StackPanel>
                </DataTemplate>
            </ListBox.ItemTemplate>
        </ListBox>
        <Button x:Name="ButtonLoad" Content="Load" Width="50" Margin="5,0" Click="Button_Click_1"/>
        <Button x:Name="ButtonSave" Content="Save" Width="50" Margin="5,5" Click="ButtonSave_Click_1"/>
    </StackPanel>
Load按钮的Click事件处理器负责把一组飞机的数据赋值给ListBox是ItemsSource属性,Save按钮的Click事件负责把修改后的数据写入文件:
  private void Button_Click_1(object sender, RoutedEventArgs e)
        {
            List<Plane> planelist = new List<Plane>
            {
                new Plane(){Category=Category.Bomber,Name="B-1",State=State.Unkuown},
                new Plane(){Category=Category.Bomber,Name="B-2",State=State.Unkuown},
                new Plane(){Category=Category.Fighter,Name="F-22",State=State.Unkuown},
                new Plane(){Category=Category.Fighter,Name="Su-47",State=State.Unkuown},
                new Plane(){Category=Category.Bomber,Name="B-52",State=State.Unkuown},
                new Plane(){Category=Category.Fighter,Name="J-10",State=State.Unkuown}
            };
            this.listBoxPlane.ItemsSource = planelist;
        }

        private void ButtonSave_Click_1(object sender, RoutedEventArgs e)
        {
            StringBuilder sb = new StringBuilder();
            foreach (Plane p in listBoxPlane.Items)
            {
                sb.AppendLine(string.Format("Category={0},Name={1},State={2}",p.Category,p.Name,p.State));
            }
            File.WriteAllText(@"D:\WORK\Program\7.5\Demo\WPF12.29\Icons\Planlist.txt", sb.ToString());
        }
效果:

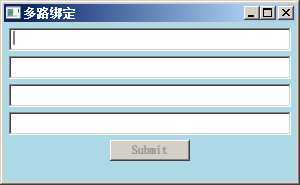
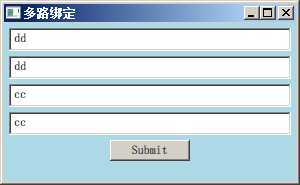
MultiBinding(多路Binding)
有时候UI显示的信息不止来自一个数据源,这时候就要用MultiBinding。
例:用户注册UI,第一、二个输入用户名三、四输入Email要求一致,Button可用。
XAML代码如下:
 <StackPanel Background="LightBlue">
        <TextBox x:Name="textbox1" Height="23" Margin="5"/>
        <TextBox x:Name="textbox2" Height="23" Margin="5,0"/>
        <TextBox x:Name="textbox3" Height="23" Margin="5"/>
        <TextBox x:Name="textbox4" Height="23" Margin="5,0"/>
        <Button x:Name="buuton1" Content="Submit" Width="80" Margin="5"/>
    </StackPanel>
用于设置MultiBinding的方法写在SetMultiBinding里并在构造器里调用,代码如下:
 public MultiBind()
        {
            InitializeComponent();
            this.SetMultiBinding();
        }
        private void SetMultiBinding()
        {
            //准备基础绑定
            Binding b1 = new Binding("Text") { Source = this.textbox1 };
            Binding b2 = new Binding("Text") { Source = this.textbox2 };
            Binding b3 = new Binding("Text") { Source = this.textbox3 };
            Binding b4 = new Binding("Text") { Source = this.textbox4 };

            //准备MulitiBinding
            MultiBinding mb = new MultiBinding() {Mode=BindingMode.OneWay};
            mb.Bindings.Add(b1);//multibinding对add的顺序是敏感的
            mb.Bindings.Add(b2);
            mb.Bindings.Add(b3);
            mb.Bindings.Add(b4);
            mb.Converter = new LogonMultiBindingConverter();

            //将Button与MultiBinding对象关联
            this.buuton1.SetBinding(Button.IsEnabledProperty,mb);
        }
Converter代码如下:
 public class LogonMultiBindingConverter : IMultiValueConverter
    {
        public object Convert(object[] values, Type targetType, object parameter, CultureInfo culture)
        {
            if (!values.Cast<string>().Any(text => string.IsNullOrEmpty(text))
                &&values[0].ToString()==values[1].ToString()
                &&values[2].ToString()==values[3].ToString())
            {
                return true;
            }
            return false;
        }
        public object[] ConvertBack(object values, Type[] targetTypes, object parameter, CultureInfo culture)
        {
            throw new NotImplementedException();
        }
    }
效果:
Binding这一章好长好长,知识点太多,基本上梳理完了。累啊!!!!
标签:
原文地址:http://www.cnblogs.com/zhwdbky/p/4196002.html