标签:
开篇:上一篇我们了解了一个请求从客户端发出到服务端接收并转到ASP.Net处理入口的过程,这篇我们开始探索ASP.Net的核心处理部分,借助强大的反编译工具,我们会看到几个熟悉又陌生的名词(类):HttpRuntime、HttpWorkerRequest、HttpContext、HttpApplication等。
(1)Part 1:前奏
(2)Part 2:核心
(3)Part 3:管道
(4)Part 4:WebForm页面生命周期
(5)Part 5:MVC页面声明周期
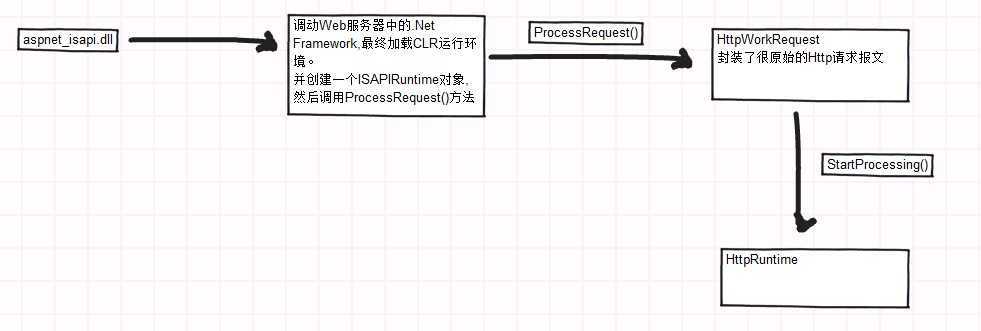
ISAPIRuntime是进入NET托管环境的入口,它在方法中通过一个ecb句柄指向了当前请求报文体的内存地址,将HTTP请求报文简单封装为一个HttpWorkerRequest对象,然后就是各种我们经常听到的PR(ProcessRequest)方法了。
通过Reflector,我们可以看到在ISAPIRuntime中的这个入口方法:ProcessRequest
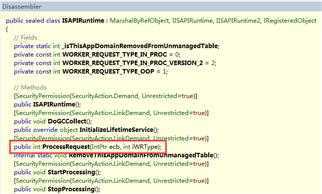
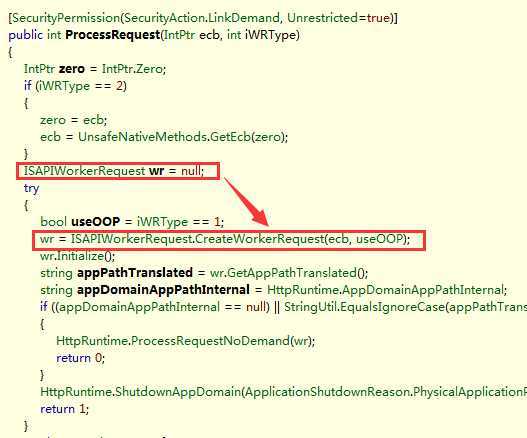
关于HttpWorkerRequest:
在Asp.Net中准备用于处理的请求,都必须封装为HttpWorkerRequest类型的对象,HttpWorkerRequest是一个抽象类型。这里创建的是一个ISAPIWorkerRequest类型,它继承于HttpWorkerRequest类。
[ComVisible(false)]
public abstract class HttpWorkerRequest
{
    // Fields
    private DateTime _startTime;
    private Guid _traceId;
    ......
}
转到ISAPIWorkerRequest类的CreateWorkerRequest方法中,看到首先判断当前IIS服务器的版本(IIS6 or IIS7?),然后创建适合不同IIS的具体WorkerRequest对象,默认都是InProc进程内的,当然,也有OutOfProc进程外的。
internal static ISAPIWorkerRequest CreateWorkerRequest(IntPtr ecb, bool useOOP)
{
    if (useOOP)
    {
        EtwTrace.TraceEnableCheck(EtwTraceConfigType.DOWNLEVEL, IntPtr.Zero);
        if (EtwTrace.IsTraceEnabled(5, 1))
        {
            EtwTrace.Trace(EtwTraceType.ETW_TYPE_APPDOMAIN_ENTER, ecb, Thread.GetDomain().FriendlyName, null, false);
        }
        return new ISAPIWorkerRequestOutOfProc(ecb);
    }
    int num = UnsafeNativeMethods.EcbGetVersion(ecb) >> 0x10;
    if (num >= 7)
    {
        EtwTrace.TraceEnableCheck(EtwTraceConfigType.IIS7_ISAPI, ecb);
    }
    else
    {
        EtwTrace.TraceEnableCheck(EtwTraceConfigType.DOWNLEVEL, IntPtr.Zero);
    }
    if (EtwTrace.IsTraceEnabled(5, 1))
    {
        EtwTrace.Trace(EtwTraceType.ETW_TYPE_APPDOMAIN_ENTER, ecb, Thread.GetDomain().FriendlyName, null, true);
    }
    if (num >= 7)
    {
        return new ISAPIWorkerRequestInProcForIIS7(ecb);
    }
    if (num == 6)
    {
        return new ISAPIWorkerRequestInProcForIIS6(ecb);
    }
    return new ISAPIWorkerRequestInProc(ecb);
}
由于HttpWorkerRequest类封装的请求报文很原始,很复杂,所以微软没有将其公开出来。
HttpRuntime是ASP.NET请求处理的第二个入口。当请求进来,首先进入HttpRuntime,由HttpRuntime来决定如何处理请求。默认情况下,在machine.config和Web.config中并没有显式定义httpRuntime节点,但该节点是有默认值的,如下:

<httpRuntime
   apartmentThreading="false"
   appRequestQueueLimit="5000"
   delayNotificationTimeout="5"
   enable="true"
   enableHeaderChecking="true"
   enableKernelOutputCache="true"
   enableVersionHeader="true"
   encoderType = "System.Web.Util.HttpEncoder"
   executionTimeout="110"
   maxQueryStringLength = "2048"
   maxRequestLength="4096"
   maxUrlLength = "260"
   maxWaitChangeNotification="0"
   minFreeThreads="8"
   minLocalRequestFreeThreads="4"
   relaxedUrlToFileSystemMapping = "False"
   requestLengthDiskThreshold="80"
   requestPathInvalidCharacters = "<,>,*,%,&,:,\"
   requestValidationMode = "4.0"
   requestValidationType = "System.Web.Util.RequestValidator"
   requireRootedSaveAsPath="true"
   sendCacheControlHeader="true"
   shutdownTimeout="90"
   useFullyQualifiedRedirectUrl="false"
   waitChangeNotification="0" />
通常情况下,我们可以在Web.config中更改httpRuntime节点的默认值,如下:

<configuration>
  <system.web>
  <httpRuntime maxRequestLength="4000"
    enable = "True"
    requestLengthDiskThreshold="512
    useFullyQualifiedRedirectUrl="True"
    executionTimeout="45"
    versionHeader="1.1.4128"/>
  </system.web>
</configuration>
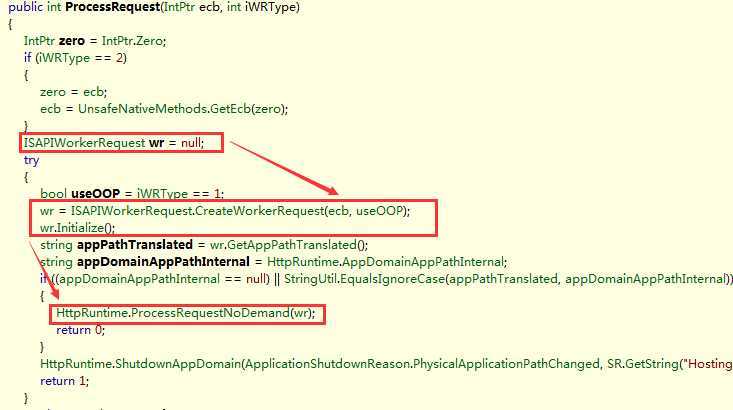
在HttpRuntime类中,有一个称为ProcessRequestNoDemand的静态方法。这里创建并初始化HttpWorkerRequest对象后,调用了HttpRuntime的这个ProcessRequestNoDemand方法。于是,我们转到ProcessRequestNoDemand方法,可以看到如下代码:
internal static void ProcessRequestNoDemand(HttpWorkerRequest wr)
{
    RequestQueue queue = _theRuntime._requestQueue;
    wr.UpdateInitialCounters();
    if (queue != null)
    {
        wr = queue.GetRequestToExecute(wr);
    }
    if (wr != null)
    {
        CalculateWaitTimeAndUpdatePerfCounter(wr);
        wr.ResetStartTime();
        ProcessRequestNow(wr);
    }
}
该方法先从请求队列中取出一个请求,然后更新请求的引用计数器的信息,然后再将HttpWorkerRequest对象传入ProcessRequestNow方法来处理请求。
这里我们还可以看到_theRuntime这个字段,它是HttpRuntime类的一个静态字段,在HttpRuntime的静态构造函数中进行初始化。
public sealed class HttpRuntime
{
    // Fields
    ......
    private static HttpRuntime _theRuntime;
    ......
}
再回到ProcessRequestNoDemand方法中,我们看到最后是由ProcessRequestNow方法来接棒。于是,我们转到ProcessRequestNow方法再来看看:
internal static void ProcessRequestNow(HttpWorkerRequest wr)
{
    _theRuntime.ProcessRequestInternal(wr);
}
我们看到在这个方法中又调用了_theRuntime的实例方法:ProcessRequestInternal,还是把HttpWorkerRequest对象作为参数传递了过去。于是,我们再转到ProcessRequestInternal这个方法中,发现了一个重要的对象:HttpContext对象。
private void ProcessRequestInternal(HttpWorkerRequest wr)
{
    Interlocked.Increment(ref this._activeRequestCount);
    if (this._disposingHttpRuntime)
    {
        ......
    }
    else
    {
        HttpContext context;
        try
        {
            context = new HttpContext(wr, false);
        }
        catch
        {
            try
            {
                wr.SendStatus(400, "Bad Request");
                wr.SendKnownResponseHeader(12, "text/html; charset=utf-8");
                byte[] data = Encoding.ASCII.GetBytes("<html><body>Bad Request</body></html>");
                wr.SendResponseFromMemory(data, data.Length);
                wr.FlushResponse(true);
                wr.EndOfRequest();
                return;
            }
            finally
            {
                Interlocked.Decrement(ref this._activeRequestCount);
            }
        }
        ......
    }
}
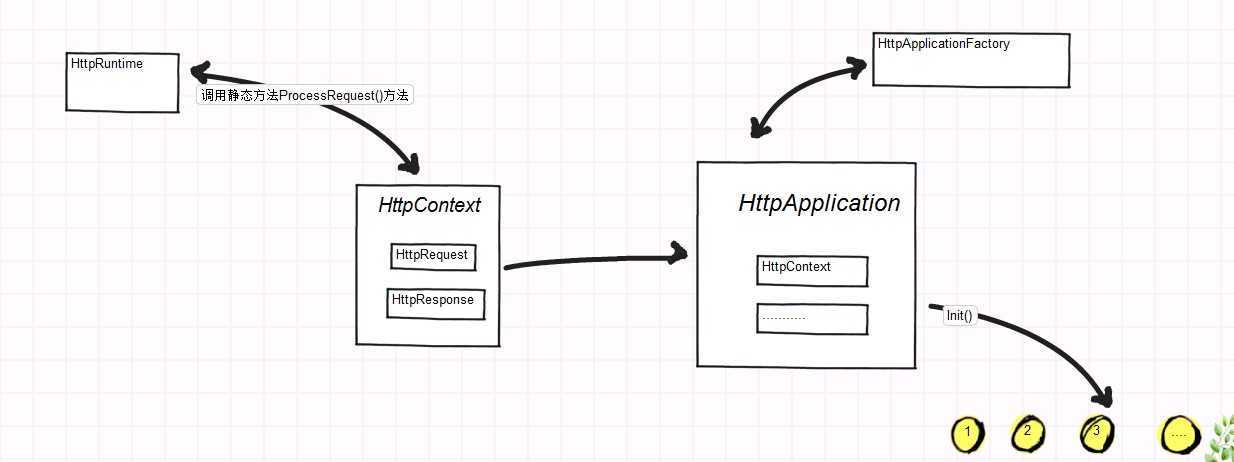
在HttpContext的构造函数中,根据HttpWorkerRequest对象创建了HttpContext对象,这是一个重要的Http上下文对象,两个重要类型的字段也随之被初始化:HttpRequest对象和HttpResponse对象。
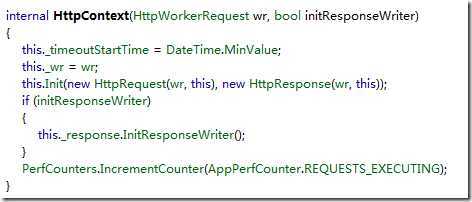
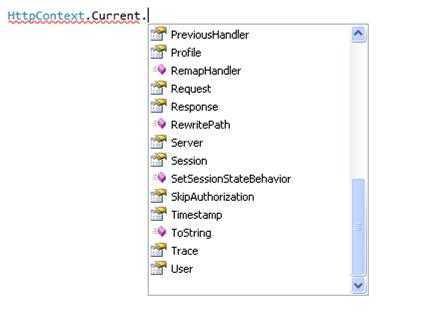
相信大家在进行ASP.NET开发时,经常使用这两个类型的实例。例如,我们可以通过HttpContext.Current获取到这个实例,且该实例会在整个生命周期中存活,我们通过它可以获取到一些常用对象,如Request,Response,Session 等。
让我们再次回到HttpRuntime的ProcessRequestInternal这个方法中,刚刚HttpContext对象被创建后,紧接着又干了什么事?让我们看看源码:
private void ProcessRequestInternal(HttpWorkerRequest wr)
{
    Interlocked.Increment(ref this._activeRequestCount);
    if (this._disposingHttpRuntime)
    {
        ......
    }
    else
    {
        HttpContext context;
        ......
        IHttpHandler applicationInstance = HttpApplicationFactory.GetApplicationInstance(context);
       ......if (applicationInstance is IHttpAsyncHandler)
        {
            IHttpAsyncHandler handler2 = (IHttpAsyncHandler) applicationInstance;
            context.AsyncAppHandler = handler2;
            handler2.BeginProcessRequest(context, this._handlerCompletionCallback, context);
        }
        else
        {
            applicationInstance.ProcessRequest(context);
            this.FinishRequest(context.WorkerRequest, context, null);
        }
        ......
    }
}
首先,我们看到了一个非常熟悉的字眼:IHttpHandler,我们的ashx、aspx不都是实现了这个IHttpHandler接口的吗?于是,我们来看看这句:IHttpHandler applicationInstance = HttpApplicationFactory.GetApplicationInstance(context); 它是通过一个叫做HttpApplicationFactory的工厂类来获取了一个HttpApplication的实例,并将HttpContext上下文对象作为参数传递了进去。于是,怀着好奇心,我们转到这个方法内部去看看:
internal static IHttpHandler GetApplicationInstance(HttpContext context)
{
    ......
    _theApplicationFactory.EnsureInited();
    _theApplicationFactory.EnsureAppStartCalled(context);
    return _theApplicationFactory.GetNormalApplicationInstance(context);
}
原来,它是调用了一个实例方法:GetNormalApplicationInstance来获取HttpApplication。于是,我们再转到这个方法的内部去看看:
private HttpApplication GetNormalApplicationInstance(HttpContext context)
{
    HttpApplication state = null;
    lock (this._freeList)
    {
        if (this._numFreeAppInstances > 0)
        {
            state = (HttpApplication) this._freeList.Pop();
            this._numFreeAppInstances--;
            if (this._numFreeAppInstances < this._minFreeAppInstances)
            {
                this._minFreeAppInstances = this._numFreeAppInstances;
            }
        }
    }
    if (state == null)
    {
        state = (HttpApplication) HttpRuntime.CreateNonPublicInstance(this._theApplicationType);
        using (new ApplicationImpersonationContext())
        {
            state.InitInternal(context, this._state, this._eventHandlerMethods);
        }
    }
    ......
    return state;
}
通过查看这段代码,它首先维护着一个HttpApplication池(_freeList,本质上就是一个Stack栈),然后判断可用的HttpApplication实例的数量(_numFreeAppInstances)是否大于0?如果存在可用的,则从池中出栈,然后将可用数量减1。最后,再判断可用的数量是否小于最低限制的数量,如果小于那么则将最低限制的数量设置为目前可用的数量。

那么,如果目前HttpApplication池暂时没有可用的实例呢?我们看到了这一句:state = (HttpApplication) HttpRuntime.CreateNonPublicInstance(this._theApplicationType); 通过此段代码,新建了一个新的HttpApplication实例,通过继续深入查看,原来是通过反射的方式将Global文件所编译后的类封装出来一个HttpApplication实例。
补充之一:_theApplicationType是_theApplicationFactory.EnsureInited();中被赋值的
private void CompileApplication() { this._theApplicationType = BuildManager.GetGlobalAsaxType(); ...... }补充之二:全局事件中例如Application_Start方法如何保证只执行一次?在_theApplicationFactory.EnsureAppStartCalled(context);方法中,判断_appOnStartCalled标志,如果是false则调用FireApplicationOnStart方法触发Application_Start方法,然后更改_appOnStartCalled标志。
private void EnsureAppStartCalled(HttpContext context)
{
    if (!this._appOnStartCalled)
    {
        lock (this)
        {
            if (!this._appOnStartCalled)
            {
                using (new DisposableHttpContextWrapper(context))
                {
                    ......
                    this.FireApplicationOnStart(context);
                }
                this._appOnStartCalled = true;
            }
        }
    }
}
在前两个入口中,HttpApplication实例被创建,现在HttpApplication需要进行初始化请求处理管道,来分别处理ASP.Net WebForm或ASP.Net MVC等类型的页面的响应操作。
让我们再次回到HttpRuntime的ProcessRequestInternal这个方法中,刚刚HttpApplication实例被创建后,开始了一系列的初始化操作,如下图所示,调用了其InitInternal方法进行了初始化。

转到InitInternal方法内部,发现调用了一个非常重要的方法:InitModules()。
internal void InitInternal(HttpContext context, HttpApplicationState state, MethodInfo[] handlers)
{
    this._state = state;
    PerfCounters.IncrementCounter(AppPerfCounter.PIPELINES);
    try
    {
         ......
         this.InitModules();
         ......
         if (HttpRuntime.UseIntegratedPipeline)
         {
             this._stepManager = new PipelineStepManager(this);
         }
     else
      {
        this._stepManager = new ApplicationStepManager(this);
      }
      this._stepManager.BuildSteps(this._resumeStepsWaitCallback);
   }
     catch
     {
         ......
    }
}
在InitModules这个方法中,首先通过读取Web.config配置文件中关于HttpModule的信息,然后将其传递给HttpModule的集合,如下代码所示:
private void InitModules()
{
    HttpModuleCollection modules = RuntimeConfig.GetAppConfig().HttpModules.CreateModules();
    HttpModuleCollection other = this.CreateDynamicModules();
    modules.AppendCollection(other);
    this._moduleCollection = modules;
    this.InitModulesCommon();
}
然后,调用InitModulesCommon方法,遍历上面这个_moduleCollection集合,分别对其每一个HttpModule执行其对应的Init方法。
private void InitModulesCommon()
{
    int count = this._moduleCollection.Count;
    for (int i = 0; i < count; i++)
    {
        this._currentModuleCollectionKey = this._moduleCollection.GetKey(i);
        this._moduleCollection[i].Init(this);
    }
    this._currentModuleCollectionKey = null;
    this.InitAppLevelCulture();
}
接上述操作之后,InitInternal方法内部还执行了这样一句:this._stepManager.BuildSteps(this._resumeStepsWaitCallback); 它完成了19个请求处理管道事件的注册工作。
internal override void BuildSteps(WaitCallback stepCallback)
{
    ArrayList steps = new ArrayList();
    HttpApplication app = base._application;
    bool flag = false;
    UrlMappingsSection urlMappings = RuntimeConfig.GetConfig().UrlMappings;
    flag = urlMappings.IsEnabled && (urlMappings.UrlMappings.Count > 0);
    steps.Add(new HttpApplication.ValidateRequestExecutionStep(app));
    steps.Add(new HttpApplication.ValidatePathExecutionStep(app));
    if (flag)
    {
        steps.Add(new HttpApplication.UrlMappingsExecutionStep(app));
    }

    /* 以下代码完成19个事件的注册 */
    app.CreateEventExecutionSteps(HttpApplication.EventBeginRequest, steps);
    app.CreateEventExecutionSteps(HttpApplication.EventAuthenticateRequest, steps);
    app.CreateEventExecutionSteps(HttpApplication.EventDefaultAuthentication, steps);
    app.CreateEventExecutionSteps(HttpApplication.EventPostAuthenticateRequest, steps);
    app.CreateEventExecutionSteps(HttpApplication.EventAuthorizeRequest, steps);
    app.CreateEventExecutionSteps(HttpApplication.EventPostAuthorizeRequest, steps);
    app.CreateEventExecutionSteps(HttpApplication.EventResolveRequestCache, steps);
    app.CreateEventExecutionSteps(HttpApplication.EventPostResolveRequestCache, steps);
    steps.Add(new HttpApplication.MapHandlerExecutionStep(app));
    app.CreateEventExecutionSteps(HttpApplication.EventPostMapRequestHandler, steps);
    app.CreateEventExecutionSteps(HttpApplication.EventAcquireRequestState, steps);
    app.CreateEventExecutionSteps(HttpApplication.EventPostAcquireRequestState, steps);
    app.CreateEventExecutionSteps(HttpApplication.EventPreRequestHandlerExecute, steps);
    steps.Add(app.CreateImplicitAsyncPreloadExecutionStep());
    steps.Add(new HttpApplication.CallHandlerExecutionStep(app));
    app.CreateEventExecutionSteps(HttpApplication.EventPostRequestHandlerExecute, steps);
    app.CreateEventExecutionSteps(HttpApplication.EventReleaseRequestState, steps);
    app.CreateEventExecutionSteps(HttpApplication.EventPostReleaseRequestState, steps);
    steps.Add(new HttpApplication.CallFilterExecutionStep(app));
    app.CreateEventExecutionSteps(HttpApplication.EventUpdateRequestCache, steps);
    app.CreateEventExecutionSteps(HttpApplication.EventPostUpdateRequestCache, steps);
    this._endRequestStepIndex = steps.Count;
    app.CreateEventExecutionSteps(HttpApplication.EventEndRequest, steps);
    steps.Add(new HttpApplication.NoopExecutionStep());
    this._execSteps = new HttpApplication.IExecutionStep[steps.Count];
    steps.CopyTo(this._execSteps);
    this._resumeStepsWaitCallback = stepCallback;
}
从上面的代码可知,ApplicationStepManager对象的BuildSteps方法被调用,完成HttpApplication 19个管道事件的注册。这个方法很重要,它将创建各种HttpApplication.IExecutionStep保存到一个数组列表 _execSteps 中:
internal override void BuildSteps(WaitCallback stepCallback)
{
    .....
    this._execSteps = new HttpApplication.IExecutionStep[steps.Count];
    steps.CopyTo(this._execSteps);
    .....
}
这样做的目的在于:便于在后面的BeginProcessRequest方法内部调用ResumeSteps方法依次执行这些对象的Execute()方法,完成各个事件的执行。
让我们再返回到HttpRuntime中的ProcessRequestInternal方法中,HttpApplication实例已创建好,HttpModules已初始化,请求处理管道中的19个事件也已经注册好,现在需要的只是一一调用HttpModule中各个事件对应的执行方法即可。
private void ProcessRequestInternal(HttpWorkerRequest wr)
{
            ......
            if (applicationInstance is IHttpAsyncHandler)
            {
                IHttpAsyncHandler handler2 = (IHttpAsyncHandler) applicationInstance;
                context.AsyncAppHandler = handler2;
                handler2.BeginProcessRequest(context, this._handlerCompletionCallback, context);
            }
            ......
}
在上述代码中,通过执行BeginProcessRequest方法,触发了ResumeSteps方法依次执行每个请求处理管道事件,也就进入了我们所说的“请求处理管道”中。
IAsyncResult IHttpAsyncHandler.BeginProcessRequest(HttpContext context, AsyncCallback cb, object extraData)
{
    this._context = context;
    this._context.ApplicationInstance = this;
    this._stepManager.InitRequest();
    this._context.Root();
    HttpAsyncResult result = new HttpAsyncResult(cb, extraData);
    this.AsyncResult = result;
    if (this._context.TraceIsEnabled)
    {
        HttpRuntime.Profile.StartRequest(this._context);
    }
    // 依次执行各个请求处理管道事件
    this.ResumeSteps(null);
    return result;
}
关于请求处理管道:
HttpApplication 采用处理管道的方法进行处理,将处理的过程分成多个步骤,每个步骤通过事件的形式暴露给程序员,这些事件按照固定的处理顺序依次触发,程序员通过编写事件处理方法就可以自定义每一个请求的扩展处理过程。
对于 HttpApplication 来说,到 ASP.NET 4.0 版本,提供了19 个标准事件,如下图所示:
至于在请求处理管道中的细节,我们在Part 3中再看,今天就到此为止,谢谢!
(1)Darren Ji,《ASP.NET MVC请求处理管道声明周期的19个关键环节》:http://www.cnblogs.com/darrenji/p/3795661.html
(2)木宛城主,《ASP.NET那点不为人知的事儿》:http://www.cnblogs.com/OceanEyes/archive/2012/08/13/aspnetEssential-1.html
(3)Tony He,《ASP.NET请求处理机制》:http://www.cnblogs.com/cilence/archive/2012/05/28/2520712.html
(4)两会的博客,《IIS是怎样处理ASP.NET请求的》:http://www.cnblogs.com/hkncd/archive/2012/03/23/2413917.html
(5)wjn2000,《ASP.NET请求处理过程(IIS6)》:http://www.cnblogs.com/wjn2010/archive/2011/04/21/2024341.html
(6)农村出来的大学生,《ASP.NET网页请求处理全过程(反编译)》:http://www.cnblogs.com/poorpan/archive/2011/09/25/2190308.html
ASP.Net请求处理机制初步探索之旅 - Part 2 核心
标签:
原文地址:http://www.cnblogs.com/edisonchou/p/4195259.html