标签:
1.android下junit测试框架配置
单元测试需要在手机中进行安装测试
(1).在清单文件中manifest节点下配置如下节点
<instrumentation
android:name="android.test.InstrumentationTestRunner"
android:targetPackage="com.example.demo1" />
上面targetPackage指定的包要和应用的package相同。
(2)在清单文件中application节点下配置如下节点
<uses-library
android:name="android.test.runner"/>
(3).编写业务逻辑类
package com.example.demo1.service;
public class UserService {
public int add(int x, int y) {
return x + y;
}
}
(4).编写单元测试类,该类继承 AndroidTestCase
package com.example.demo1.test;
import com.example.demo1.service.UserService;
import android.test.AndroidTestCase;
public class TestUserService extends AndroidTestCase {
public void testAdd() throws Exception {
UserService us = new UserService();
int result = us.add(3, 5);
assertEquals(8, result);
}
}
选择要测试的方法,右键点击“Run As”--“Android Junit Test”
2.保存文件到手机内存
<?xml version="1.0" encoding="utf-8"?>
<LinearLayout xmlns:android="http://schemas.android.com/apk/res/android"
android:layout_width="fill_parent"
android:layout_height="fill_parent"
android:orientation="vertical" >
<TextView
android:layout_width="wrap_content"
android:layout_height="wrap_content"
android:text="请输入用户名" />
<EditText
android:id="@+id/et_username"
android:layout_width="match_parent"
android:layout_height="wrap_content" >
<requestFocus />
</EditText>
<TextView
android:layout_width="wrap_content"
android:layout_height="wrap_content"
android:text="请输入密码" />
<EditText
android:id="@+id/et_password"
android:layout_width="match_parent"
android:layout_height="wrap_content"
android:inputType="textPassword" />
<RelativeLayout
android:layout_width="wrap_content"
android:layout_height="wrap_content" >
<CheckBox
android:id="@+id/cb_remember_psw"
android:layout_width="wrap_content"
android:layout_height="wrap_content"
android:checked="true"
android:text="记住密码" />
<Button
android:onClick="login"
android:layout_alignParentRight="true"
android:id="@+id/login"
android:layout_width="wrap_content"
android:layout_height="wrap_content"
android:text="登录" />
</RelativeLayout>
</LinearLayout>
package com.example.demo1;
import java.util.HashMap;
import com.example.demo1.service.LoginService;
import android.app.Activity;
import android.os.Bundle;
import android.text.TextUtils;
import android.view.View;
import android.widget.CheckBox;
import android.widget.EditText;
import android.widget.Toast;
public class LoginUIActivity extends Activity {
private EditText et_username = null;
private EditText et_password = null;
private CheckBox cb_remeber_password = null;
@Override
public void onCreate(Bundle savedInstanceState) {
super.onCreate(savedInstanceState);
setContentView(R.layout.activity_login_ui);
this.et_username = (EditText) this.findViewById(R.id.et_username);
this.et_password = (EditText) this.findViewById(R.id.et_password);
this.cb_remeber_password = (CheckBox) this.findViewById(R.id.cb_remember_psw);
HashMap<String, String> info = LoginService.getInfo(this);
if (info != null) {
this.et_username.setText(info.get("username"));
this.et_password.setText(info.get("password"));
}
}
public void login(View view) {
String username = this.et_username.getText().toString().trim();
String password = this.et_password.getText().toString().trim();
if (TextUtils.isEmpty(username) || TextUtils.isEmpty(password)) {
Toast.makeText(this, "用户名或密码不能为空", 0).show();
} else {
if (this.cb_remeber_password.isChecked()) {
boolean result = LoginService.saveInfo(this, username, password);
if (result) {
Toast.makeText(this, "保存密码成功", 0).show();
}
}
if ("weijie".equals(username) && "123".equals(password)) {
Toast.makeText(this, "登录成功", 0).show();
} else {
Toast.makeText(this, "登录失败", 0).show();
}
}
}
}
package com.example.demo1.service;
import java.io.BufferedReader;
import java.io.File;
import java.io.FileInputStream;
import java.io.FileOutputStream;
import java.io.InputStreamReader;
import java.util.HashMap;
import android.content.Context;
import android.widget.Toast;
public class LoginService {
public static boolean saveInfo(Context context, String username,
String password) {
// getFileDir : /data/data/包名/files
// getCacheDir : /data/data/包名/cache
File file = new File(context.getFilesDir(), "info.txt");
try {
FileOutputStream fos = new FileOutputStream(file);
fos.write((username + "=" + password).getBytes());
fos.flush();
fos.close();
return true;
} catch (Exception e) {
e.printStackTrace();
return false;
}
}
public static HashMap<String, String> getInfo(Context context) {
File file = new File(context.getFilesDir(), "info.txt");
try {
if (file.exists()) {
FileInputStream fis = new FileInputStream(file);
BufferedReader br = new BufferedReader(new InputStreamReader(fis));
String[] result = br.readLine().split("=");
HashMap<String, String> map = new HashMap<String, String>();
map.put("username", result[0]);
map.put("password", result[1]);
br.close();
return map;
}
} catch (Exception e) {
Toast.makeText(context, "无法读取用户信息", 0).show();
}
return null;
}
}
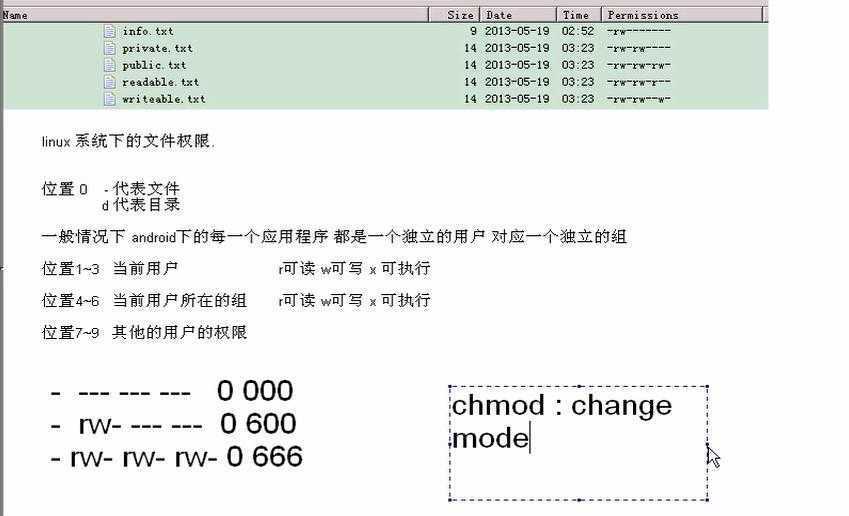
3.android下文件访问的权限
利用Context提供的参数,我们可以设置文件不同访问权限
Context.MODE_PRIVATE:为默认操作模式,代表该文件是私有数据,只能被应用本身访问,在该模式下,写入的内容会覆盖原文件的内容,如果想把新写入的内容追加到原文件中。可以使用Context.MODE_APPEND
Context.MODE_APPEND:模式会检查文件是否存在,存在就往文件追加内容,否则就创建新文件。
Context.MODE_WORLD_READABLE和Context.MODE_WORLD_WRITEABLE用来控制其他应用是否有权限读写该文件。
MODE_WORLD_READABLE:表示当前文件可以被其他应用读取;MODE_WORLD_WRITEABLE:表示当前文件可以被其他应用写入。
如果希望文件被其他应用读和写,可以传入:
openFileOutput("info.txt", Context.MODE_WORLD_READABLE + Context.MODE_WORLD_WRITEABLE);
4.保存文件到SD卡
package com.example.demo1.service;
import java.io.BufferedReader;
import java.io.File;
import java.io.FileInputStream;
import java.io.FileOutputStream;
import java.io.InputStreamReader;
import java.util.HashMap;
import android.content.Context;
import android.os.Environment;
import android.widget.Toast;
public class LoginService1 {
public static boolean saveInfo(Context context, String username,
String password) {
try {
if (Environment.MEDIA_MOUNTED.equals(Environment
.getExternalStorageState())) {
File file = new File(Environment.getExternalStorageDirectory(),
"info.txt");
FileOutputStream fos = new FileOutputStream(file);
fos.write((username + "=" + password).getBytes());
fos.flush();
fos.close();
return true;
} else {
Toast.makeText(context, "cdcard被卸载", 0).show();
return false;
}
} catch (Exception e) {
e.printStackTrace();
return false;
}
}
public static HashMap<String, String> getInfo(Context context) {
File file = new File(Environment.getExternalStorageDirectory(),
"info.txt");
try {
FileInputStream fis = new FileInputStream(file);
BufferedReader br = new BufferedReader(new InputStreamReader(fis));
String[] result = br.readLine().split("=");
HashMap<String, String> map = new HashMap<String, String>();
map.put("username", result[0]);
map.put("password", result[1]);
br.close();
return map;
} catch (Exception e) {
Toast.makeText(context, "无法读取用户信息", 0).show();
}
return null;
}
}
<uses-permission android:name="android.permission.WRITE_EXTERNAL_STORAGE"/>
5.分析setting源代码获取SD卡大小
public String getSdcardInfo() {
File path = Environment.getExternalStorageDirectory();
StatFs stat = new StatFs(path.getPath());
long blockSize = stat.getBlockSize();
long totalBlocks = stat.getBlockCount();
long availableBlocks = stat.getAvailableBlocks();
long totalSize = blockSize * totalBlocks;
long availSize = blockSize * availableBlocks;
String totalStr = Formatter.formatFileSize(LoginUIActivity.this,
totalSize);
String availStr = Formatter.formatFileSize(LoginUIActivity.this,
availSize);
return "cdcard总内存:" + totalStr + "\n" + "可用内存:" + availStr;
}
public String getROMInfo() {
File path = Environment.getDataDirectory();
StatFs stat = new StatFs(path.getPath());
long blockSize = stat.getBlockSize();
long totalBlocks = stat.getBlockCount();
long availableBlocks = stat.getAvailableBlocks();
long totalSize = blockSize * totalBlocks;
long availSize = blockSize * availableBlocks;
String totalStr = Formatter.formatFileSize(LoginUIActivity.this,
totalSize);
String availStr = Formatter.formatFileSize(LoginUIActivity.this,
availSize);
return "手机总内存:" + totalStr + "\n" + "可用内存:" + availStr;
}
6.使用SharedPreferences进行数据存储
(1)保存信息,会生成config.xml文件,一般用来保存配置信息的
SharedPreferences sp = context.getSharedPreferences("config", Context.MODE_PRIVATE);
Editor editor = sp.edit();
editor.putString("username", username);
editor.putString("password", password);
editor.commit();
(2)获取信息
SharedPreferences sp = context.getSharedPreferences("config", Context.MODE_PRIVATE);
sp.getString("username", "");
sp.getString("password", "");
7.使用Pull解析器生成XML文件
public void save(View view) {
XmlSerializer xmlSerializer = Xml.newSerializer();
File file = new File(Environment.getExternalStorageDirectory(),
"config.xml");
try {
FileOutputStream fos = new FileOutputStream(file);
xmlSerializer.setOutput(fos, "utf-8");
xmlSerializer.startDocument("utf-8", true);
xmlSerializer.startTag(null, "smss");
for (SmsInfo info : infos) {
xmlSerializer.startTag(null, "sms");
xmlSerializer.attribute(null, "id", info.getId() + "");
xmlSerializer.startTag(null, "date");
xmlSerializer.text(info.getDate() + "");
xmlSerializer.endTag(null, "date");
xmlSerializer.startTag(null, "address");
xmlSerializer.text(info.getAddress());
xmlSerializer.endTag(null, "address");
xmlSerializer.startTag(null, "body");
xmlSerializer.text(info.getBody());
xmlSerializer.endTag(null, "body");
xmlSerializer.endTag(null, "sms");
}
xmlSerializer.endTag(null, "smss");
xmlSerializer.endDocument();
fos.close();
Toast.makeText(this, "保存成功", 0).show();
} catch (Exception e) {
e.printStackTrace();
Toast.makeText(this, "保存失败", 0).show();
}
}
8.采用pull解析器解析xml文件
(1).准备一个xml文件,将其拷贝到工程的src目录下
<?xml version="1.0" encoding="utf-8"?>
<infos>
<city id="1">
<temp>20‘C/30‘C</temp>
<weather>多云</weather>
<wind>南风3级</wind>
<name>上海</name>
<pm>200</pm>
</city>
<city id="2">
<temp>20‘C/35‘C</temp>
<weather>暴雨</weather>
<wind>南风10级</wind>
<name>北京</name>
<pm>800</pm>
</city>
<city id="3">
<temp>0‘C/10‘C</temp>
<weather>暴雪</weather>
<wind>北风32级</wind>
<name>广州</name>
<pm>200</pm>
</city>
</infos>
(2)
public static ArrayList<WeatherInfo> getWeatherInfo(InputStream is)
throws Exception {
ArrayList<WeatherInfo> infos = null;
WeatherInfo info = null;
// XmlPullParser parser = Xml.newPullParser();
XmlPullParserFactory fac = XmlPullParserFactory.newInstance();
XmlPullParser parser = fac.newPullParser();
parser.setInput(is, "utf-8");
int type = parser.getEventType();
while (type != XmlPullParser.END_DOCUMENT) {
switch (type) {
case XmlPullParser.START_TAG:
if ("infos".equals(parser.getName())) {
infos = new ArrayList<WeatherInfo>();
} else if ("city".equals(parser.getName())) {
info = new WeatherInfo();
info.setId(Integer.parseInt(parser.getAttributeValue(0)));
} else if ("temp".equals(parser.getName())) {
info.setTemp(parser.nextText());
} else if ("weather".equals(parser.getName())) {
info.setWeather(parser.nextText());
} else if ("wind".equals(parser.getName())) {
info.setWind(parser.nextText());
} else if ("name".equals(parser.getName())) {
info.setName(parser.nextText());
} else if ("pm".equals(parser.getName())) {
info.setPm(parser.nextText());
}
break;
case XmlPullParser.END_TAG:
if ("city".equals(parser.getName())) {
infos.add(info);
info = null;
}
break;
}
type = parser.next();
}
return infos;
}
(3).调用
public class WeatherActivity extends Activity {
@Override
public void onCreate(Bundle savedInstanceState) {
super.onCreate(savedInstanceState);
setContentView(R.layout.main);
TextView tv_info = (TextView) this.findViewById(R.id.vt_info);
try {
ArrayList<WeatherInfo> infos = WeaterService
.getWeatherInfo(WeatherActivity.class.getClassLoader()
.getResourceAsStream("weather.xml"));
StringBuffer sb = new StringBuffer();
for (WeatherInfo info : infos) {
sb.append(info);
sb.append("\n");
}
tv_info.setText(sb.toString());
} catch (Exception e) {
e.printStackTrace();
Toast.makeText(this, "xml解析失败", 0).show();
}
}
}
9.android下创建一个sqlite数据库
public class PersonSQLiteOpenHelper extends SQLiteOpenHelper {
private static final String DBFILENAME = "person.db";
private static int db_version = 2;
public PersonSQLiteOpenHelper(Context context) {
super(context, DBFILENAME, null, db_version);
}
/**
* 当数据库第一次创建时调用
*/
@Override
public void onCreate(SQLiteDatabase db) {
String sql = "create table person(id integer primary key autoincrement,name varchar(20),number varchar(20))";
db.execSQL(sql);
}
/**
* 当数据库的版本号发生增加的时候调用
*/
@Override
public void onUpgrade(SQLiteDatabase db, int oldVersion, int newVersion) {
System.out.println("数据库更改!");
String sql = "alter table person add account varchar(20)";
db.execSQL(sql);
}
}
10.sql语句实现数据库的增删改查
(1)添加条目
public void add(String name, String number) {
SQLiteDatabase db = this.helper.getWritableDatabase();
db.execSQL("insert into person(name,number) values(?,?)", new Object[] {
name, number });
db.close();
}
(2).查找条目是否存在
public boolean find(String name) {
SQLiteDatabase db = this.helper.getReadableDatabase();
Cursor cursor = db.rawQuery("select * from person where name=?",
new String[] { name });
boolean result = cursor.moveToNext();
cursor.close();
db.close();
return result;
}
(3).更新条目
public void update(String name, String newNumber) {
SQLiteDatabase db = this.helper.getWritableDatabase();
db.execSQL("update person set number=? where name=?", new Object[] {
newNumber, name });
db.close();
}
(4).删除条目
public void delete(String name) {
SQLiteDatabase db = this.helper.getWritableDatabase();
db.execSQL("delete from person where name=?", new Object[] { name });
db.close();
}
(5).查找所有条目
public ArrayList<Person> findAll() {
SQLiteDatabase db = this.helper.getReadableDatabase();
ArrayList<Person> persons = new ArrayList<Person>();
Cursor cursor = db.rawQuery("select * from person", null);
while (cursor.moveToNext()) {
int id = cursor.getInt(cursor.getColumnIndex("id"));
String name = cursor.getString(cursor.getColumnIndex("name"));
String number = cursor.getString(cursor.getColumnIndex("number"));
Person p = new Person(id, name, number);
persons.add(p);
}
cursor.close();
db.close();
return persons;
}
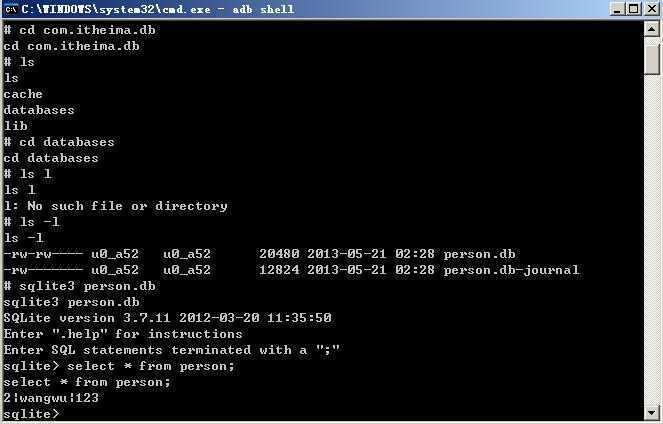
11.系统api实现数据库的增删改查&sqlite3工具的使用
(1).添加条目
public long add(String name, String number) {
SQLiteDatabase db = this.helper.getWritableDatabase();
ContentValues values = new ContentValues();
values.put("name", name);
values.put("number", number);
long id = db.insert("person", null, values);
db.close();
return id;
}
(2).查找条目是否存在
public boolean find(String name) {
SQLiteDatabase db = this.helper.getReadableDatabase();
Cursor cursor = db.query("person", null, "name=?",
new String[] { name }, null, null, null);
boolean result = cursor.moveToNext();
cursor.close();
db.close();
return result;
}
(3).更新条目
public int update(String name, String newNumber) {
SQLiteDatabase db = this.helper.getWritableDatabase();
ContentValues values = new ContentValues();
values.put("number", newNumber);
int number = db.update("person", values, "name=?",
new String[] { name });
db.close();
return number;
}
(4).删除条目
public int delete(String name) {
SQLiteDatabase db = this.helper.getWritableDatabase();
// db.execSQL("delete from person where name=?", new Object[] { name });
int number = db.delete("person", "name=?", new String[] { name });
db.close();
return number;
}
(5).查找所有条目
public ArrayList<Person> findAll() {
SQLiteDatabase db = this.helper.getReadableDatabase();
ArrayList<Person> persons = new ArrayList<Person>();
Cursor cursor = db.query("person", null, null, null, null, null, null);
while (cursor.moveToNext()) {
int id = cursor.getInt(cursor.getColumnIndex("id"));
String name = cursor.getString(cursor.getColumnIndex("name"));
String number = cursor.getString(cursor.getColumnIndex("number"));
Person p = new Person(id, name, number);
persons.add(p);
}
cursor.close();
db.close();
return persons;
}
12.使用事务操作SQLite数据库
SQLiteDatabase db = this.helper.getReadableDatabase();
db.beginTransaction();//开始事务
try {
db.execSQL("insert into person(name, age) values(?,?)", new Object[]{"张三", 4});
db.execSQL("update person set name=? where personid=?", new Object[]{"李四", 1});
db.setTransactionSuccessful();//调用此方法会在执行到endTransaction() 时提交当前事务,如果不调用此方法会回滚事务
} finally {
db.endTransaction();//由事务的标志决定是提交事务,还是回滚事务
}
db.close();
标签:
原文地址:http://www.cnblogs.com/yxlblogs/p/4217267.html