标签:
We can use the Arc XAML element to draw arcs in XAML. Besides drawing arcs using the Arc element, we can also use the ArcSegment element. The ArcSegment is useful when an arc becomes a part of a graphics path or a larger geometric object.
In this article, we will see how to use the ArcSegment to draw arcs in XAML and WPF.
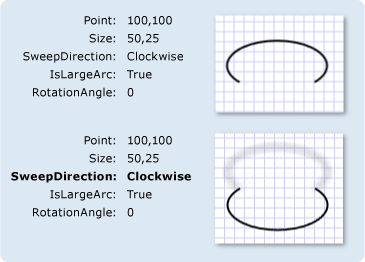
The ArcSegment object represents an elliptical arc between two points. The ArcSegment class has the five properties Point, Size, SweepDirection, IsLargeArc and RotationAngle.
The following figure provided by the MSDN documentation shows these property values and their results.
<ArcSegment Size="300,50" RotationAngle="30"
IsLargeArc="True" SweepDirection="CounterClockwise" Point="200,100" />
A Path object is used to draw an arc by setting a PathGeomerty as Path.Data. The following code snippet creates a Path and sets a ArcSegment as a part of PathFigure.Segments.
<Path Stroke="Black" StrokeThickness="1">
<Path.Data>
<PathGeometry>
<PathGeometry.Figures>
<PathFigureCollection>
<PathFigure StartPoint="0,100">
<PathFigure.Segments>
<PathSegmentCollection>
<ArcSegment Size="300,50" RotationAngle="30"
IsLargeArc="True"
SweepDirection="CounterClockwise"
Point="200,100" />
</PathSegmentCollection>
</PathFigure.Segments>
</PathFigure>
</PathFigureCollection>
</PathGeometry.Figures>
</PathGeometry>
</Path.Data>
</Path>
The output looks like Figure 1.

Figure 1
We can paint an arc by simply painting the path using the Fill method. The following code snippet has changes in it from the previous code that fills a path.
<Path Stroke="Black" StrokeThickness="1" Fill="Yellow">
The new output looks like Figure 2.
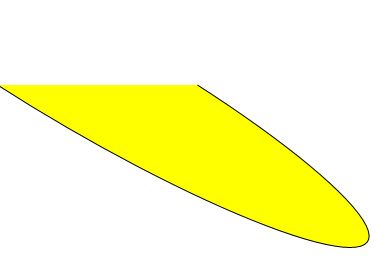
Figure 2
The following code snippet creates an arc segment shown in Figure 2 dynamically.
private void CreateArcSegment()
{
PathFigure pthFigure = new PathFigure();
pthFigure.StartPoint = new Point(0, 100);
ArcSegment arcSeg = new ArcSegment();
arcSeg.Point = new Point(200, 100);
arcSeg.Size = new Size(300,50);
arcSeg.IsLargeArc = true;
arcSeg.SweepDirection = SweepDirection.Counterclockwise;
arcSeg.RotationAngle = 30;
PathSegmentCollection myPathSegmentCollection = new PathSegmentCollection();
myPathSegmentCollection.Add(arcSeg);
pthFigure.Segments = myPathSegmentCollection;
PathFigureCollection pthFigureCollection = new PathFigureCollection();
pthFigureCollection.Add(pthFigure);
PathGeometry pthGeometry = new PathGeometry();
pthGeometry.Figures = pthFigureCollection;
Path arcPath = new Path();
arcPath.Stroke = new SolidColorBrush(Colors.Black);
arcPath.StrokeThickness = 1;
arcPath.Data = pthGeometry;
arcPath.Fill = new SolidColorBrush(Colors.Yellow);
LayoutRoot.Children.Add(arcPath);
}
Drawing Arc Using ArcSegment in XAML
标签:
原文地址:http://www.cnblogs.com/xpvincent/p/4228979.html