标签:
一、目标。
制作向导设置里面每一步的UI布局及点击事件控制。
1、使用自定义button背景、自定义组合控件、自定义文本样式等。
2、利用SharedPreferences对象,设置应用程序配置信息(向导设置完成后就不再进入)


二、代码实现。
1、在程序包下新建另外3个UI的类(分别为SetupWizard_ui_2.java、SetupWizard_ui_3.java、SetupWizard_ui_4.java),并在配置文件中注册Activity。
2、根据UI设计,在设置向导中均存在“下一步、“上一步”按钮,因此可将这些相同的属性抽出(包括onClick),在value文件夹下的style文件中制成一个样式。可参照第十六节-自定义文本框的介绍。同时完成”上一步“按钮的样式。
自定义下一步button样式代码;

 1 <style name="setup_bt_next">
 2         <item name="android:onClick">next</item>
 3         <item name="android:layout_width">wrap_content</item>
 4         <item name="android:layout_alignParentBottom">true</item>
 5         <item name="android:layout_alignParentRight">true</item>
 6         <item name="android:layout_marginBottom">5dip</item>
 7         <item name="android:layout_marginRight">5dip</item>
 8         <item name="android:background">@drawable/button</item>
 9         <item name="android:text">下一步</item>
10     </style>
3、在需要使用该样式的button属性中引用该样式。
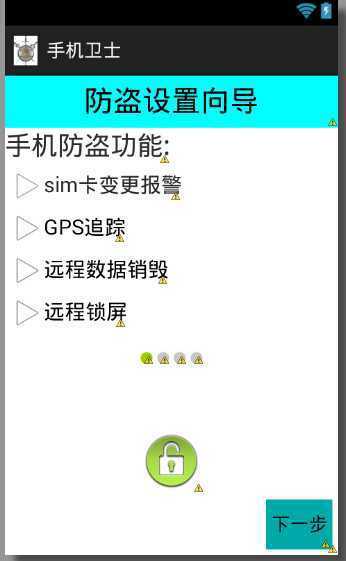
4、在设置向导第一步页面中设置点击事件(在第2步中已经取名为next),通过Intent使其跳转至第二步的页面中。
跳转代码:

1 public void next(View view){
2         Intent intent = new Intent(SetupWizard_ui_1.this,SetupWizard_ui_2.class);
3         startActivity(intent);
4         finish();
5     }
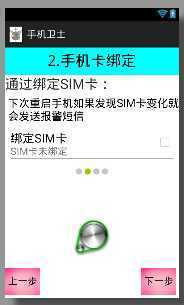
5、根据要求将向导第二步的UI设计完成。可以采用之前的TextView样式和自定义组合控件完成。
6、在向导第二步中设置点击事件(在第2步中已经取名为next),在button样式中已取名上一步的点击事件名称为pre,均通过Intent使其跳转至第三步和第一步的页面中。
代码如下:

 1 //设置下一步点击事件
 2     public void next (View view){
 3         Intent intent = new Intent (SetupWizard_ui_2.this,SetupWizard_ui_3.class);
 4         startActivity(intent);
 5         finish();
 6     }
 7     //设置上一步点击事件
 8     public void pre (View view){
 9         Intent intent = new Intent (SetupWizard_ui_2.this,SetupWizard_ui_1.class);
10         startActivity(intent);
11         finish();
12     }
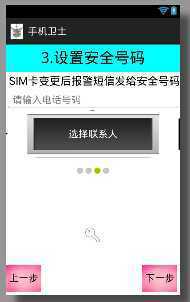
7、同理可以完成第三步UI类和布局文件。
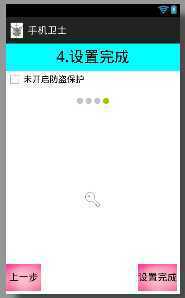
8、第四步点击设置完成时应该将SharedPreferences对象(config文件)中的向导标记(setupwizard)设置为true。
向导四步的类代码:
第一步类:

 1 public class SetupWizard_ui_1 extends Activity{
 2
 3     @Override
 4     protected void onCreate(Bundle savedInstanceState) {
 5         super.onCreate(savedInstanceState);
 6         setContentView(R.layout.activity_setupwizard_ui1);
 7     }
 8
 9     //下一步的点击事件
10     public void next(View view){
11         Intent intent = new Intent(SetupWizard_ui_1.this,SetupWizard_ui_2.class);
12         startActivity(intent);
13         finish();
14     }
15
16 }
第一步UI布局文件:

 1 <?xml version="1.0" encoding="utf-8"?>
 2 <LinearLayout xmlns:android="http://schemas.android.com/apk/res/android"
 3     xmlns:custom="http://schemas.android.com/apk/res/com.example.mobilesafe"
 4     android:layout_width="match_parent"
 5     android:layout_height="match_parent"
 6     android:orientation="vertical" >
 7
 8     <TextView
 9         android:layout_width="match_parent"
10         android:layout_height="50dip"
11         android:background="#00ffff"
12         android:gravity="center"
13         android:text="防盗设置向导"
14         android:textColor="#000000"
15         android:textSize="28sp" />
16
17     <TextView
18         android:layout_width="wrap_content"
19         android:layout_height="35dip"
20         android:gravity="center"
21         android:text="手机防盗功能:"
22         android:textSize="25sp" />
23
24     <TextView
25         style="@style/SetupWizardTVStyle"
26         android:drawableLeft="@drawable/ic_menu_play_clip"
27         android:text="sim卡变更报警" />
28
29     <TextView
30         style="@style/SetupWizardTVStyle"
31         android:drawableLeft="@drawable/ic_menu_play_clip"
32         android:text="GPS追踪" />
33
34     <TextView
35         style="@style/SetupWizardTVStyle"
36         android:drawableLeft="@drawable/ic_menu_play_clip"
37         android:text="远程数据销毁" />
38
39     <TextView
40         style="@style/SetupWizardTVStyle"
41         android:drawableLeft="@drawable/ic_menu_play_clip"
42         android:text="远程锁屏" />
43
44     <LinearLayout
45         android:layout_width="wrap_content"
46         android:layout_height="wrap_content"
47         android:layout_gravity="center_horizontal"
48         android:layout_marginTop="15dip" >
49
50         <ImageView
51             android:layout_width="wrap_content"
52             android:layout_height="wrap_content"
53             android:src="@android:drawable/presence_online" />
54
55         <ImageView
56             android:layout_width="wrap_content"
57             android:layout_height="wrap_content"
58             android:src="@android:drawable/presence_invisible" />
59
60         <ImageView
61             android:layout_width="wrap_content"
62             android:layout_height="wrap_content"
63             android:src="@android:drawable/presence_invisible" />
64
65         <ImageView
66             android:layout_width="wrap_content"
67             android:layout_height="wrap_content"
68             android:src="@drawable/presence_invisible" />
69     </LinearLayout>
70
71     <RelativeLayout
72         android:layout_width="match_parent"
73         android:layout_height="match_parent" >
74
75         <ImageView
76             android:layout_width="wrap_content"
77             android:layout_height="wrap_content"
78             android:layout_centerInParent="true"
79             android:src="@drawable/ic_jog_dial_unlock" />
80
81         <Button
82             style="@style/setup_bt_next"/>
83     </RelativeLayout>
84
85 </LinearLayout>
第二步类:

 1 package com.example.mobilesafe;
 2
 3 import android.app.Activity;
 4 import android.content.Intent;
 5 import android.os.Bundle;
 6 import android.view.View;
 7
 8 public class SetupWizard_ui_2 extends Activity{
 9
10     @Override
11     protected void onCreate(Bundle savedInstanceState) {
12         super.onCreate(savedInstanceState);
13         setContentView(R.layout.activity_setupwizard_ui2);
14     }
15
16     //设置下一步点击事件
17     public void next (View view){
18         Intent intent = new Intent (SetupWizard_ui_2.this,SetupWizard_ui_3.class);
19         startActivity(intent);
20         finish();
21     }
22     //设置上一步点击事件
23     public void pre (View view){
24         Intent intent = new Intent (SetupWizard_ui_2.this,SetupWizard_ui_1.class);
25         startActivity(intent);
26         finish();
27     }
28 }
第二步UI布局文件:

 1 <?xml version="1.0" encoding="utf-8"?>
 2 <LinearLayout xmlns:android="http://schemas.android.com/apk/res/android"
 3     xmlns:custom="http://schemas.android.com/apk/res/com.example.mobilesafe"
 4     android:layout_width="match_parent"
 5     android:layout_height="match_parent"
 6     android:orientation="vertical" >
 7
 8     <TextView
 9         android:layout_width="match_parent"
10         android:layout_height="50dip"
11         android:background="#00ffff"
12         android:gravity="center"
13         android:text="2.手机卡绑定"
14         android:textColor="#000000"
15         android:textSize="28sp" />
16
17     <TextView
18         android:layout_width="wrap_content"
19         android:layout_height="35dip"
20         android:gravity="center"
21         android:text="通过绑定SIM卡:"
22         android:textSize="25sp" />
23
24     <TextView
25         style="@style/SetupWizardTVStyle"
26         android:layout_height="wrap_content"
27         android:gravity="center_vertical"
28         android:text="下次重启手机如果发现SIM卡变化就会发送报警短信" />
29
30     <com.example.mobilesafe.ui.SettingItemView
31         custom:title="绑定SIM卡"
32         custom:content="SIM卡未绑定"
33         custom:checked="false"
34         custom:check_off="SIM卡未绑定"
35         custom:check_on="SIM卡已成功绑定"
36         android:layout_width="wrap_content"
37         android:layout_height="wrap_content" >
38     </com.example.mobilesafe.ui.SettingItemView>
39
40
41     <LinearLayout
42         android:layout_width="wrap_content"
43         android:layout_height="wrap_content"
44         android:layout_gravity="center_horizontal"
45         android:layout_marginTop="15dip" >
46
47         <ImageView
48             android:layout_width="wrap_content"
49             android:layout_height="wrap_content"
50             android:src="@android:drawable/presence_invisible" />
51
52         <ImageView
53             android:layout_width="wrap_content"
54             android:layout_height="wrap_content"
55             android:src="@android:drawable/presence_online" />
56
57         <ImageView
58             android:layout_width="wrap_content"
59             android:layout_height="wrap_content"
60             android:src="@android:drawable/presence_invisible" />
61
62         <ImageView
63             android:layout_width="wrap_content"
64             android:layout_height="wrap_content"
65             android:src="@drawable/presence_invisible" />
66     </LinearLayout>
67
68     <RelativeLayout
69         android:layout_width="match_parent"
70         android:layout_height="match_parent" >
71
72         <ImageView
73             android:layout_width="wrap_content"
74             android:layout_height="wrap_content"
75             android:layout_centerInParent="true"
76             android:src="@drawable/ic_launcher_android" />
77
78         <Button
79             style="@style/setup_bt_next"/>
80          <Button
81             style="@style/setup_bt_pre"/>
82     </RelativeLayout>
83
84 </LinearLayout>
第三步类:

 1 package com.example.mobilesafe;
 2
 3 import android.app.Activity;
 4 import android.content.Intent;
 5 import android.os.Bundle;
 6 import android.view.View;
 7
 8 public class SetupWizard_ui_3 extends Activity {
 9
10     @Override
11     protected void onCreate(Bundle savedInstanceState) {
12         super.onCreate(savedInstanceState);
13         setContentView(R.layout.activity_setupwizard_ui3);
14     }
15
16     // 设置下一步点击事件
17     public void next(View view) {
18         Intent intent = new Intent(SetupWizard_ui_3.this,
19                 SetupWizard_ui_4.class);
20         startActivity(intent);
21         finish();
22     }
23
24     // 设置上一步点击事件
25     public void pre(View view) {
26         Intent intent = new Intent(SetupWizard_ui_3.this,
27                 SetupWizard_ui_2.class);
28         startActivity(intent);
29         finish();
30     }
31
32 }
第三步UI布局文件;

 1 <?xml version="1.0" encoding="utf-8"?>
 2 <LinearLayout xmlns:android="http://schemas.android.com/apk/res/android"
 3     xmlns:custom="http://schemas.android.com/apk/res/com.example.mobilesafe"
 4     android:layout_width="match_parent"
 5     android:layout_height="match_parent"
 6     android:orientation="vertical" >
 7
 8     <TextView
 9         android:layout_width="match_parent"
10         android:layout_height="50dip"
11         android:background="#00ffff"
12         android:gravity="center"
13         android:text="3.设置安全号码"
14         android:textColor="#000000"
15         android:textSize="28sp" />
16
17     <TextView
18         style="@style/SetupWizardTVStyle"
19         android:layout_height="wrap_content"
20         android:gravity="center_vertical"
21         android:text="SIM卡变更后报警短信发给安全号码" />
22
23     <EditText
24         android:layout_width="match_parent"
25         android:layout_height="wrap_content"
26         android:hint="请输入电话号码"
27         android:inputType="phone" />
28
29     <Button
30         android:layout_width="match_parent"
31         android:layout_height="wrap_content"
32         android:text="选择联系人"
33         android:textColor="#ffffff"
34         android:background="@drawable/button_select_context"/>
35
36     <LinearLayout
37         android:layout_width="wrap_content"
38         android:layout_height="wrap_content"
39         android:layout_gravity="center_horizontal"
40         android:layout_marginTop="15dip" >
41
42         <ImageView
43             android:layout_width="wrap_content"
44             android:layout_height="wrap_content"
45             android:src="@android:drawable/presence_invisible" />
46
47         <ImageView
48             android:layout_width="wrap_content"
49             android:layout_height="wrap_content"
50             android:src="@android:drawable/presence_invisible" />
51
52         <ImageView
53             android:layout_width="wrap_content"
54             android:layout_height="wrap_content"
55             android:src="@android:drawable/presence_online" />
56
57         <ImageView
58             android:layout_width="wrap_content"
59             android:layout_height="wrap_content"
60             android:src="@drawable/presence_invisible" />
61     </LinearLayout>
62
63     <RelativeLayout
64         android:layout_width="match_parent"
65         android:layout_height="match_parent" >
66
67         <ImageView
68             android:layout_width="wrap_content"
69             android:layout_height="wrap_content"
70             android:layout_centerInParent="true"
71             android:src="@drawable/ic_menu_login" />
72
73         <Button style="@style/setup_bt_next" />
74
75         <Button style="@style/setup_bt_pre" />
76     </RelativeLayout>
77
78 </LinearLayout>
第四步类:

 1 package com.example.mobilesafe;
 2
 3 import android.app.Activity;
 4 import android.content.Intent;
 5 import android.content.SharedPreferences;
 6 import android.content.SharedPreferences.Editor;
 7 import android.os.Bundle;
 8 import android.view.View;
 9
10 public class SetupWizard_ui_4 extends Activity{
11
12     private SharedPreferences sp;
13
14     @Override
15     protected void onCreate(Bundle savedInstanceState) {
16         super.onCreate(savedInstanceState);
17         setContentView(R.layout.activity_setupwizard_ui4);
18         sp = getSharedPreferences("config", MODE_PRIVATE);
19     }
20
21     // 设置下一步点击事件
22         public void next(View view) {
23             Editor editor = sp.edit();
24             editor.putBoolean("setupwizard", true);
25             editor.commit();
26             Intent intent = new Intent(SetupWizard_ui_4.this,
27                     SecurityActivity.class);
28             startActivity(intent);
29             finish();
30         }
31
32         // 设置上一步点击事件
33         public void pre(View view) {
34             Intent intent = new Intent(SetupWizard_ui_4.this,
35                     SetupWizard_ui_3.class);
36             startActivity(intent);
37             finish();
38         }
39
40 }
第四步UI布局文件;

 1 <?xml version="1.0" encoding="utf-8"?>
 2 <LinearLayout xmlns:android="http://schemas.android.com/apk/res/android"
 3     xmlns:custom="http://schemas.android.com/apk/res/com.example.mobilesafe"
 4     android:layout_width="match_parent"
 5     android:layout_height="match_parent"
 6     android:orientation="vertical" >
 7
 8     <TextView
 9         android:layout_width="match_parent"
10         android:layout_height="50dip"
11         android:background="#00ffff"
12         android:gravity="center"
13         android:text="4.设置完成"
14         android:textColor="#000000"
15         android:textSize="28sp" />
16
17     <CheckBox
18         android:layout_width="wrap_content"
19         android:layout_height="wrap_content"
20         android:text="未开启防盗保护" />
21
22     <LinearLayout
23         android:layout_width="wrap_content"
24         android:layout_height="wrap_content"
25         android:layout_gravity="center_horizontal"
26         android:layout_marginTop="15dip" >
27
28         <ImageView
29             android:layout_width="wrap_content"
30             android:layout_height="wrap_content"
31             android:src="@android:drawable/presence_invisible" />
32
33         <ImageView
34             android:layout_width="wrap_content"
35             android:layout_height="wrap_content"
36             android:src="@android:drawable/presence_invisible" />
37
38         <ImageView
39             android:layout_width="wrap_content"
40             android:layout_height="wrap_content"
41             android:src="@android:drawable/presence_invisible" />
42
43         <ImageView
44             android:layout_width="wrap_content"
45             android:layout_height="wrap_content"
46             android:src="@drawable/presence_online" />
47     </LinearLayout>
48
49     <RelativeLayout
50         android:layout_width="match_parent"
51         android:layout_height="match_parent" >
52
53         <ImageView
54             android:layout_width="wrap_content"
55             android:layout_height="wrap_content"
56             android:layout_centerInParent="true"
57             android:src="@drawable/ic_menu_login" />
58
59         <Button
60             style="@style/setup_bt_next"
61             android:text="设置完成" />
62
63         <Button style="@style/setup_bt_pre" />
64     </RelativeLayout>
65
66 </LinearLayout>
Android实例-手机安全卫士(十八)-完成设置向导的4个UI和跳转事件
标签:
原文地址:http://www.cnblogs.com/Red-Shark/p/4253162.html