标签:
我要做回自己--Aaronyang的博客(www.ayjs.net)
博客摘要:
WPF验证
第一:使用自带的属性SET抛出异常,前台捕捉到异常,描红
第二:我们可以自定义验证规则,替代刚开始的异常捕捉验证
第三:我们可以使用INotifyDataErrorInfo方式,增加异常,并实现了验证通知和还原非法值
第四:我们使用了Error方法,在容器的Error中捕获自定义错误信息
第五:我们自己手动指定元素,获得异常的信息
第六:自定义验证信息模板
第七:多个属性组合验证(失败了)
1. 简单了解Virtualizing虚拟化的思路加载列表控件中的数据,并拓展实时监控的思路
使用ComboBox做简单的例子,创建一个wpf窗口,添加一个修改容器布局panel的combobox,后台加载10万记录,而普通容器面板只是加载了1万条就已经有点卡了,估计有1-3秒
 <ComboBox x:Name="virtualCbo" HorizontalAlignment="Left" Margin="120,97,0,0" VerticalAlignment="Top" Width="179">
            <ComboBox.ItemsPanel>
                <ItemsPanelTemplate>
                    <VirtualizingStackPanel></VirtualizingStackPanel>
                </ItemsPanelTemplate>
            </ComboBox.ItemsPanel>
        </ComboBox>
后台代码如下
    private void Window_Loaded(object sender, RoutedEventArgs e)
        {

            for (int i = 0; i < 100000; i++)
            {
                virtualCbo.Items.Add(i.ToString());
            }

        }

        private void Button_Click(object sender, RoutedEventArgs e)
        {
            for (int i = 0; i < 10000; i++)
            {
                normalCbo.Items.Add(i.ToString());

            }
        }
界面大致如下:
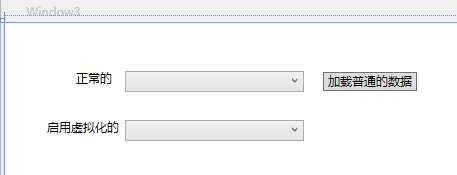
同样的,窗体显示速度很快,但是如果你把普通的cbo的数据加载事件也放在窗体加载时,就会显示很慢了,导致窗体锁住了,你无法操作,直到数据加载完。
普通的加载真正创建了1万个ComboBoxItem对象,所以很占内存,而虚拟化,就是他对数据进行了分页,每次只创建那么多你可见的数据给你,所以内存占用的少,而有的人自己实现个虚拟面板,就是滚动时候,删除上面的元素,增加新元素。从而达到一个列表项固定长度的容器,所以展现速度很快。像实时监控曲线就是这个思路,它不停地在图标控件画线移动,就是就是固定长度的线条数,超过长度,就会删掉前面的点,从而减少内存占用
2. 项容器再循环
这个知识就是我上面说的实时监控曲线的思路,每次创建的新的,删除旧的
2.1 VirtualizingStackPanel 是 ListBox 元素的默认项宿主。 默认情况下, IsVirtualizing 属性设置为 true。
增加代码:
  <ListBox x:Name="aylb" Height="169" VirtualizingStackPanel.IsVirtualizing="True"  Margin="91,172,837,308" />
        <Button Content="加载ListBox" HorizontalAlignment="Left" Margin="360,172,0,0" VerticalAlignment="Top" Width="94" Click="Button_Click_1"/>
后台创建10万个,1秒不到就加载完了
  for (int i = 0; i < 100000; i++)
            {
                aylb.Items.Add("第"+i+"个Item");
            }
使用VirtualizingStackPanel.VirtualizationMode="Recycling",提高了滚动时候的性能,除了DataGrid,该特性是禁用的。如果是大列表,就应该总是启用这个特性。加载100万个,大约3秒
<ListBox x:Name="aylb" Height="169" VirtualizingStackPanel.IsVirtualizing="True" VirtualizingStackPanel.VirtualizationMode="Recycling" Margin="91,172,837,308" />
WPF4.5 的 缓存长度知识
在以前的WPF版本中,将多个附加项硬编码到VirtualizingStackPanel中,在WPF4.5中,使用CacheLength和CacheLengthUnit这两个VirtualizingStackPanel属性进一步调整显示的方式和数量,在vs2013中提示只有VirtualizingPanel,其中CacheLengthUnit属性有3个值:Item,Page,Pixel
默认的CacheLength和CacheLengthUnit属性在当前可见项之前和之后存储项的附加页,如下所示:

下面是基于当前项,在当前项创建100个,在当前项后面创建100个
<ListBox x:Name="aylb" Height="169" VirtualizingPanel.CacheLength="100" VirtualizingPanel.CacheLengthUnit="Item" Margin="91,172,837,328" />
下面的代码在当前可见项之前存储100条,在当前可见项之后存储500项(原因可能是您预估用户将耗费大部分时间向下滚动)
<ListBox x:Name="aylb" Height="169" VirtualizingPanel.CacheLength="100,500" VirtualizingPanel.CacheLengthUnit="Item" Margin="91,172,837,328" />
有必要指出,附加项的缓存用背景来填充,意味着VirtualizingPanel将立即显示创建的可见项集。此后VirtualizingPanel将开始在优先级较低的后台线程上填充缓存,因此不会锁定程序,造成卡顿。
3. 延迟滚动
就是拖动滚动条滑块时候不会更新列表显示,释放后才刷新显示数据 ScrollViewer.IsDeferredScrollingEnabled="True"
<ListBox x:Name="aylb" Height="169" VirtualizingPanel.CacheLength="100,500" VirtualizingPanel.CacheLengthUnit="Item" Margin="91,172,837,328" ScrollViewer.IsDeferredScrollingEnabled="True"/>
此时拖动滑块,左侧列表不动了,停下来才刷新数据。下面是基于像素的滚动,不加的话,你看到的就是一个listboxitem整体的显示,使用像素让滚动看起来更流畅,可以只显示一部分单个的listboxitem
代码:VirtualizingPanel.ScrollUnit="Pixel"
<ListBox x:Name="aylb" Height="169" VirtualizingPanel.CacheLength="100,500" VirtualizingPanel.CacheLengthUnit="Item" Margin="91,172,837,328" ScrollViewer.IsDeferredScrollingEnabled="True" VirtualizingPanel.ScrollUnit="Pixel"/>
4.数据提供者(有时候方便wpf前端测试,但也有异步方式)
4.1 ObjectDataProvider
在SchoolDomain.cs文件中(在上篇博客的项目基础上写的)
我们使用Thread.Sleep模拟个耗时数据库操作
        //ObjectDataProvider测试
        public static ICollection<ClassroomDTO> GetClassroomDelay()
        {
            System.Threading.Thread.Sleep(TimeSpan.FromSeconds(3));
            return GetClassByTeacherId(1);
        }
现在在界面上添加一个新的listbox,然后定义个window资源,简单看下结构就懂了,什么类,什么方法,就OK了
    <Window.Resources>
        <ObjectDataProvider ObjectType="{x:Type data:SchoolDomain}"
                       MethodName="GetClassroomDelay" x:Key="classData"  IsAsynchronous="True"></ObjectDataProvider>
    </Window.Resources>
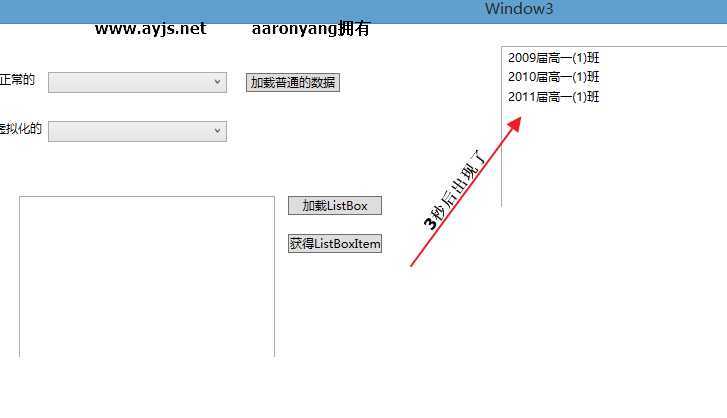
当然普通的Binding中除了path,ElementName,Converter等,还有IsAsync,表示是否异步的显示数据
例如以下代码:在检索到数据之前,默认是空白的,也可以不是异步的,就是同步的,这样会导致窗体冻结,无法操作,直到数据或得到为止
 <TextBox Width="120" Height="30">
            <TextBox.Text>
                <PriorityBinding>
                    <Binding Path="p1" IsAsync="True"></Binding>
                    <Binding Path="p2" IsAsync="True"></Binding>
                    <Binding Path="p3" IsAsync="True"></Binding>
                </PriorityBinding>
            </TextBox.Text>
        </TextBox>
或者:
 <TextBox Width="120" Height="30" Margin="778,302,294,337" Text="{Binding Path=p1,IsAsync=True}">
        </TextBox>
4.2 XmlDataProvider
OK,这里有个我以前写的优惠券系统的xml,拿这个测试了,另存为shop.xml了
<?xml version="1.0" encoding="utf-8"?>
<HuiKe>
  <Shop>
    <Name>麦当劳</Name>
    <Address>马鞍山路家乐福店</Address>
    <PicLocation>image\Shop\M.bmp</PicLocation>
    <advPic>image\麦当劳\adv啊.bmp</advPic>
    <Class>1</Class>
    <ItemName>
      <Item>image\麦当劳\1.bmp</Item>
      <Item>image\麦当劳\2.bmp</Item>
      <Item>image\麦当劳\麦乐鸡.bmp</Item>
    </ItemName>
  </Shop>
  <Shop>
    <Name>合肥野生动物园</Name>
    <PicLocation>image\Shop\HFYSDWY.bmp</PicLocation>
    <Address>宿州路1000米</Address>
    <advPic>image\合肥野生动物园\0.bmp</advPic>
    <Class>4</Class>
    <ItemName>
      <Item>image\合肥野生动物园\1.bmp</Item>
      <Item>image\合肥野生动物园\2.bmp</Item>
    </ItemName>
  </Shop>
  <Shop>
    <Name>徐大妈卤菜店</Name>
    <PicLocation>image\Shop\XFF.bmp</PicLocation>
    <Address>大东门商之都2楼</Address>
    <advPic>image\徐大妈卤菜店\0.bmp</advPic>
    <Class>4</Class>
    <ItemName>
      <Item>image\徐大妈卤菜店\1.bmp</Item>
    </ItemName>
  </Shop>
  <Shop>
    <Name>杨大叔烤鸭店</Name>
    <PicLocation>image\Shop\YY.bmp</PicLocation>
    <Address>三里街100号</Address>
    <advPic>image\杨大叔烤鸭店\0.bmp</advPic>
    <Class>4</Class>
    <ItemName>
      <Item>image\杨大叔烤鸭店\1.bmp</Item>
    </ItemName>
  </Shop>
  <Shop>
    <Name>肯德基</Name>
    <Address>大东门商之都一楼</Address>
    <PicLocation>image\Shop\KFC.bmp</PicLocation>
    <advPic>image\肯德基\0.bmp</advPic>
    <Class>1</Class>
    <ItemName>
      <Item>image\肯德基\1.bmp</Item>
      <Item>image\肯德基\15.bmp</Item>
      <Item>image\肯德基\2.bmp</Item>
      <Item>image\肯德基\JCJTB.bmp</Item>
      <Item>image\肯德基\3.bmp</Item>
    </ItemName>
  </Shop>

</HuiKe>
创建一个xml数据提供器,使用XPath指定根节点
 <Window.Resources>
        <ObjectDataProvider ObjectType="{x:Type data:SchoolDomain}"
                       MethodName="GetClassroomDelay" x:Key="classData"  IsAsynchronous="True"></ObjectDataProvider>
        <XmlDataProvider Source="shop.xml" XPath="/HuiKe" x:Key="xmlData"  IsAsynchronous="True"></XmlDataProvider>
    </Window.Resources>
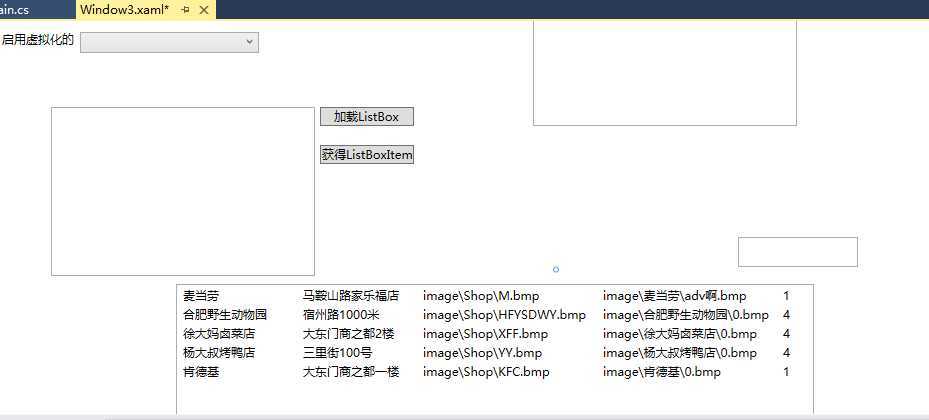
接下来,我们创建一个新的listbox,并指定那个xml,对象使用Path指定数据,xml使用XPath绑定数据
<ListBox x:Name="lbxmlData" Height="169" Margin="216,349,338,151" ItemsSource="{Binding Source={StaticResource xmlData},XPath=Shop}">
OK,接下来我们使用 数据模板 DataTemplate简单使用下,定义每个listboxItem怎么显示数据
 <ListBox x:Name="lbxmlData" Height="169"  Margin="216,349,338,151" ItemsSource="{Binding Source={StaticResource xmlData},XPath=Shop}">
            <ListBox.ItemTemplate>
                <DataTemplate>
                    <Grid>
                        <Grid.ColumnDefinitions>
                            <ColumnDefinition Width="120"/>
                            <ColumnDefinition Width="120"/>
                            <ColumnDefinition Width="180"/>
                            <ColumnDefinition Width="180"/>
                            <ColumnDefinition Width="30"/>
                        </Grid.ColumnDefinitions>
                        <TextBlock Text="{Binding XPath=Name}" Grid.Column="0"/>
                        <TextBlock Text="{Binding  XPath=Address}" Grid.Column="1"/>
                        <TextBlock Text="{Binding  XPath=PicLocation}" Grid.Column="2"/>
                        <TextBlock Text="{Binding  XPath=advPic}" Grid.Column="3"/>
                        <TextBlock Text="{Binding  XPath=Class}" Grid.Column="4"/>
                    </Grid>
                </DataTemplate>
            </ListBox.ItemTemplate>
        </ListBox>
OK,此时你已经发现写代码的时候数据已经显示上去了,所以很适合做前端静态演示用
WPF4.5验证
常见的点提交后台验证逻辑,那是winform常用的做法。也可以属性中set时候加判断,但是做法都没有wpf自带的好,因为wpf的验证是可以错误通知的
下面假如我们使用属性中的set抛出异常,怎样可以让wpf在界面上显示错误的样子,默认wpf是红色边框
第一步:增加Aaronyang.cs类
 public class Aaronyang : INotifyPropertyChanged
    {

        public event PropertyChangedEventHandler PropertyChanged;
        public void OnPropertyChanged(PropertyChangedEventArgs e)
        {
            if (PropertyChanged != null)
            {
                PropertyChanged(this, e);
            }
        }
        private string chineseName;
        public string ChineseName
        {
            get { return chineseName; }
            set { chineseName = value; }
        }


        private int age;
        public int Age
        {
            get { return age; }
            set {
                if (value > 100)
                {
                    throw new ArgumentException("年龄不要超过100岁");
                }
                else {
                    age = value;
                    OnPropertyChanged(new PropertyChangedEventArgs("Age"));
                }
            }
        }
    }
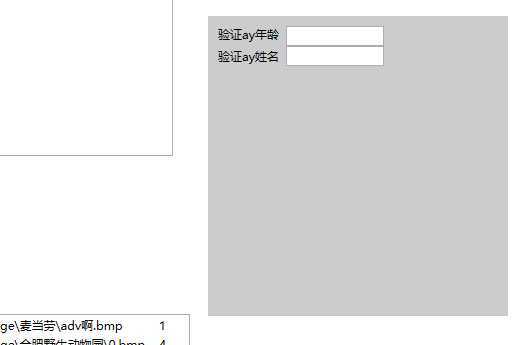
前台增加一个简单的表单:
   <Canvas  Margin="872,51,20,318" Width="300" Height="300" Background="#ccc" x:Name="canvasValidation">
            <TextBox Width="98" Height="20" Canvas.Left="78" Canvas.Top="10" >
                <TextBox.Text>
                    <Binding Path="Age">
                        <Binding.ValidationRules>
                            <ExceptionValidationRule></ExceptionValidationRule>
                        </Binding.ValidationRules>
                    </Binding>
                </TextBox.Text>
            </TextBox>
            <TextBlock HorizontalAlignment="Left" TextWrapping="Wrap" Text="验证ay年龄" VerticalAlignment="Top" Height="19" Width="63" Canvas.Left="10" Canvas.Top="11"/>
            <TextBox Width="98" Height="20" Canvas.Left="78" Canvas.Top="30" >
                <TextBox.Text>
                    <Binding Path="ChineseName">
                        <Binding.ValidationRules>
                            <ExceptionValidationRule></ExceptionValidationRule>
                        </Binding.ValidationRules>
                    </Binding>
                </TextBox.Text>
            </TextBox>
            <TextBlock HorizontalAlignment="Left" TextWrapping="Wrap" Text="验证ay姓名" VerticalAlignment="Top" Height="19" Width="63" Canvas.Left="10" Canvas.Top="33"/>
        </Canvas>
大致样子:
后台绑定canvas的datacontext
 private void Window_Loaded(object sender, RoutedEventArgs e)
        {

            //for (int i = 0; i < 100000; i++)
            //{
            //    virtualCbo.Items.Add(i.ToString());
            //}


            Aaronyang ay = new Aaronyang();
            ay.ChineseName = "杨洋";
            ay.Age = 24;
            canvasValidation.DataContext = ay;
        }
由于前台使用了ExceptionValidationRule的异常验证规则,当然也可以自定义,这里后面说
运行项目时候,我们输入不符合的数据,焦点离开文本框时候,就开始验证了,不符合,显示了红色边框,这是wpf自带的样式,也可以修改
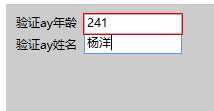
WPF4.5移植了silverlight的INotifyDataErrorInfo和IDataErrorInfo,允许你构建报告错误的对象而不会抛出异常。
接下来我们使用INotifyDataErrorInfo来检测Aaronyang对象存在的问题;IDataErrorInfo是初始的错误跟踪接口,可以追溯到以一个.NET版本。
我们修改Aaronyang类,实现INotifyDataErrorInfo接口,右键实现接口,默认会有3个方法,更上节课说的属性通知很像
这里就不用死记硬背了,我已经写好了一个错误通知的模板
 private Dictionary<string, List<string>> errors = new Dictionary<string, List<string>>();

        private void SetErrors(string propertyName, List<string> propertyErrors)
        {
            errors.Remove(propertyName);
            errors.Add(propertyName, propertyErrors);
            if (ErrorsChanged != null)
            {
                ErrorsChanged(this, new DataErrorsChangedEventArgs(propertyName));
            }
        }
        private void ClearErrors(string propertyName)
        {
            errors.Remove(propertyName);
            if (ErrorsChanged != null)
            {
                ErrorsChanged(this, new DataErrorsChangedEventArgs(propertyName));
            }
        }


        public event EventHandler<DataErrorsChangedEventArgs> ErrorsChanged;

        public System.Collections.IEnumerable GetErrors(string propertyName)
        {
            if (string.IsNullOrEmpty(propertyName))
            {
                return (errors.Values);//返回所有错误
            }
            else
            {
                if (errors.ContainsKey(propertyName))
                {
                    return errors[propertyName];
                }
                else
                {
                    return null;
                }
            }
        }

        public bool HasErrors
        {
            get { return errors.Count > 0; }
        }
更属性通知一个用法,在属性set的时候使用
我们修改年龄Age属性
  public int Age
        {
            get { return age; }
            set
            {
                if (value == 0)
                {
                    List<string> errors = new List<string>();
                    errors.Add("年龄需要大于0岁");
                    SetErrors("Age", errors);
                }
                else if (value > 100)
                {
                    List<string> errors = new List<string>();
                    errors.Add("年龄必须小于100岁");
                    SetErrors("Age", errors);
                }
                else
                {
                    age = value;
                    OnPropertyChanged(new PropertyChangedEventArgs("Age"));
                }
            }
        }
通过这一步,你大致已经知道了怎么用了,通过SetErrors加入指定属性,跟它的错误列表
回到前台页面,我们增加一个新的验证方式,由于INotifyDataErrorInfo作用的绑定的 Mode必须是TwoWay或者OneWayToSource模式时候才能应用验证。这个说法也是应该的,因为绑定的属性的Age,界面的Age变了,才能作用到源,也就是对象的Age,这样才能触发验证的代码,所以Mode的前提是必须的。
  <TextBox Width="98" Height="20" Canvas.Left="116" Canvas.Top="10" >
                <TextBox.Text>
                    <Binding Path="Age" Mode="TwoWay" ValidatesOnNotifyDataErrors="True" NotifyOnValidationError="True">
                    </Binding>
                </TextBox.Text>
            </TextBox>
运行项目,效果大致如下:
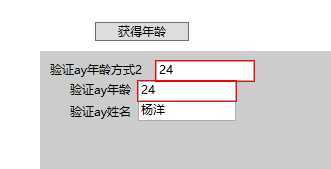
获得年龄
MessageBox.Show(((Aaronyang)(canvasValidation.DataContext)).Age.ToString());
我输入了241,鼠标离开后,文本框被wpf又还原成了24,因为241不符合规则,不能大约100岁,我们获得年龄时候,也还是24,只有填写正确时候,get年龄时候才是正确的。
关于 ValidatesOnNotifyDataErrors 默认就是等于True的,写出来,表明准备在标记中使用它。
如果和转换器一起用,先验证,后执行转换器
接下来,自定义验证规则,自定义一个AgeRule.cs
using System;
using System.Collections.Generic;
using System.Linq;
using System.Text;
using System.Windows.Controls;

namespace ControlStyleDemo
{
    public class AgeRule:ValidationRule
    {


        private int minAge;
        public int MinAge
        {
            get { return minAge; }
            set { minAge = value; }
        }

        private int maxAge;
        public int MaxAge
        {
            get { return maxAge; }
            set { maxAge = value; }
        }


        public override ValidationResult Validate(object value, System.Globalization.CultureInfo cultureInfo)
        {
            string a = value as string;
            if (a != null)
            {
                int age;
                if (int.TryParse(a,out age))
                {
                    if (age < minAge || age > maxAge)
                    {
                        return new ValidationResult(false, "年龄的范围必须在" + MinAge + "和" + MaxAge + "之间");
                    }
                    else {
                        return new ValidationResult(true, this);
                    }
                }
                else {
                    return new ValidationResult(false, "年龄必须输入是正整数");
                }
            }
            else {
                return new ValidationResult(true, this);
            }
        }
    }
}
使用方式,我们在前面已经使用过了别人定义好的ExceptionValidationRule了,我们只需要替换成我们的就可以了,data是我引入的命名空间 xmlns:data="clr-namespace:ControlStyleDemo",你的命名空间如果不一样,请自己更换
   <TextBox Width="98" Height="20" Canvas.Left="98" Canvas.Top="80" >
                <TextBox.Text>
                    <Binding Path="Age">
                        <Binding.ValidationRules>
                            <data:AgeRule MinAge="18" MaxAge="100"></data:AgeRule>
                        </Binding.ValidationRules>
                    </Binding>
                </TextBox.Text>
            </TextBox>
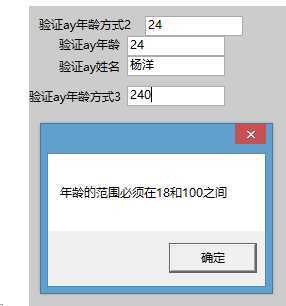
我们定义了这个方式的文本框,只能输入18-100之间的数字,否则会被描红的。
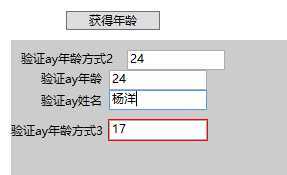
个人感觉自定义rule更有感觉,这样大家可以拓展一个验证类,使用正则就可以了,这里可以公开个正则表达式,或者直接rule定义了一些常用的正则表达式,也可以自定义表达式就OK了
让容器Canvas能够触发Error事件,如果容器内的元素的binding时候NotifyOnValidationError的属性等于true就行了
在这个例子的Canvas中, Validation.的时候,并没有Error,但可以写出来,然后光标置于Error="光标的为止",vs提示快捷键,新建事件即可
<Canvas Margin="872,51,20,318" Width="300" Height="300" Background="#ccc" x:Name="canvasValidation" Validation.Error="canvasValidation_Error">
我们修改刚刚自定义的AgeRule使用者的前台代码,增加 NotifyOnValidationError="True",这样由于事件冒泡就会到Canvas,触发Error事件,弹出自定义错误信息
 <TextBox Width="98" Height="20" Canvas.Left="98" Canvas.Top="80" >
                <TextBox.Text>
                    <Binding Path="Age" NotifyOnValidationError="True">
                        <Binding.ValidationRules>
                            <data:AgeRule MinAge="18" MaxAge="100"></data:AgeRule>
                        </Binding.ValidationRules>
                    </Binding>
                </TextBox.Text>
            </TextBox>
后台的错误弹出:
   private void canvasValidation_Error(object sender, ValidationErrorEventArgs e)
        {
            //新增错误 aaronyang
            if (e.Action == ValidationErrorEventAction.Added) {
                MessageBox.Show(e.Error.ErrorContent.ToString());//使用自定义验证规则输出validationRule返回的自定义信息
            }
        }
效果图:
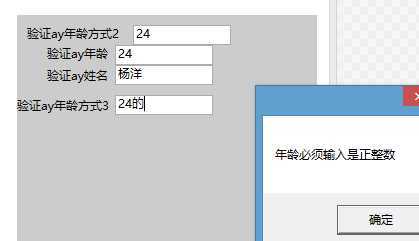
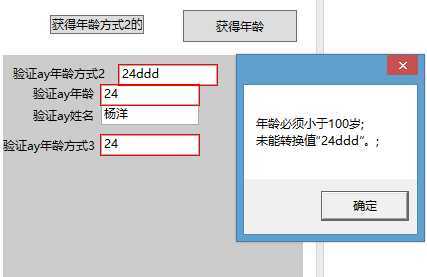
手动获得错误,现在我们取消Canvas的Error方法
<Button Content="获得年龄方式2的错误信息" HorizontalAlignment="Left" Margin="884,46,0,0" VerticalAlignment="Top" Width="152" x:Name="getAge2Info" Click="getAge2Info_Click" Height="49"/>
后台:
  private void getAge2Info_Click(object sender, RoutedEventArgs e)
        {
            if (Validation.GetHasError(this.txtAge2))
            {
                StringBuilder sb = new StringBuilder();
                foreach (ValidationError error in Validation.GetErrors(this.txtAge2))
                {
                    sb.AppendLine(error.ErrorContent.ToString() + ";");
                }
                MessageBox.Show(sb.ToString());
            }
            else {
                MessageBox.Show("没有错误信息!");
            }

        }
效果图:
 同理,我们获得方式3的错误信息
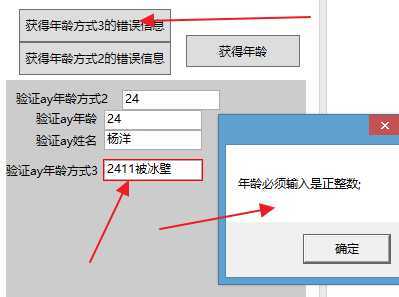
所以想看什么元素的错误,就传入那个元素就行了。
OK,讲了这么多的验证,我们先总结下:
第一:使用自带的属性SET抛出异常,前台捕捉到异常,描红
第二:我们可以自定义验证规则,替代刚开始的异常捕捉验证
第三:我们可以使用INotifyDataErrorInfo方式,增加异常,并实现了验证通知和还原非法值
第四:我们使用了Error方法,在容器的Error中捕获自定义错误信息
第五:我们自己手动指定元素,获得异常的信息
接下来,就是验证模板,我们到现在为止使用的都是Validation自带的ErrorTemplate,效果就是描红,但是你可能更喜欢更好看的验证错误时候提示的友好信息。那么肯定要拿到它为什么报错的错误信息,然后友好提示才行。
开始动手模板,我选择在样式里面设置textbox模板值:
        <Style TargetType="{x:Type TextBox}" x:Key="customValidate">
            <Setter Property="Validation.ErrorTemplate">
                <Setter.Value>
                    <ControlTemplate>
                        <DockPanel LastChildFill="True">
                            <TextBlock DockPanel.Dock="Right"
                      Foreground="Red" FontSize="14" FontWeight="Bold"
                        ToolTip="{Binding ElementName=adornerPlaceholder,
                        Path=AdornedElement.(Validation.Errors)[0].ErrorContent}"
                               >*</TextBlock>
                            <Border BorderBrush="Green" BorderThickness="1">
                                <AdornedElementPlaceholder Name="adornerPlaceholder"></AdornedElementPlaceholder>
                            </Border>
                        </DockPanel>
                    </ControlTemplate>
                </Setter.Value>
            </Setter>
            <Style.Triggers>
                <Trigger Property="Validation.HasError" Value="true">
                    <Setter Property="ToolTip"
                  Value="{Binding RelativeSource={RelativeSource Self},
                        Path=(Validation.Errors)[0].ErrorContent}"/>
                </Trigger>
            </Style.Triggers>
        </Style>
我们重新建立一个文本框4,并应用这个样式,效果如下:
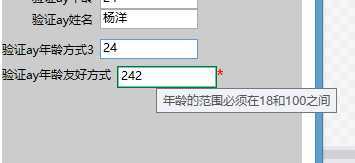
这里讲解下AdornedElementPlaceholder:
它是支持这种技术的粘合剂,代表控件本身,位于元素居中,他能在文本框的背后安排自己的内容,由于使用了Dock,*号固定在右边,左侧填充所有,所以AdornedElementPlaceholder在文本框填充的满满的
这里通过{Binding ElementName=adornerPlaceholder,Path=AdornedElement.(Validation.Errors)[0].ErrorContent}获得了错误信息
这里通过AdornedElementPlaceholder的AdornedElement属性提供了指向背后元素,在这个例子中,AdornedElement就是文本框,一旦错误以后,它的附加属性Validation.Errors就会有值,由于附加属性,就需要用括号括起来。每次只显示一个错误,所以[0],并通过ErrorContent属性拿到自定义信息。接着使用了触发器,动态绑定了ToolTip的错误信息提示。
=============潇洒的版权线==========www.ayjs.net============== AY ================= 安徽 六安 杨洋 ========== 未经允许不许转载 =========
接下来,我们讲一下本节课最后一个知识点:多个组合验证,比如选择日期,前一个日期不能大于后一个日期,后一个日期不能小于前一个日期。这里不用日期控件了会增加代码的复杂度,我们使用2个文本框加一个radio,分别绑定 证件类型和身份证文本框和护照文本框,如果选择的身份证类型,则身份证不能为空,其他的验证先省了,如果是护照,则护照文本框不能为空
我还在那个Canvas中写的,先定下大致布局
 <GroupBox x:Name="cardGroup" Canvas.Top="138" Header="证件">
                <StackPanel>
                    <StackPanel Orientation="Horizontal"  HorizontalAlignment="Left">
                        <Label>证件类型:</Label>
                        <Controls:AyRadioList CheckedRadioPath="Tag" CheckedRadioValue="{Binding CardType,BindingGroupName=bgcard}" VerticalAlignment="Center">
                            <RadioButton Tag="1">身份证</RadioButton>
                            <RadioButton Tag="2">护照</RadioButton>
                        </Controls:AyRadioList>
                    </StackPanel>
                    <StackPanel Orientation="Horizontal"  HorizontalAlignment="Right">
                        <Label>身份证号码:</Label>
                        <TextBox x:Name="icNum" Width="150" Text="{Binding IndentityCard,BindingGroupName=bgcard}">
                        </TextBox>
                    </StackPanel>
                    <StackPanel Orientation="Horizontal" HorizontalAlignment="Right">
                        <Label>护照号码:</Label>
                        <TextBox x:Name="psNum" Width="150" Text="{Binding PassportCard,BindingGroupName=bgcard}"></TextBox>
                    </StackPanel>
                </StackPanel>
效果图:这里我在后台Aaronyang类中拓展了3个属性PassportCard,IndentityCard,CardType,并在显示窗体前也赋值了,所以运行效果如下:
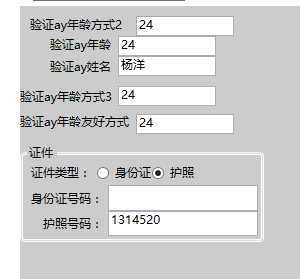
当然,你发现了我在textbox的binding中增加了BindingGroupName,声明一个组,当然,我这里还有更简单的办法,只要在上级的Stackpanel中声明一个BindingGroup就行了.
首先我新建一个多值验证的 rule,DuoCardRule.cs类
using System;
using System.Collections.Generic;
using System.Linq;
using System.Text;
using System.Windows.Controls;
using System.Windows.Data;

namespace ControlStyleDemo
{
    public class DuoCardRule : ValidationRule
    {

        public override ValidationResult Validate(object value, System.Globalization.CultureInfo cultureInfo)
        {

            BindingGroup bindingGroup = (BindingGroup)value;

            Aaronyang ay = (Aaronyang)bindingGroup.Items[0];

            int ct = (int)bindingGroup.GetValue(ay, "CardType");
            string ic = (string)bindingGroup.GetValue(ay, "IndentityCard"); //这里可以理解反射拿值那种思路
            string pc = (string)bindingGroup.GetValue(ay, "PassportCard");
            if (ct == 1 && string.IsNullOrEmpty(ic))
            {
                return new ValidationResult(false,
                       "身份证号码不能为空!");
            }
            else if (ct == 2 && string.IsNullOrEmpty(pc))
            {
                return new ValidationResult(false,
                       "护照号码不能为空!");
            }
            else
            {
                return new ValidationResult(true, null);
            }

        }
    }
}
接下来,前台绑定一个BindingGroup,在最外面的赋值的DataContext容器的BindingGroup
       <Canvas  Margin="871,100,21,269" Width="300" Height="300" Background="#ccc" x:Name="canvasValidation" >
            <Canvas.BindingGroup>
                <BindingGroup x:Name="bgcard">
                    <BindingGroup.ValidationRules>
                        <data:DuoCardRule></data:DuoCardRule>
                    </BindingGroup.ValidationRules>
                </BindingGroup>
            </Canvas.BindingGroup>
运行项目时候。。。。发现竟然没有任何作用。。我也不知道怎么回事了。。先写到这里吧
表示这篇文章,花了7个小时去写的 ,好累。。。www.ayjs.net 请转载的人手下留情。 博客园地址 aaronyang.cnblogs.com
[Aaronyang] 写给自己的WPF4.5 笔记6[三巴掌-大数据加载与WPF4.5 验证体系详解 2/3]
标签:
原文地址:http://www.cnblogs.com/AaronYang/p/4252518.html