标签:
最近想要学习了解orchard,但却没有找到相关的中文文档,只有英文文档。于是决定自行翻译,以便日后方便翻阅。
转载请注明原作者与出处。
本人英文水平有限,错误之处欢迎指出以便修正。
WebMatrix,微软的一站式web开发工具,让你创建、编辑、发布web站点时拥有前所未有的便捷。WebMatrix包括嵌入式的web服务(IIS Express),以及如同Orchard般简单易用的编辑器来自定义站点应用程序。当使用Web Platform Installer安装Orchard时,可以通过选项用WebMatrix替代IIS。
下载并运行Microsoft Web Platform Installer,点击Microsoft WebMatrix的Add按钮后点击Install。

当安装完成时接受许可协议后运行WebMatrix。
要使用WebMatrix创建基于Orchard的web站点,在WebMatrix的启动页面中点击App Gallery。

向下拖动滚动条找到并选择Orchard CMS,为你的站点所使用的文件夹输入名称(译者注:图中Site Name处) 。举例来说,如果输入的站点名称是"Orchard CMS",将会创建文件夹"Documents/My Websites/Orchard CMS"。点击Next继续下一步。

点击I Accept来接受最终用户许可协议。

一个新的子文件夹,"Orchard CMS"将会被添加到"My Websites"文件夹下。点击OK。你的Orchard站点将会在Web Matrix Your Orchard中打开并且"Orchard Setup"页面将会在新的浏览器窗口中启动。

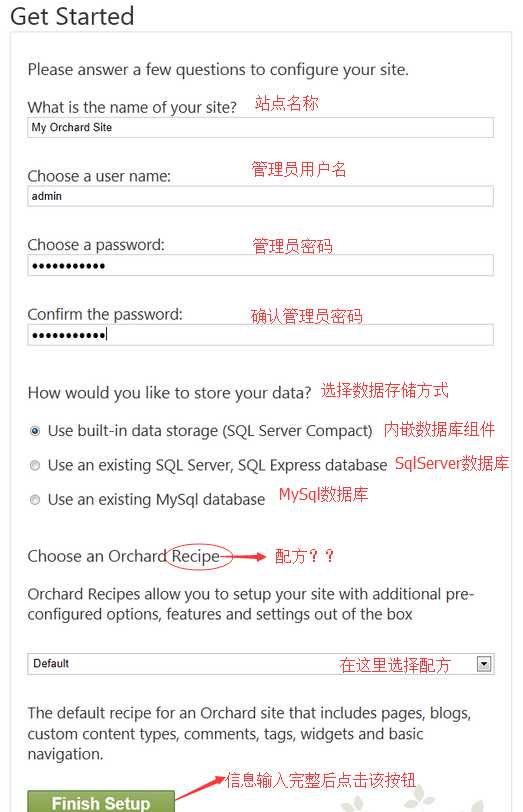
在Orchard安装页面关于站点的输入基本信息。必须明确之处:站点名称,用户密码,站点数据库类型,Orchard配方。
如果你仅仅是想要尽快使用Orchard,我们建议你选择SQL Compact Server数据库类型并使用Default配方(recip)。输入所有必备信息后点击Finish Setup。

点击按钮后,Orchard会在站点初始化完成后在浏览器窗口中打开站点首页。你将会自动使用刚刚设置的用户信息登陆(刚刚设置的是admin用户)。在该处,点击Dashboard将会带你进入Orchard Dashboard页面,在那里可以改变一些站点配置。

At any point in time, you can run your website from WebMatrix by selecting the project node and clicking Run.

You can use WebMatrix to edit the files in your Orchard installation. WebMatrix provides a simple editor that includes colorization for HTML, CSS, JavaScript, and code files.
Although WebMatrix does not provide a build system for compiling code files, Orchard itself provides dynamic compilation for code files when they are edited. For more information, see Orchard Dynamic Compilation.

You can change the editor WebMatrix uses by following these instructions.
As an example, you may find it helpful to use the XML editor (which provides colorization) on the placement.info file. To do this you must change the setting for .info files in the WebMatrix filefiletypes.xml (which can be found in the following locations):
32-bit machines: C:\Program Files\Microsoft WebMatrix\config\filetypes.xml
64-bit machines: C:\Program Files (x86)\Microsoft WebMatrix\config\filetypes.xml
1) Add the .info file extension to the list of XML file types:
<FileType extension=".info;.config;.csproj;.vbproj;.resx;.settings;.sitemap;.user;.wsdl;.browser;.xaml;.xml;.xoml;.xsd;.xsl;.xslt;.mxml;.dbml;.wstemplate">
    <OpenAs>XML</OpenAs>
    <TabColor>Yellow</TabColor>
    <Icon>XMLFileIcon</Icon>
    <EmitUtf8BomByDefault>True</EmitUtf8BomByDefault>
    <Description>An XML File</Description>
</FileType>
2) Remove the .info file extension from the list of Text file types:
<FileType extension=".ashx;.export;.po;.blogtemplate;.yml;.yaml;.manifest;.pl;.json;.csv">
    <OpenAs>Text</OpenAs>
    <TabColor>Gray</TabColor>
    <Icon>DefaultFileIcon</Icon>
    <EmitUtf8BomByDefault>False</EmitUtf8BomByDefault>
    <Description>Unknown file type</Description>
</FileType>
3) Restart WebMatrix to apply the change.
If you selected SQL Server Compact for the the database option in Orchard setup, you can open theOrchard.sdf database in WebMatrix by selecting Databases.

Once the database window is opened, you can view the contents of a table by selecting the table in the explorer pane.

(If you were already in the Databases workspace, you might need to right-click the Orchard node and then click Refresh in order to display the database and tables.)

When you‘re ready to upload the local copy of your website to the Internet, click the Publish button in the WebMatrix ribbon.

The first time you publish, the Publish Your Site dialog box is displayed.

To publish a website, you must have an account with a web hosting provider. If you don‘t have one yet, you can select either Get Started with Windows Azure or Find Windows Web Hosting. If you select Windows Azure, you will have the option of creating your website as either an Azure Website or Azure Web Role. For instructions on working with Azure see ?????
After you‘ve set up an account with a hosting provider, the provider will typically send you an email with your user name, server name, and other information. To save you the extra step of entering this information manually, the provider might send you a "Profile XML" file (named with the.publishsettings extension) that contains this information. You can use these settings by selectingImport publish profile and then selecting the file provided by your hoster. Otherwise, you can enter the settings manually.

After you‘ve published your site, you might want to make changes to it and republish it. When you subsequently select Publish, WebMatrix will list the local files that have been changed since the last time the local site was published. At this point you can select which files you want to upload to the remote stie and select Continue or cancel.
Once you have published your website, you can view the files in the remote site by opening theRemote View.

More information about using WebMatrix to publish websites can be found here.
Orchard官方文档翻译(四) 让Orchard在WebMatrix下工作
标签:
原文地址:http://www.cnblogs.com/windzhao/p/4269198.html