标签:
Appwidget就是手机应用中常常放在桌面(即home)上的一些应用程序,比如说闹钟等。这种应用程序的特点是它上面显示的内容能够根据系统内部的数据进行更新,不需要我们进入到程序的内部去,比如说闹钟指针的摆动等。本节内容就简单的介绍下实现这种功能所用到的appwidget技术,通过3个例子由浅入深来学会使用它。参考资料是mars的教程。
实验基础:
自己实现一个AppWidget的步骤如下:
1. 在src目录下新建一个名为xml的文件夹,在该文件夹下新建一个xml文件,该xml文件的根标签为appwidget-provider. 该xml文件主要是对所建立的appwidget的一个属性设置,其中比较常见的属性有appwidget更新的时间,其初始的布局文件等等。
2. 在src下的layout文件夹下新建一个xml文件夹,然后在xml文件夹新建一个布局文件,该布局文件就是第一步中需要加载的appwidget初始化时所需的布局文件,因此该xml文件的根标签为与layout有关,比如说LinearLayout类型等。
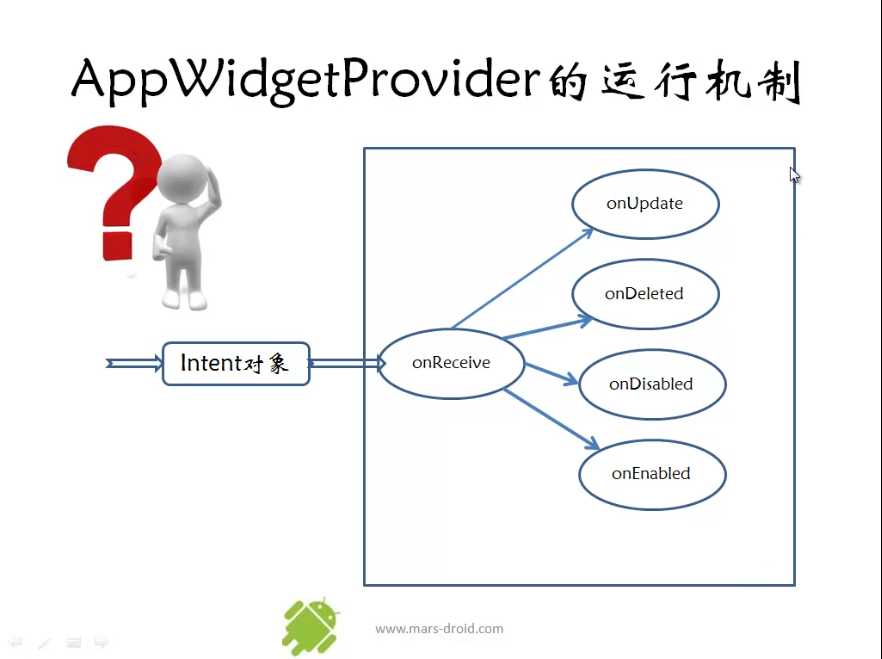
3. 在src的包目录下新建一个java文件,该文件为实现所需建立的appwidget全部功能,其中比较重要的功能是接收广播消息来更新appwidget的内容。该java文件时一个类,继承AppWidgetProvider这个类,复写其中的onDeleted,onDisabled,onEnabled,onReceive,onUpdate等方法。其中几个方法都是与AppWidgetProvider的生命周期有关的。其中onDeleted()方法是当appwidget删除时被执行,onDisabled()是当最后一个appwidget被删除时执行,onEnabled()为当第一个appwidget被建立时执行,onReceive()为当接收到了相应的广播信息后被执行(在每次添加或者删除appwidget时都会执行,且在其它方法执行的前面该方法也会被执行,其实本质上该方法不是AppWidgetProvider这个类的生命周期函数);onUpdate()为到达了appwidget的更新时间或者一个appwidget被建立时执行。
在android4.1模拟器中,在桌面上添加一个appwidget的方法是在WIDGETS栏目(和APPS栏目并列)中选中所需要添加的appwidget,并按住鼠标不动,一会儿会出现手机桌面空白处,放在自己想放的位置即可。在该模拟器中删除一个appwidge的方法是选中该appwidget一会儿,然后向屏幕上方拖动,屏幕上方会出现XRemove字样,放进去即可。
appwidget中本身里面就有一个程序(有个activity),但是我们在桌面上添加一个appwidget后也相当于一个程序,这2个程序本身不是在同一个进程当中,而是在各自单独的进程中。
例一:
实验说明:
这个例子实现一个最简单的appwidget,即我们的appwidget只有一个按钮,按钮上面写着“我的常用密码字样”,没有其它功能,呵呵。然后我们在appwidget的java类的程序中,每个生命周期函数都在后台打印出一句话,内容是与该生命周期函数名相对应的。
实验结果:
往桌面添加自己创建的一个appwidget效果如下所示:
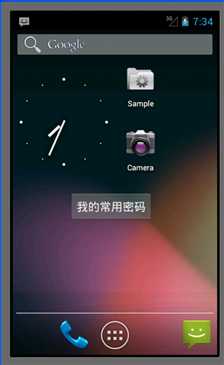
该实验室先后在桌面上放2个appwidget,然后依次删除2个appwidget,则程序后台的输出结果如下所示:

实验主要代码及注释(附录有实验工程code下载链接):
MainActivity.java不用更改任何代码,采用默认的就行了,这里就不贴出来了。
my_passward_provider.java(Appwidget功能实现):
package com.example.appwidget1;

import android.appwidget.AppWidgetManager;
import android.appwidget.AppWidgetProvider;
import android.content.Context;
import android.content.Intent;

public class my_password_provider extends AppWidgetProvider {

    @Override
    public void onDeleted(Context context, int[] appWidgetIds) {
        // TODO Auto-generated method stub
        System.out.println("appwidget--->onDeleted()");
        super.onDeleted(context, appWidgetIds);
    }

    @Override
    public void onDisabled(Context context) {
        // TODO Auto-generated method stub
        System.out.println("appwidget--->onDisabled()");
        super.onDisabled(context);
    }

    @Override
    public void onEnabled(Context context) {
        // TODO Auto-generated method stub
        System.out.println("appwidget--->onEnabled()");
        super.onEnabled(context);
    }

    @Override
    public void onReceive(Context context, Intent intent) {
        // TODO Auto-generated method stub
        System.out.println("appwidget--->onReceive()");
        super.onReceive(context, intent);
    }

    @Override
    public void onUpdate(Context context, AppWidgetManager appWidgetManager,
            int[] appWidgetIds) {
        // TODO Auto-generated method stub
        System.out.println("appwidget--->onUpdate()");
        super.onUpdate(context, appWidgetManager, appWidgetIds);
    }

}
the AppWidgetProvider receives the following method calls:

onUpdate()
This is called to update the App Widget at intervals defined by the updatePeriodMillis attribute in the AppWidgetProviderInfo (see Adding the AppWidgetProviderInfo Metadata above). This method is also called when the user adds the App Widget, so it should perform the essential setup, such as define event handlers for Views and start a temporary Service, if necessary. However, if you have declared a configuration Activity, this method is not called when the user adds the App Widget, but is called for the subsequent updates. It is the responsibility of the configuration Activity to perform the first update when configuration is done. (See Creating an App Widget Configuration Activity below.)

onAppWidgetOptionsChanged()
This is called when the widget is first placed and any time the widget is resized. You can use this callback to show or hide content based on the widget‘s size ranges. You get the size ranges by calling getAppWidgetOptions(), which returns a Bundle that includes the following:

OPTION_APPWIDGET_MIN_WIDTH—Contains the lower bound on the current width, in dp units, of a widget instance.
OPTION_APPWIDGET_MIN_HEIGHT—Contains the lower bound on the current height, in dp units, of a widget instance.
OPTION_APPWIDGET_MAX_WIDTH—Contains the upper bound on the current width, in dp units, of a widget instance.
OPTION_APPWIDGET_MAX_HEIGHT—Contains the upper bound on the current width, in dp units, of a widget instance.
This callback was introduced in API Level 16 (Android 4.1). If you implement this callback, make sure that your app doesn‘t depend on it since it won‘t be called on older devices.

onDeleted(Context, int[])
This is called every time an App Widget is deleted from the App Widget host.

onEnabled(Context)
This is called when an instance the App Widget is created for the first time. For example, if the user adds two instances of your App Widget, this is only called the first time. If you need to open a new database or perform other setup that only needs to occur once for all App Widget instances, then this is a good place to do it.

onDisabled(Context)
This is called when the last instance of your App Widget is deleted from the App Widget host. This is where you should clean up any work done in onEnabled(Context), such as delete a temporary database.

onReceive(Context, Intent)
This is called for every broadcast and before each of the above callback methods. You normally don‘t need to implement this method because the default AppWidgetProvider implementation filters all App Widget broadcasts and calls the above methods as appropriate.
The most important AppWidgetProvider callback is onUpdate() because it is called when each App Widget is added to a host (unless you use a configuration Activity). If your App Widget accepts any user interaction events, then you need to register the event handlers in this callback. If your App Widget doesn‘t create temporary files or databases, or perform other work that requires clean-up, then onUpdate() may be the only callback method you need to define. For example, if you want an App Widget with a button that launches an Activity when clicked, you could use the following implementation of AppWidgetProvider:
res/xml/my_password.xml:
<?xml version="1.0" encoding="utf-8"?>
<appwidget-provider xmlns:android="http://schemas.android.com/apk/res/android"
    android:minWidth="200dp"
    android:minHeight="100dp"
    android:updatePeriodMillis="600000"
    android:initialLayout="@layout/my_password_initillayout"
    >
</appwidget-provider>
res/layout/my_password_initilayout.xml:
<?xml version="1.0" encoding="utf-8"?>
<LinearLayout xmlns:android="http://schemas.android.com/apk/res/android"
    android:layout_width="match_parent"
    android:layout_height="match_parent"
    android:orientation="vertical" >
    <Button
        android:layout_width="wrap_content"
        android:layout_height="wrap_content"
        android:text="@string/my_appwidget"
        />

</LinearLayout>
例二:
该实验的目的主要是学会在appwidget中使用PendingIntent和RemoteViews这2个类,并最终对它们有一定的了解。
实验说明:
这个例子在上面的例子中多增加了一个功能,即当我们把appwidget添加到桌面上的时候(上面那个例子是个按钮),单击这个按钮,这个时候程序会从home界面跳转到其它activity界面。那么怎么实现监听appwidget上的按钮控件呢?这里实现该过程与在activity中的方法不同。在此之前,我们需要了解2个概念。
PendingIntent:
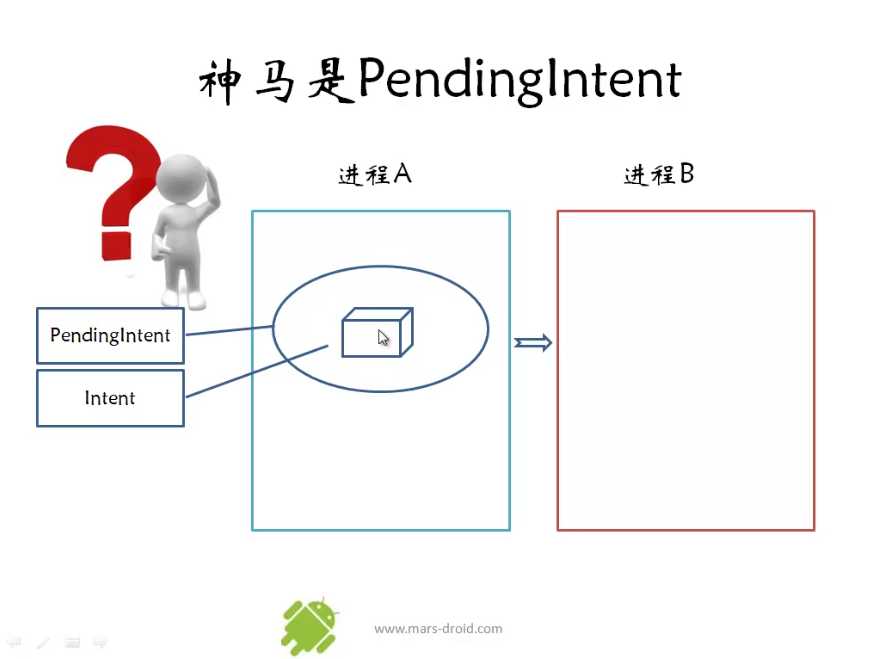
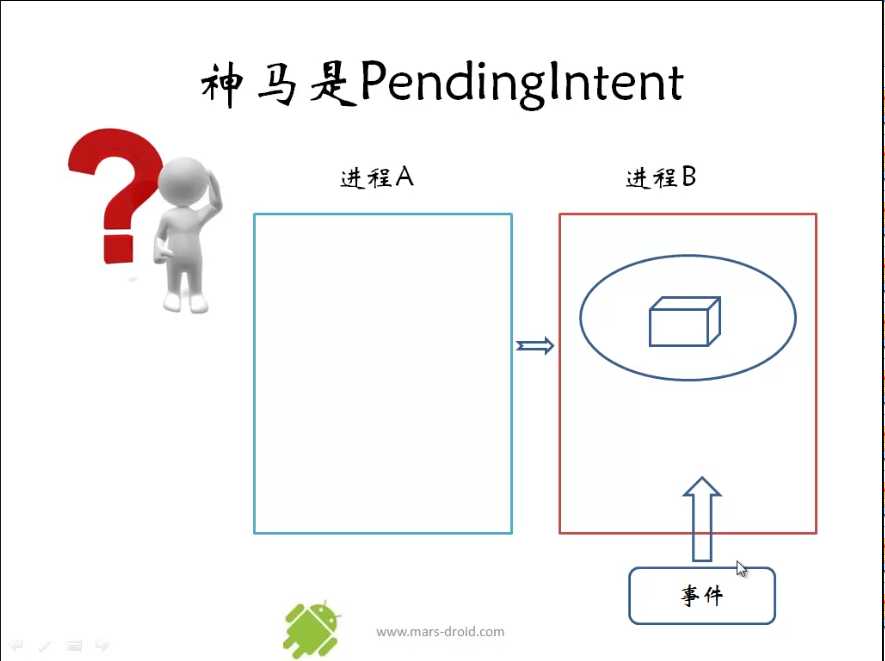
PendingIntent与以前我们的Intent不同,以前我们新建一个intent时,立刻就用它启动一个activity,或者启动一个service,亦或是发送一个broadcast。这里我们新建一个PendingIntent后,按照字面意思并不马上使用它,而是当我们需要使用它的时候再启动,比如说当某一事件需要响应时,我们这时候可以使用建立好了的PendingIntent了。一个PendingIntent中包含了一个intent。Mars老师把PendingIntent比作成三国中的“精囊妙计”,从下面mars老师的2张示意图中可以更深一步了解PendingIntent。
建立PendingIntent示意图:
响应PendingIntent示意图:
RemoteViews:
RemoteView代表了与调用它的那个activity不在同一个进程的view,因此叫做”远程view”。在appWidget中使用这个类就可以实现当对appwidget的那个进程进行操作时响应其它进程中的activity。而RemoteViews则表示了一系列的RemoteView。
实验结果与例一一样,只不过是在单击appwidget上的按钮时,会自动跳转到相应的activity上。这里就不截图看效果了。
实验主要部分及代码(附录有实验工程code下载链接):
其它部分与例一都差不多,只不过是在appwidget生命周期的onUpdate()函数不同,下面是对应其文件的java代码:
package com.example.appwidget1;

import android.app.PendingIntent;
import android.appwidget.AppWidgetManager;
import android.appwidget.AppWidgetProvider;
import android.content.Context;
import android.content.Intent;
import android.widget.RemoteViews;

public class my_password_provider extends AppWidgetProvider {

    @Override
    public void onDeleted(Context context, int[] appWidgetIds) {
        // TODO Auto-generated method stub
        System.out.println("appwidget--->onDeleted()");
        super.onDeleted(context, appWidgetIds);
    }

    @Override
    public void onDisabled(Context context) {
        // TODO Auto-generated method stub
        System.out.println("appwidget--->onDisabled()");
        super.onDisabled(context);
    }

    @Override
    public void onEnabled(Context context) {
        // TODO Auto-generated method stub
        System.out.println("appwidget--->onEnabled()");
        super.onEnabled(context);
    }

    @Override
    public void onReceive(Context context, Intent intent) {
        // TODO Auto-generated method stub
        System.out.println("appwidget--->onReceive()");
        super.onReceive(context, intent);
    }

    @Override
    public void onUpdate(Context context, AppWidgetManager appWidgetManager,
            int[] appWidgetIds) {
        // TODO Auto-generated method stub
    //    System.out.println("appwidget--->onUpdate()");
        for(int i = 0; i < appWidgetIds.length; i++)
        {
            System.out.println(appWidgetIds[i]);
            //该构造函数之间把跳转的2个activity给联系起来了
            Intent intent =  new Intent(context, MyPasswordActivity.class);
            //创建一个PendingIntent
            PendingIntent pendint_intent = PendingIntent.getActivity(context, 0, intent, 0);
            //创建一个remoteview对象,第2个参数为appwidget的初始布局文件
            RemoteViews remote_views = new RemoteViews(context.getPackageName(), R.layout.my_password_initillayout);
            //为RemoteViews中的button按钮添加监听器,第二个参数为PendingIntent类型,当事件触发时才执行
            remote_views.setOnClickPendingIntent(R.id.my_password, pendint_intent);
            //更新appwidget
            appWidgetManager.updateAppWidget(appWidgetIds[i], remote_views);
        }
        super.onUpdate(context, appWidgetManager, appWidgetIds);
    }

}
例三:
实验说明:
这个例子在例二的基础上增加一些功能,即利用appwidget的onUpdate()方法中发送广播信息,然后在onReceive()方法中来接收广播消息,从而来更改appwidget的外观,这里是更改它的图片和文本显示。
这个例子不像上面那样采用getActivity来创建PendingI,而是采用的getBroadcast,因为这里需要的是发送广播信息,而不是跳转到另一个activity。
同样的,需要啊manifest.xml文件中队appwidget这个类来注册它的接收器,action过滤时采用的是自己定义的action,名字可以自己随便取,保证不和系统提供的action名字相同即可,该程序中采用的是"my.action.APPWIDGET_UPDATE"这个名字。
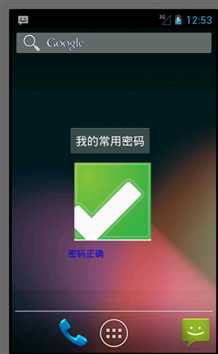
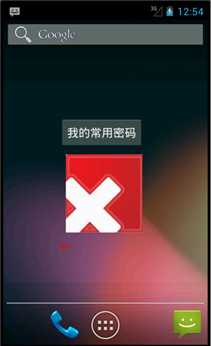
Appwidget中有1个按钮,一个ImageView,一个TextView。程序实现的是这么一个功能:appwidget在桌面被创建时,imageview和textview都有各自的内容,当按钮按下时,这2个控件的内容都会发生变化,这种变化都是通过RemotViews的方法实现的。其中imageview是用的setImageViewResource()函数,textview是用的setTextViewText()函数。
从上面的解释可以看到,为什么在同一个类(这里指继承AppWidgetProvide的那个类)中,从onUpdate()函数发送出去的广播能够在onReceiver()函数里接收呢?这是因为AppWidgetProvider的其它4个生命周期函数的执行都是由onReceiver分发下去的。由mars老师提供的这张示意图可以看出它们之间的关系:
实验结果:
桌面上创建appwidget时显示如下:
单击按钮后,显示如下:
实验主要部分代码即注释(附录有实验工程code下载链接):
AndriodManifest.xml:
<manifest xmlns:android="http://schemas.android.com/apk/res/android"
    package="com.example.appwidget1"
    android:versionCode="1"
    android:versionName="1.0" >

    <uses-sdk
        android:minSdkVersion="8"
        android:targetSdkVersion="15" />

    <application
        android:icon="@drawable/ic_launcher"
        android:label="@string/app_name"
        android:theme="@style/AppTheme" >
        <activity
            android:name=".MainActivity"
            android:label="@string/title_activity_main" >
            <intent-filter>
                <action android:name="android.intent.action.MAIN" />

                <category android:name="android.intent.category.LAUNCHER" />
            </intent-filter>
        </activity>
        <receiver android:name=".my_password_provider" >
            <intent-filter>
                <action android:name="android.appwidget.action.APPWIDGET_UPDATE" />
            </intent-filter>
            <intent-filter>
                <action android:name="my.action.APPWIDGET_UPDATE"/>
            </intent-filter>
            <meta-data
                android:name="android.appwidget.provider"
                android:resource="@xml/my_password" />
        </receiver>
        <activity
            android:name=".MyPasswordActivity"
            android:label="@string/title_activity_my_password" >
        </activity>
    </application>

</manifest>
my_password_provider.java(里面有appwidget的生命周期函数):
package com.example.appwidget1;

import android.app.PendingIntent;
import android.appwidget.AppWidgetManager;
import android.appwidget.AppWidgetProvider;
import android.content.ComponentName;
import android.content.Context;
import android.content.Intent;
import android.graphics.Color;
import android.widget.RemoteViews;

public class my_password_provider extends AppWidgetProvider {

    private static final String MY_ACTION = "my.action.APPWIDGET_UPDATE";
    @Override
    public void onDeleted(Context context, int[] appWidgetIds) {
        // TODO Auto-generated method stub
        System.out.println("appwidget--->onDeleted()");
        super.onDeleted(context, appWidgetIds);
    }

    @Override
    public void onDisabled(Context context) {
        // TODO Auto-generated method stub
        System.out.println("appwidget--->onDisabled()");
        super.onDisabled(context);
    }

    @Override
    public void onEnabled(Context context) {
        // TODO Auto-generated method stub
        System.out.println("appwidget--->onEnabled()");
        super.onEnabled(context);
    }

    @Override
    public void onReceive(Context context, Intent intent) {
        String action = intent.getAction();
        if(MY_ACTION.equals(action))
        {
            RemoteViews remote_views = new RemoteViews(context.getPackageName(), R.layout.my_password_initillayout);
            //更改appwidget界面中的图片
            remote_views.setImageViewResource(R.id.my_image, R.drawable.no);
            //更改appwidget界面中textview中的文字内容
            remote_views.setTextViewText(R.id.my_text, "no");
            remote_views.setTextColor(R.id.my_text, Color.RED);
            //获得本context的AppWidgetManager
            AppWidgetManager appwidget_manager = AppWidgetManager.getInstance(context);
            //新建一个ComponentName,该ComponentName指的是针对appwidget整体而言的;而RemoteViews是针对appwidget
            //中各个部件之和而言的,这两者有些区别
            ComponentName component_name = new ComponentName(context, my_password_provider.class);
            //上面2句代码是为下面更新appwidget做准备的
            appwidget_manager.updateAppWidget(component_name, remote_views);
        }
        else
            super.onReceive(context, intent);
    }

    @Override
    public void onUpdate(Context context, AppWidgetManager appWidgetManager,
            int[] appWidgetIds) {
        // TODO Auto-generated method stub
        Intent intent = new Intent();
        intent.setAction(MY_ACTION);
        //以发送广播消息的方式创建PendingIntent.
        PendingIntent pending_intent = PendingIntent.getBroadcast(context, 0, intent, 0);
        //创建一个remoteviews,其布局文件为appwidget的初始布局文件
        RemoteViews remote_views = new RemoteViews(context.getPackageName(), R.layout.my_password_initillayout);
        //为按钮添加监听器
        remote_views.setOnClickPendingIntent(R.id.my_password, pending_intent);
        //更新appwidget
        appWidgetManager.updateAppWidget(appWidgetIds, remote_views);

        super.onUpdate(context, appWidgetManager, appWidgetIds);
    }

}
res/layout/my_password_initillayout.xml(appwidget的布局文件):
<?xml version="1.0" encoding="utf-8"?>
<LinearLayout xmlns:android="http://schemas.android.com/apk/res/android"
    android:layout_width="match_parent"
    android:layout_height="match_parent"
    android:orientation="vertical" >

    <Button
        android:id="@+id/my_password"
        android:layout_width="wrap_content"
        android:layout_height="wrap_content"
        android:text="@string/my_appwidget" />

    <ImageView
        android:id="@+id/my_image"
        android:layout_width="wrap_content"
        android:layout_height="wrap_content"
        android:layout_margin="10dip"
        android:src="@drawable/yes"
         />
    <TextView
        android:id="@+id/my_text"
        android:layout_width="wrap_content"
        android:layout_height="wrap_content"
        android:text="@string/yes"
        android:textColor="#0000ff"
        />

</LinearLayout>
Res/xml/my_password.xml(appwidget的属性设置xml文件):
<?xml version="1.0" encoding="utf-8"?>
<LinearLayout xmlns:android="http://schemas.android.com/apk/res/android"
    android:layout_width="match_parent"
    android:layout_height="match_parent"
    android:orientation="vertical" >

    <Button
        android:id="@+id/my_password"
        android:layout_width="wrap_content"
        android:layout_height="wrap_content"
        android:text="@string/my_appwidget" />

    <ImageView
        android:id="@+id/my_image"
        android:layout_width="wrap_content"
        android:layout_height="wrap_content"
        android:layout_margin="10dip"
        android:src="@drawable/yes"
         />
    <TextView
        android:id="@+id/my_text"
        android:layout_width="wrap_content"
        android:layout_height="wrap_content"
        android:text="@string/yes"
        android:textColor="#0000ff"
        />

</LinearLayout>
总结:通过这几个例子,可以初步了解创建一个appwidget的整个流程,并且学会了简单的是appwidget和其它的进程间进行通信。
参考资料:
http://www.mars-droid.com/bbs/forum.php
附录:
作者:tornadomeet 出处:http://www.cnblogs.com/tornadomeet 欢迎转载或分享,但请务必声明文章出处。 (新浪微博:tornadomeet,欢迎交流!)
标签:
原文地址:http://www.cnblogs.com/icgq/p/4270042.html