标签:
The Tree Panel Component is one of the most versatile Components in Ext JS and is an excellent tool for displaying heirarchical data in an application. Tree Panel extends from the same class as Grid Panel, so all of the benefits of Grid Panels - features, extensions, and plugins can also be used on Tree Panels. Things like columns, column resizing, dragging and dropping, renderers, sorting and filtering can be expected to work similarly for both components.
树面板组件是在 ExtJS 里面最多彩缤纷的组件之一,用于显示层次状明显的数据来说十分适合。树面板跟 Grid 都是来自同一个基类的,之所以这样的设计,是为了那些扩展或者插件统统都可以复用一致的功能。比如多列、尺寸控制、拖放、渲染和筛选这些功能都是两者共性的内容。
Let‘s start by creating a very simple Tree.
让我们开始创建一个颗非常简单的树。
Ext.create(‘Ext.tree.Panel‘, {
    renderTo: Ext.getBody(),
    title: ‘Simple Tree‘,
    width: 150,
    height: 150,
    root: {
        text: ‘Root‘,
        expanded: true,
        children: [
            {
                text: ‘Child 1‘,
                leaf: true
            },
            {
                text: ‘Child 2‘,
                leaf: true
            },
            {
                text: ‘Child 3‘,
                expanded: true,
                children: [
                    {
                        text: ‘Grandchild‘,
                        leaf: true
                    }
                ]
            }
        ]
    }
});
This Tree Panel renders itself to the document body. We defined a root node that is expanded by default. The root node has three children, the first two of which are leaf nodes which means they cannot have any children. The third node is not a leaf node and has has one child leaf node. The text property is used as the node‘s text label. See Simple Tree for a live demo.
此树面板渲染到 document.body 元素上。我们把定义的根节点(The Root Node)自动扩张开来,这是默认的情况。根节点有三个子节点 ,其中前两个是 leaf 节点,表示他们下面没有任何子节点(children)了(终结了)。第三个节点是一个叶子节点,已经有一个 child 的叶节点(one child leaf node)。 text 属性是节点的显示的文本。可打开例子看看效果如何。
Internally a Tree Panel stores its data in a TreeStore. The above example uses the root config as a shortcut for configuring a store. If we were to configure the store separately, the code would look something like this:
树面板的数据存储在 TreeStore。上面的例子看不见 Store 配置的地方不是没有 Store,而是使用内部缺省的。如果我们要另外配置不同的 Store,应该看起来像这样:
var store = Ext.create(‘Ext.data.TreeStore‘, {
    root: {
        text: ‘Root‘,
        expanded: true,
        children: [
            {
                text: ‘Child 1‘,
                leaf: true
            },
            {
                text: ‘Child 2‘,
                leaf: true
            },
            ...
        ]
    }
});

Ext.create(‘Ext.tree.Panel‘, {
    title: ‘Simple Tree‘,
    store: store,
    ...
});
For more on Stores see the Data Guide.
参阅《DataGuide》以了解更多 Store 内容。
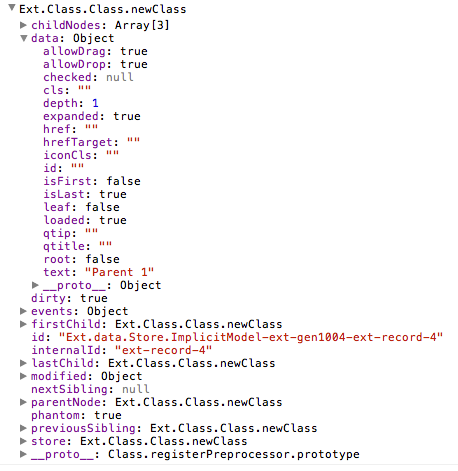
In the above examples we set a couple of different properties on tree nodes. But what are nodes exactly? As mentioned before, the Tree Panel is bound to a TreeStore. A Store in Ext JS manages a collection of Model instances. Tree nodes are simply Model instances that are decorated with a NodeInterface. Decorating a Model with a NodeInterface gives the Model the fields, methods and properties that are required for it to be used in a tree. The following is a screenshot that shows the structure of a node in the developer tools.
从上面的例子我们可以看到关于树节点其下的许多属性。那么真正的节点究竟为何物?前面已提到过,树面板绑定到 TreeStore。而 ExtJS 中的 Store 是负责管理 Model 实例的集合。树节点只是 Model 实例通过 NodeInterface 的装饰接口。用 NodeInterface 装饰 Model 的好处是赋予了 Model 在树控件的状态下,有新的方法与属性。以下的截图显示了在开发工具节点其结构如何。
In order to see the full set of fields, methods and properties available on nodes, see the API documentation for the NodeInterface class.
要全面了解一下节点的属性、方法、事件,应参阅 API 文档。
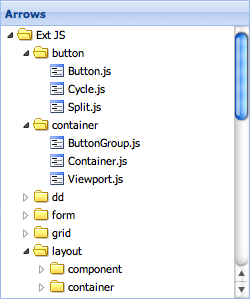
Let‘s try something simple. When you set the useArrows configuration to true, the Tree Panel hides the lines and uses arrows as expand and collapse icons.
让我们试试简单的。在你设置 useArrows 配置项为 true 的时候,树面板会隐藏旁边的线条,而采用图标箭头表示展开和折叠。
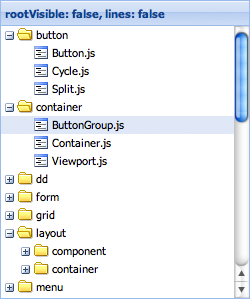
Setting the rootVisible property to false visually removes the root node. By doing this, the root node will automatically be expanded. The following image shows the same tree with rootVisible set to false and lines set to false.
设置根节点的 rootVisible 可决定根节点显示与否。通过这样做的话,一般就是根节点会自动扩大。下面的图片显示,rootVisible 设置为 false,并设置 lines 为 false 的时候看不见线的树。
Since Tree Panel extends from the same base class as Grid Panel adding more columns is very easy to do.
鉴于树面板跟 Grid 面板来自同一个基类,所以构成多列是非常轻松的。
var tree = Ext.create(‘Ext.tree.Panel‘, {
    renderTo: Ext.getBody(),
    title: ‘TreeGrid‘,
    width: 300,
    height: 150,
    fields: [‘name‘, ‘description‘],
    columns: [{
        xtype: ‘treecolumn‘,
        text: ‘Name‘,
        dataIndex: ‘name‘,
        width: 150,
        sortable: true
    }, {
        text: ‘Description‘,
        dataIndex: ‘description‘,
        flex: 1,
        sortable: true
    }],
    root: {
        name: ‘Root‘,
        description: ‘Root description‘,
        expanded: true,
        children: [{
            name: ‘Child 1‘,
            description: ‘Description 1‘,
            leaf: true
        }, {
            name: ‘Child 2‘,
            description: ‘Description 2‘,
            leaf: true
        }]
    }
});
The columns configuration expects an array of Ext.grid.column.Column configurations just like a Grid Panel would have. The only difference is that a Tree Panel requires at least one column with an xtype of ‘treecolumn‘. This type of column has tree-specific visual effects like depth, lines and expand and collapse icons. A typical Tree Panel would have only one ‘treecolumn‘.
和 Grid 面板那样子配置 Ext.grid.column.Column,Tree 面板也是通过 columns 数组进行配置。唯一区别在于 Tree 面板至少得要一个 xtype 是“treecolumn”的列。该类型的列根据树而设计的,拥有深度(depth)、线条(lines)、展开与闭合图标等的特性。典型的 Tree 面板便是一个单独的“treecolumn”。
The fields configuration is passed on to the Model that the internally created Store uses (See the Data Guide for more information on Models). Notice how the dataIndex configurations on the columns map to the fields we specified - name and description.
配置项 fields 会由内部的 Store 被复制到 Model 上(该方面可参阅《Data Guide》的 Model 部分)。请注意列其 dataIndex 配置项就是映射到 field 的。
It is also worth noting that when columns are not defined, the tree will automatically create one single treecolumn with a dataIndex set to ‘text‘. It also hides the headers on the tree. To show this header when using only a single column set the hideHeaders configuration to ‘false‘.
应该提出,当未定义列的时候,树会自动创建一个单独的 treecolumn,带有“text” 的 dataIndex。还会隐藏树的头部。要显示的话,可设置配置项 hideHeaders 为 false。
The root node for the Tree Panel does not have to be specified in the initial configuration. We can always add it later:
不一定要在配置的时候将所有的节点添加到树上,及后再加也可以的。
var tree = Ext.create(‘Ext.tree.Panel‘);
tree.setRootNode({
    text: ‘Root‘,
    expanded: true,
    children: [{
        text: ‘Child 1‘,
        leaf: true
    }, {
        text: ‘Child 2‘,
        leaf: true
    }]
});
Although this is useful for very small trees with only a few static nodes, most Tree Panels will contain many more nodes. So let‘s take a look at how we can programmatically add new nodes to the tree.
这样子在一棵静态的树上加上几个节点毫无问题,但是一般而言树面板还是会动态地加入许多节点。这样我们就来看看如何通过编程来添加新的节点树。
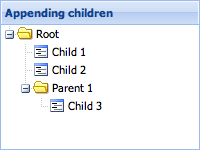
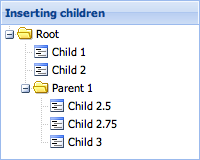
var root = tree.getRootNode();

var parent = root.appendChild({
    text: ‘Parent 1‘
});

parent.appendChild({
    text: ‘Child 3‘,
    leaf: true
});

parent.expand();
Every node that is not a leaf node has an appendChild method which accepts a Node, or a config object for a Node as its first parameter, and returns the Node that was appended. The above example also calls the expand method to expand the newly created parent.
只要不是 leaf 节点,它都有 appendChild 的方法,送入一个节点的实例,或者节点的配置项对象作为参数,该方法就是返回新创建的节点。上一例调用了新创建节点其 expand 的方法。
Also useful is the ability to define children inline when creating the new parent nodes. The following code gives us the same result.
另外你可以通过内联的写法创建父节点。下一例与上例的作用一样。
var parent = root.appendChild({
    text: ‘Parent 1‘,
    expanded: true,
    children: [{
        text: ‘Child 3‘,
        leaf: true
    }]
});
Sometimes we want to insert a node into a specific location in the tree instead of appending it. Besides the appendChild method, Ext.data.NodeInterfacealso provides insertBefore and insertChild methods.
有些时候我们想将节点插入到某个固定的位置。这样的话,就需要 insertBefore 或 insertChild 方法,都由 Ext.data.NodeInterface 提供。
var child = parent.insertChild(0, {
    text: ‘Child 2.5‘,
    leaf: true
});

parent.insertBefore({
    text: ‘Child 2.75‘,
    leaf: true
}, child.nextSibling);
The insertChild method expects an index at which the child will be inserted. The insertBefore method expects a reference node. The new node will be inserted before the reference node.
insertChild 方法需要一个 child 将被插入索引。 insertBefore 方法预计的参考节点。将参考节点之前插入新的节点。
NodeInterface also provides several more properties on nodes that can be used to reference other nodes.
NodeInterface 还提供了以下几个属性,供其他节点作“引用”时之用。
Loading and saving Tree data is somewhat more complex than dealing with flat data because of all the fields that are required to represent the hierarchical structure of the tree. This section will explain the intricacies of working with tree data.
加载和保存tree数据要比处理平面数据复杂,因为数据代表了树形层次结构。本小节说明操作树形数据的复杂工作。
The first and most important thing to understand when working with tree data is how the NodeInterface class‘ fields work. Every node in a Tree is simply aModel instance decorated with the NodeInterface‘s fields and methods. Assume for a moment that an application has a Model called Person. A Person only has two fields - id and name:
理解tree数据如何工作的首要事情是知道NodeInterface类如何工作。树中的每个节点都是一个model实例,并被修饰了NodeInterface的自动和方法。假设一个app具有一个model叫做person,有两个字段id和name:
Ext.define(‘Person‘, {
    extend: ‘Ext.data.Model‘,
    fields: [
        { name: ‘id‘, type: ‘int‘ },
        { name: ‘name‘, type: ‘string‘ }
    ]
});
At this point Person is just a plain vanilla Model. If an instance is created, it can easily be verified that it only has two fields by looking at its fieldscollection
这是person仅是一个平面数据。如果一个实例被创建,可以很容易验证它只有两个字段:
console.log(Person.prototype.fields.getCount()); // outputs ‘2‘
When the Person model is used in a TreeStore, something interesting happens. Notice the field count now:
当一个personmodel用在了TreeStore中,一些有趣的事情发生了。注意下面的字段数统计:
var store = Ext.create(‘Ext.data.TreeStore‘, {
    model: ‘Person‘,
    root: {
        name: ‘Phil‘
    }
});

console.log(Person.prototype.fields.getCount()); // outputs ‘24‘
The Person model‘s prototype got 22 extra fields added to it just by using it in a TreeStore. All of these extra fields are defined on the NodeInterface class and are added to the Model‘s prototype the first time an instance of that Model is used in a TreeStore (by setting it as the root node).
person模型的prototype获得了22个额外添加的字段,仅仅是在treestore中使用它。所有这些额外的字段是在 NodeInterface类中定义的,并且在第一次在treestore中使用的时候(通过设置它为root 节点)被加入model的prototype。
So what exactly are these 22 extra fields, and what do they do? A quick look at the NodeInterface source code reveals that it decorates the Model with the following fields. These fields are used internally to store information relating to the tree‘s structure and state:
{name: ‘parentId‘,   type: idType,    defaultValue: null},
{name: ‘index‘,      type: ‘int‘,     defaultValue: null, persist: false},
{name: ‘depth‘,      type: ‘int‘,     defaultValue: 0, persist: false},
{name: ‘expanded‘,   type: ‘bool‘,    defaultValue: false, persist: false},
{name: ‘expandable‘, type: ‘bool‘,    defaultValue: true, persist: false},
{name: ‘checked‘,    type: ‘auto‘,    defaultValue: null, persist: false},
{name: ‘leaf‘,       type: ‘bool‘,    defaultValue: false},
{name: ‘cls‘,        type: ‘string‘,  defaultValue: null, persist: false},
{name: ‘iconCls‘,    type: ‘string‘,  defaultValue: null, persist: false},
{name: ‘icon‘,       type: ‘string‘,  defaultValue: null, persist: false},
{name: ‘root‘,       type: ‘boolean‘, defaultValue: false, persist: false},
{name: ‘isLast‘,     type: ‘boolean‘, defaultValue: false, persist: false},
{name: ‘isFirst‘,    type: ‘boolean‘, defaultValue: false, persist: false},
{name: ‘allowDrop‘,  type: ‘boolean‘, defaultValue: true, persist: false},
{name: ‘allowDrag‘,  type: ‘boolean‘, defaultValue: true, persist: false},
{name: ‘loaded‘,     type: ‘boolean‘, defaultValue: false, persist: false},
{name: ‘loading‘,    type: ‘boolean‘, defaultValue: false, persist: false},
{name: ‘href‘,       type: ‘string‘,  defaultValue: null, persist: false},
{name: ‘hrefTarget‘, type: ‘string‘,  defaultValue: null, persist: false},
{name: ‘qtip‘,       type: ‘string‘,  defaultValue: null, persist: false},
{name: ‘qtitle‘,     type: ‘string‘,  defaultValue: null, persist: false},
{name: ‘children‘,   type: ‘auto‘,   defaultValue: null, persist: false}
It is important to note that all of the above field names should be treated as "reserved" names. For example, it is not allowed to have a field called "parentId" in a Model, if that Model is intended to be used in a Tree, since the Model‘s field will override the NodeInterface field. The exception to this rule is when there is a legitimate need to override the persistence of a field.
很重要的一点是,上面这些字段名称要被当做 "reserved" 名称。例如,在model中不允许具有一个叫做 "parentId" 的字段,如果model将被用于tree,model的字段将覆盖NodeInterface字段。这个规则的例外是,如果覆盖这些字段是正当的。
Most of NodeInterface‘s fields default to persist: false. This means they are non-persistent fields by default. Non-persistent fields will not be saved via the Proxy when calling the TreeStore‘s sync method or calling save() on the Model. In most cases, the majority of these fields can be left at their default persistence setting, but there are cases where it is necessary to override the persistence of some fields. The following example demonstrates how to override the persistence of a NodeInterface field. When overriding a NodeInterface field it is important to only change the persist property. name,type, and defaultValue should never be changed.
// overriding the persistence of NodeInterface fields in a Model definition
Ext.define(‘Person‘, {
    extend: ‘Ext.data.Model‘,
    fields: [
        // Person fields
        { name: ‘id‘, type: ‘int‘ },
        { name: ‘name‘, type: ‘string‘ }

        // override a non-persistent NodeInterface field to make it persistent
        { name: ‘iconCls‘, type: ‘string‘,  defaultValue: null, persist: true },
    ]
});
Let‘s take a more in-depth look at each NodeInterface field and the scenarios in which it might be necessary to override its persist property. In each example below it is assumed that a Server Proxy is being used unless otherwise noted.
Persistent by default:
parentId - used to store the id of a node‘s parent node. This field should always be persistent, and should not be overridden.leaf - used to indicate that the node is a leaf node, and therefore cannot have children appended to it. This field should not normally need to be overridden.Non-persistent by default:
index - used to store the order of nodes within their parent. When a node is inserted or removed, all of its sibling nodes after the insertion or removal point will have their indexes updated. If desired, the application can use this field to persist the ordering of nodes. However, if the server uses a different method of storing order, it may be more appropriate to leave the index field as non-persistent. When using a WebStorage Proxy if storing order is required, this field must be overridden to be persistent. Also if client-side sorting is being used it is recommended for the index field to be left as non-persistent, since sorting updates the indexes of all the sorted nodes, which would cause them to be persisted on next sync or save if the persist property is true.depth - used to store the depth of a node in the tree hierarchy. Override this field to turn on persistence if the server needs to store the depth field. When using a WebStorage Proxy it is recommended to not override the persistence of the depth field since it is not needed to properly store the tree structure and will just take up extra space.checked - this field should be overridden to be persistent if the tree is using the checkbox featureexpanded - used to store the expanded/collapsed state of a node. This field should not normally need to be overridden.expandable - used internally to indicate that this node is expandable. Do not override the persistence of this field.cls - used to apply a css class to the node when it is rendered in a TreePanel. Override this field to be persistent if desired.iconCls - used to apply a css class to the node‘s icon when it is rendered in a TreePanel. Override this field to be persistent if desired.icon - used to apply a cutom icon to the node node when it is rendered in a TreePanel. Override this field to be persistent if desired.root - used to indicate that this node is the root node. This field should not be overridden.isLast - used to indicate that this node is the last of its siblings. This field should not normally need to be overridden.isFirst - used to indicate that this node is the first of its siblings. This field should not normally need to be overridden.allowDrop - used internally to deny dropping on the node. Do not override the persistence of this field.allowDrag - used internally to deny dragging the node. Do not override the persistence of this field.loaded - used internally to indicate that the node‘s children have been loaded. Do not override the persistence of this field.loading - used internally to indicate that the proxy is in the process of loading the node‘s children. Do not override the persistence of this field.href - used to specify a url that the node should be a link to. Override to be persistent if desired.hrefTarget - used to specify the target for the href. Override to be persistent if desired.qtip - used to add a tooltip text to the node. Override to be persistent if desired.qtitle - used to specify the title for the tooltip. Override to be persistent if desired.children - used internally when loading a node and its children all in one request. Do not override the persistence of this field.There are two ways to load tree data. The first is to for the proxy to fetch the entire tree all at once. For larger trees where loading everything at once is not ideal, it may be preferable to use the second method - dynamically loading the children for each node when it is expanded.
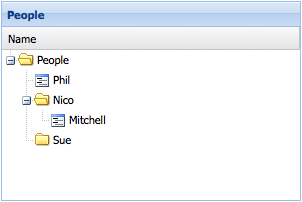
Internally the tree only loads data in response to a node being expanded. However the entire hierarchy can be loaded if the proxy retrieves a nested object containing the whole tree structure. To accomplish this, initialize the TreeStore‘s root node to expanded:
Ext.define(‘Person‘, {
    extend: ‘Ext.data.Model‘,
    fields: [
        { name: ‘id‘, type: ‘int‘ },
        { name: ‘name‘, type: ‘string‘ }
    ],
    proxy: {
        type: ‘ajax‘,
        api: {
            create: ‘createPersons‘,
            read: ‘readPersons‘,
            update: ‘updatePersons‘,
            destroy: ‘destroyPersons‘
        }
    }

});

var store = Ext.create(‘Ext.data.TreeStore‘, {
    model: ‘Person‘,
    root: {
        name: ‘People‘,
        expanded: true
    }
});

Ext.create(‘Ext.tree.Panel‘, {
    renderTo: Ext.getBody(),
    width: 300,
    height: 200,
    title: ‘People‘,
    store: store,
    columns: [
        { xtype: ‘treecolumn‘, header: ‘Name‘, dataIndex: ‘name‘, flex: 1 }
    ]
});
Assume that the readPersons url returns the following json object
{
    "success": true,
    "children": [
        { "id": 1, "name": "Phil", "leaf": true },
        { "id": 2, "name": "Nico", "expanded": true, "children": [
            { "id": 3, "name": "Mitchell", "leaf": true }
        ]},
        { "id": 4, "name": "Sue", "loaded": true }
    ]
}
That‘s all that‘s needed to load the entire tree.
Important items to note:
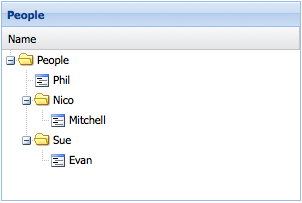
loaded property to true. Otherwise the proxy will attempt to load children for these nodes when they are expanded.loaded property on a node in the JSON response can it set any of the other non-persistent fields? The answer is yes - sometimes. In the example above the node with name "Nico" has is expanded field set to true so that it will be initially displayed as expanded in the Tree Panel. Caution should be exercised as there are cases where this is not appropriate and could cause serious problems, like setting the root property on a node that is not the root node for example. In general loaded and expanded are the only cases where it is recommended for the server to set a non-persistent field in the JSON response.For larger trees it may be desirable to only load parts of the tree by loading child nodes only when their parent node is expanded. Suppose in the above example, that the node with name "Sue" does not have its loaded field set to true by the server response. The Tree would display an expander icon next to the node. When the node is expanded the proxy will make another request to the readPersons url that looks something like this:
/readPersons?node=4
This tells the server to retrieve the child nodes for the node with an id of 4. The data should be returned in the same format as the data that was used to load the root node:
{
    "success": true,
    "children": [
        { "id": 5, "name": "Evan", "leaf": true }
    ]
}
Now the Tree looks something like this:
Creating, updating, and deleting nodes is handled automatically and seamlessly by the Proxy.
// Create a new node and append it to the tree:
var newPerson = Ext.create(‘Person‘, { name: ‘Nige‘, leaf: true });
store.getNodeById(2).appendChild(newPerson);
Since the proxy is defined directly on the Model, the Model‘s save() method can be used to persist the data:
newPerson.save();
store.getNodeById(1).set(‘name‘, ‘Philip‘);
store.getRootNode().lastChild.remove();
After creating, updating, and removing several nodes, they can all be persisted in one operation by calling the TreeStore‘s sync() method:
store.sync();
标签:
原文地址:http://www.cnblogs.com/jimcheng/p/4273393.html