linux源码版本linux-3.14,可以从https://www.kernel.org/获取。
由于已经有了dom0(fedora19),现在需要安装domU,domU可以用xen源码自带的miniOS,这个os是xen客户机的最小系统,有机会一定安装一下试试。这次我配置安装的是linux。
参考xen的wiki页 http://wiki.xenproject.org/wiki/Mainline_Linux_Kernel_Configs
获取linux源码之后,make menuconfig
NOTE0: Make sure you have correct CPU type (Processor Family) set in the kernel configuration, Xen Dom0 options won‘t show up at all if you have too old CPU selected (too old means a CPU that doesn‘t support PAE; Pentium Pro was the first CPU to have PAE).
选择 Processor type and features -> Processor family -> core2
接着往下
NOTE1: If you‘re building 32 bit version of the kernel, you first need to enable PAE support, since Xen only supports 32 bit PAE kernels nowadays. Xen kernel build options won‘t show up at all before you‘ve enabled PAE for 32 bit builds (Processor type and features -> High Memory Support (64GB) -> PAE (Physical Address Extension) Support). PAE is not needed for 64 bit kernels.
由于我编译64位内核,所以这一条忽略。
接下来开始配置:
第一条忽略。
看到第二条
Enable these core options (Processor type and features| Paravirtualized guest support]
- CONFIG_HYPERVISOR_GUEST=y (3.10+ only)
- CONFIG_PARAVIRT=y
- CONFIG_XEN=y
- CONFIG_PARAVIRT_GUEST=y
- CONFIG_PARAVIRT_SPINLOCKS=y
menuconfig没有出现Paravirtualized guest support,只能手动编辑.config文件。
看到hypervisor被注释了

我们去掉注释,赋值为y,保存,退出。
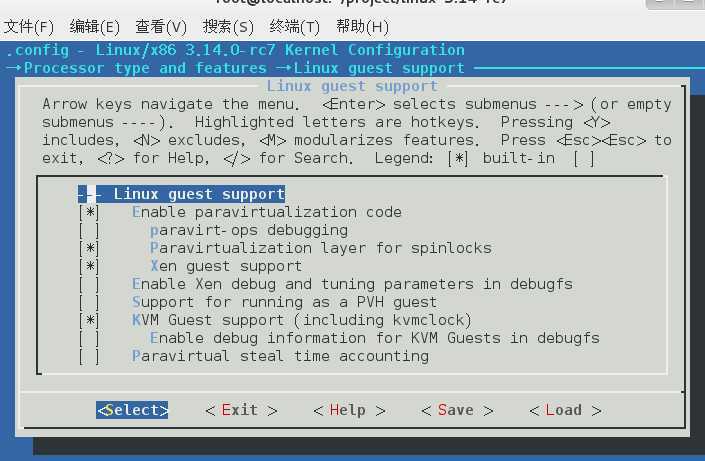
接着继续make menuconfig,选择Processor type and features -> Linux guest support
对了,上面没有出现的Paravirtualized guest support选项,在这里变成了Linux guest support选项,进入该选项,配置如下
往下
And Xen pv console device support (Device Drivers|Character devices
- CONFIG_HVC_DRIVER=y
- CONFIG_HVC_XEN=y
这条不用做,打开.config搜索这个选项可以看到这条已经自动配置好了。
下一步
And Xen disk and network support (Device Drivers|Block devices and Device Drivers|Network device support)
- CONFIG_XEN_FBDEV_FRONTEND=y
- CONFIG_XEN_BLKDEV_FRONTEND=y
- CONFIG_XEN_NETDEV_FRONTEND=y
这一步也不用做。。
下一步,确认一下已经配置好。
And the rest (Device Drivers|Xen driver support)
- CONFIG_XEN_PCIDEV_FRONTEND=y
- CONFIG_INPUT_XEN_KBDDEV_FRONTEND=y
- CONFIG_XEN_FBDEV_FRONTEND=y
- CONFIG_XEN_XENBUS_FRONTEND=y
- CONFIG_XEN_SAVE_RESTORE=y
- CONFIG_XEN_GRANT_DEV_ALLOC=m
下一步,改.config的以下选项。
And for tmem support:
- CONFIG_XEN_TMEM=y
- CONFIG_CLEANCACHE=y
- CONFIG_FRONTSWAP=y
- CONFIG_XEN_SELFBALLOONING=y
用linux源码构建xen的domU,布布扣,bubuko.com
原文地址:http://www.cnblogs.com/huahaofeng/p/3759801.html