标签:c style class blog code java
iOS开发UI篇—实现UItableview控件数据刷新
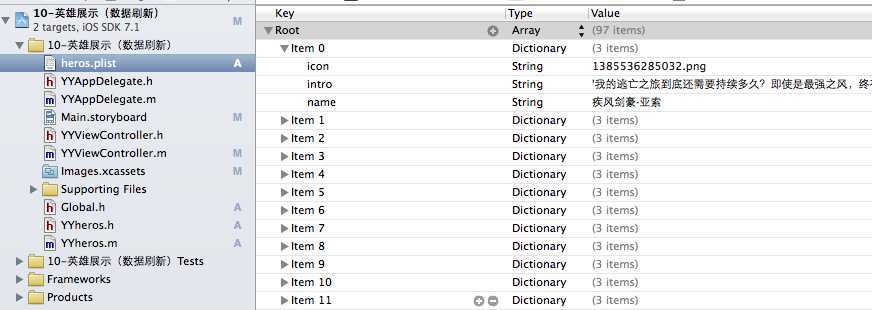
一、项目文件结构和plist文件

二、实现效果
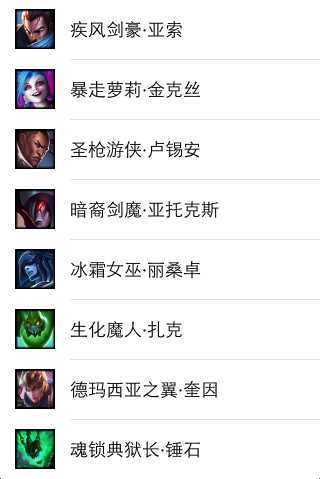
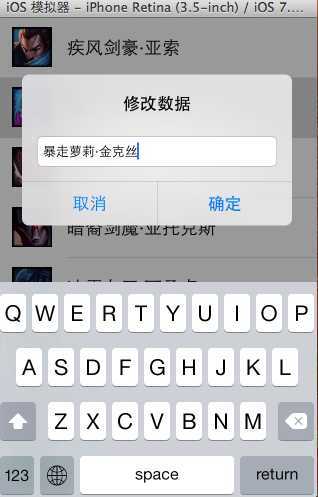
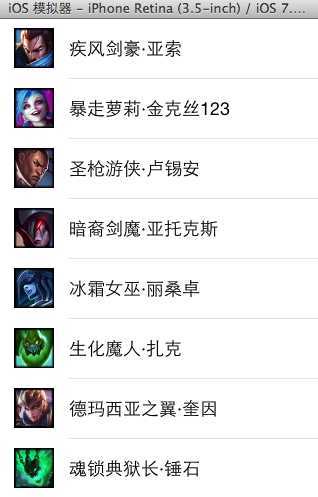
1.说明:这是一个英雄展示界面,点击选中行,可以修改改行英雄的名称(完成数据刷新的操作).
运行界面:

点击选中行:

修改数据后自动刷新:

三、代码示例
数据模型部分:
YYheros.h文件
 1 //
 2 //  YYheros.h
 3 //  10-英雄展示(数据刷新)
 4 //
 5 //  Created by apple on 14-5-29.
 6 //  Copyright (c) 2014年 itcase. All rights reserved.
 7 //
 8
 9 #import <Foundation/Foundation.h>
10 #import "Global.h"
11
12 @interface YYheros : NSObject
13 @property(nonatomic,copy)NSString *name;
14 @property(nonatomic,copy)NSString *icon;
15 @property(nonatomic,copy)NSString *intro;
16
17 //-(instancetype)initWithDict:(NSDictionary *)dict;
18 //+(instancetype)herosWithDict:(NSDictionary *)dict;
19 YYinitH(hero)
20 @end
YYheros.m文件
 1 //
 2 //  YYheros.m
 3 //  10-英雄展示(数据刷新)
 4 //
 5 //  Created by apple on 14-5-29.
 6 //  Copyright (c) 2014年 itcase. All rights reserved.
 7 //
 8
 9 #import "YYheros.h"
10
11 @implementation YYheros
12 //-(instancetype)initWithDict:(NSDictionary *)dict
13 //{
14 //    if (self=[super init]) {
15 ////        self.name=dict[@"name"];
16 ////        self.icon=dict[@"icon"];
17 ////        self.intro=dict[@"intro"];
18 //
19 //        //使用KVC
20 //        [self setValuesForKeysWithDictionary:dict];
21 //    }
22 //    return self;
23 //}
24 //
25 //+(instancetype)herosWithDict:(NSDictionary *)dict
26 //{
27 //    return [[self alloc]initWithDict:dict];
28 //}
29 YYinitM(hero)
30 @end
主控制器 YYViewController.m文件
  1 //
  2 //  YYViewController.m
  3 //  10-英雄展示(数据刷新)
  4 //
  5 //  Created by apple on 14-5-29.
  6 //  Copyright (c) 2014年 itcase. All rights reserved.
  7 //
  8
  9 #import "YYViewController.h"
 10 #import "YYheros.h"
 11
 12 @interface YYViewController ()<UITableViewDataSource,UIAlertViewDelegate,UITableViewDelegate>
 13 @property (strong, nonatomic) IBOutlet UITableView *tableview;
 14 @property(nonatomic,strong)NSArray *heros;
 15 @end
 16
 17 @implementation YYViewController
 18
 19 - (void)viewDidLoad
 20 {
 21     [super viewDidLoad];
 22     //设置数据源
 23     self.tableview.dataSource=self;
 24     self.tableview.delegate=self;
 25     self.tableview.rowHeight=60.f;
 26     NSLog(@"%d",self.heros.count);
 27 }
 28
 29 #pragma mark -懒加载
 30 -(NSArray *)heros
 31 {
 32     if (_heros==nil) {
 33
 34         NSString *fullpath=[[NSBundle mainBundle]pathForResource:@"heros.plist" ofType:nil];
 35         NSArray *temparray=[NSArray arrayWithContentsOfFile:fullpath];
 36
 37         NSMutableArray *arrayM=[NSMutableArray array];
 38         for (NSDictionary *dict in temparray) {
 39             YYheros *hero=[YYheros herosWithDict:dict];
 40             [arrayM addObject:hero];
 41         }
 42         _heros=[arrayM mutableCopy];
 43     }
 44     return _heros;
 45 }
 46
 47 #pragma mark- tableview的处理
 48 //多少组
 49 -(NSInteger)numberOfSectionsInTableView:(UITableView *)tableView
 50 {
 51     return 1;
 52 }
 53 //多少行
 54 -(NSInteger)tableView:(UITableView *)tableView numberOfRowsInSection:(NSInteger)section
 55 {
 56     return self.heros.count;
 57 }
 58 //每组每行的数据,设置cell
 59 -(UITableViewCell *)tableView:(UITableView *)tableView cellForRowAtIndexPath:(NSIndexPath *)indexPath
 60 {
 61     //NSLog(@"cellForRowAtIndexPath 修改的了 %d", indexPath.row);
 62     //1.去缓存中取
 63     static NSString *identifier=@"hero";
 64     UITableViewCell *cell=[tableView dequeueReusableCellWithIdentifier:identifier];
 65     //2.如果没有,那么就自己创建
 66     if (cell==nil) {
 67         NSLog(@"chuangjiancell");
 68         cell=[[UITableViewCell alloc]initWithStyle:UITableViewCellStyleDefault reuseIdentifier:identifier];
 69     }
 70     //3.设置数据
 71
 72     //3.1拿到该行的模型
 73     YYheros *hero=self.heros[indexPath.row];
 74     cell.textLabel.text=hero.name;
 75     cell.imageView.image=[UIImage imageNamed:hero.icon];
 76     cell.detailTextLabel.text=hero.intro;
 77     //4.返回cell
 78     return cell;
 79 }
 80
 81 #pragma mark-数据刷新
 82 //1.弹出窗口,拿到数据
 83 //当某一行被选中的时候调用该方法
 84 -(void)tableView:(UITableView *)tableView didSelectRowAtIndexPath:(NSIndexPath *)indexPath
 85 {
 86     //拿到改行的数据模型
 87     YYheros *hero=self.heros[indexPath.row];
 88     UIAlertView *alert=[[UIAlertView alloc]initWithTitle:@"修改数据" message:nil delegate:self cancelButtonTitle:@"取消" otherButtonTitles:@"确定", nil];
 89
 90     //密码框形式的
 91     //alert.alertViewStyle=UIAlertViewStyleSecureTextInput;
 92     alert.alertViewStyle=UIAlertViewStylePlainTextInput;
 93     UITextField *text=[alert textFieldAtIndex:0];
 94     //把当前行的英雄数据显示到文本框中
 95     text.text=hero.name;
 96     alert.tag=indexPath.row;
 97     [alert show];
 98 }
 99 //2.修改数据,完成刷新操作
100 -(void)alertView:(UIAlertView *)alertView clickedButtonAtIndex:(NSInteger)buttonIndex
101 {
102     //1.修改模型
103     //如果选中的是取消,那么就返回,不做任何操作
104     if (0==buttonIndex) return;
105     //否则就修改模型,刷新数据
106     YYheros *hero=self.heros[alertView.tag];
107
108     //拿到当前弹窗中的文本数据(已经修改后的数据)
109     UITextField *text=[alertView textFieldAtIndex:0];
110     //用修改后的数据去修改模型
111     hero.name=text.text;
112
113     //2.刷新数据
114     // 只要调用tableview的该方法就会自动重新调用数据源的所有方法
115     // 会自动调用numberOfSectionsInTableView
116     // 会自动调用numberOfRowsInSection
117     // 会自动调用cellForRowAtIndexPath
118     //    [self.tableview reloadData];
119
120     // 刷新指定行
121        NSIndexPath *path = [NSIndexPath indexPathForRow:alertView.tag inSection:0];
122         [self.tableview reloadRowsAtIndexPaths:@[path] withRowAnimation:UITableViewRowAnimationRight];
123     //如果不进行刷新会怎么样?(修改之后不会即时刷新,要等到重新对cell进行数据填充的时候才会刷新)
124 }
125 //隐藏状态栏
126 -(BOOL)prefersStatusBarHidden
127 {
128     return YES;
129 }
130 @end
四、把常用的代码封装成一个带参数的宏
封装方法和代码:
 1 //
 2 //  Global.h
 3 //  10-英雄展示(数据刷新)
 4 //
 5 //  Created by apple on 14-5-29.
 6 //  Copyright (c) 2014年 itcase. All rights reserved.
 7 //
 8
 9 #ifndef _0____________Global_h
10 #define _0____________Global_h
11
12 /**
13  *  自定义带参数的宏
14  */
15 #define     YYinitH(name)   -(instancetype)initWithDict:(NSDictionary *)dict;16 +(instancetype)herosWithDict:(NSDictionary *)dict;
17
18
19 #define     YYinitM(name)  -(instancetype)initWithDict:(NSDictionary *)dict20 {21     if (self=[super init]) {22         [self setValuesForKeysWithDictionary:dict];23     }24     return self;25 }26 27 +(instancetype)herosWithDict:(NSDictionary *)dict28 {29     return [[self alloc]initWithDict:dict];30 }31
32 #endif
以后在需要使用的时候,只需要使用宏即可。
如在YYheros.m文件中使用YYinitM(hero)这一句代码可以代替下面的代码段:
-(instancetype)initWithDict:(NSDictionary *)dict
{
    if (self=[super init]) {
//        self.name=dict[@"name"];
//        self.icon=dict[@"icon"];
//        self.intro=dict[@"intro"];

        //使用KVC
        [self setValuesForKeysWithDictionary:dict];
    }
    return self;
}

+(instancetype)herosWithDict:(NSDictionary *)dict
{
    return [[self alloc]initWithDict:dict];
}
五、注意点
1.刷新数据的两个步骤:
1)修改模型
2)刷新表格数据(可以全部刷新,也可以刷新指定的行)
2.在主控制器文件中,遵守了三个协议
分别是:
UITableViewDataSource,
UIAlertViewDelegate,
UITableViewDelegate
iOS开发UI篇—实现UItableview控件数据刷新,布布扣,bubuko.com
标签:c style class blog code java
原文地址:http://www.cnblogs.com/wendingding/p/3759960.html