标签:
http://justjavac.iteye.com/blog/698029
http://www.cnblogs.com/skynet/archive/2010/06/06/1752616.html

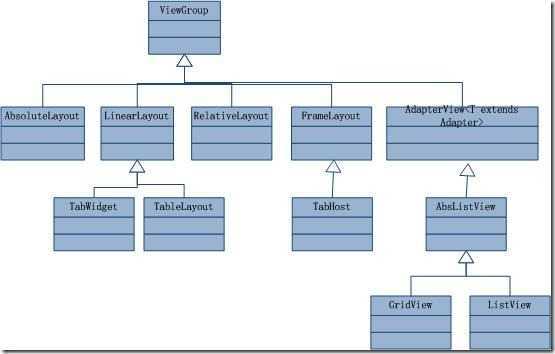
1. FrameLayout
最简单的layout管理器,FrameLayout简单地将每一个View显示在左上角。增加多个子View时,新的View位于先前的上方,并且还遮盖先前的View。
2. LinearLayout
LinearLayout用来沿着某一个直线方向增加子View,包括垂直的和水平的。垂直的layout每一行有一个孩子;而水平的layout只有一行。LinearLayout可以为每个子View指定“weight”,来控制在可获得的空间里每个子View的相对大小。
<?xml version="1.0" encoding="utf-8"?>
<LinearLayout xmlns:android="http://schemas.android.com/apk/res/android"
              android:layout_width="fill_parent"
              android:layout_height="fill_parent"
              android:orientation="horizontal"><!-- have an eye on ! -->
    <Button android:id="@+id/button1"
            android:layout_width="wrap_content"
            android:layout_height="wrap_content"
            android:text="Hello, I am a Button1"
            android:layout_weight="1"
            />
    />
</LinearLayout>
3. RelativeLayout
使用RelativeLayout,你可以定义每个子View相对于其它的View或屏幕边界的位置。
4. TableLayout
TableLayout允许你按照网格的行列来放置View。每格可以占据多个行和列,并且列可以设定为缩小或增长。
5. AbsoluteLayout
在AbsoluteLayout里,每个子View的位置以绝对坐标进行定义。使用这个类,你可以为组件安排最精确的布局,但是有代价的。与之前的管理器比较而言,以绝对的坐标来定义layout意味着你的layout不能为不同的屏幕分辨率和方向进行动态调整
标签:
原文地址:http://www.cnblogs.com/phoenix13suns/p/4279633.html