标签:
这个还是我在刚开始学习selenium的时候做的,自己觉得有点意思,在接下来我会基于目前我对于selenium的一些深入研究,写下我对selenium的理解以及UIAutomation的一些理解,以此开篇吧^_^
前段时间研究Selenium,写了一些测试网页的代码,写着写着,就感觉这些自动化cases的相似度太高,多数是大同小异,基本上可以归纳为这样三步1)找到元素 2)进行操作, 比如点击或者滑动 3) 验证期望, 比如跳转到了一个新页面,或者新元素出现在屏幕中.
比如下面:
from selenium import webdriver
from selenium.webdriver.support.wait import WebDriverWait
def web_automation():
    browser=webdriver.Chrome()
    browser.get(‘http://www.baidu.com/‘)

    Input_element=browser.find_element_by_id(‘kw‘)
    Input_element.send_keys(‘Selenium‘)
    browser.find_element_by_id(‘su‘).click()
    result=browser.find_element_by_xpath(‘//*[@id="container"]/div[2]‘).is_displayed()

    assert result!=True,"Failed"
写的多了,这时候就想,能不能有什么模板,让我们快速的创建一条case,甚或者能让一个不会Selenium的Tester也能写自动化case呢。
说做就做,最后就搞出来了下面一个雏形, 我们可以定义这样的一个XML:
    <TestCase name="ClickBackButton" scriptVersion="1.0.0">
        <Executable>Chrome</Executable>
        <Address>http://www.baidu.com</Address>
        <Action Operate="InputSearchInfo" Type="Input" ID="kw" Content="Glow"/>
        <Action Operate="Scroll" Type="Scroll" />
        <Action Operate="ClickNextPageHLink" Type="Click" XPath=‘//*[@id="page"]/a[10]‘>
              <Expected XPath=‘//*[@id="page"]/strong/span[2]‘ Text="2" />
        </Action>
        <Action Operate="Goback" Type="Back">
             <Expected XPath=‘//*[@id="page"]/strong/span[2]‘ Text="1" />
        </Action>
        <Action Operate="Scroll" Type="Scroll" />
        <Action Operate="ClickPage6" Type="Click" XPath=‘//*[@id="page"]/a[5]‘>
                   <Expected XPath=‘//*[@id="page"]/strong/span[2]‘ Text="6" />
        </Action>
        <Action Operate="Goback" Type="Back">
             <Expected XPath=‘//*[@id="page"]/strong/span[2]‘ Text="1" />
        </Action>
    </TestCase>
然后我们就可以这样来解析:
第一步解析XML生成TestCase的list,在例子中就一个Testcase:
import xml.etree.ElementTree as ET
import logging
import os
import sys
import traceback
from TestCase import TestCase

class ParseCase:
    def __init__(self,xml_path):
        if os.path.exists(os.getcwd()+"\\"+xml_path) or os.path.exists(xml_path):
            self.caseList=[]
            try:
                xml=ET.parse(xml_path)
                root=xml.getroot()
                self.caseList=root.find(‘TestList‘).findall(‘TestCase‘)
            except IOError as e:
                print traceback.format_exc()
                logging.debug(traceback.format_exc())
            if self.caseList:
                logging.info(‘No Testcase detected‘)
            else:
                logging.info(‘No Testcase detected‘)
        else:
            print "XML file is not exists"
            logging.debug("XML file is not exists")

    def getAllTestCaseList(self):
        TestCases=[]
        for case in self.caseList:
            _testcase=TestCase(case)
            TestCases.append(_testcase)
        return TestCases
第二步, 根据每个testcase建立TestCase类的实例:
class TestCase:
    def __init__(self, _testcase):
        self.name=_testcase.attrib[‘name‘]
        _list=[]
        self.actions=[]
        try:
            _list=_testcase.getchildren()
        except Exception,msg:
            print msg
        self._executor=_testcase.find(‘Executable‘).text
        self.address=_testcase.find(‘Address‘).text
        for act in _testcase.findall(‘Action‘):
            if act.tag==‘Action‘:
                _action=Action(act)
                self.actions.append(_action)

    def setUp(self):
        if ‘Chrome‘==self._executor:
            self.executor=webdriver.Chrome()
        elif ‘Firefox‘==self._executor:
            self.executor=webdriver.Firefox()
        else:
            self.executor=webdriver.Ie()
        self.executor.get(self.address)

    def tearDown(self):
        self.executor.quit()


    def execute(self):
        logging.debug("Start to execute the testcase:%s" % self.name)
        print "TestCaseName:%s" % self.name
        try:
          self.setUp()
          for action in self.actions:
              action.execute(self.executor);
          self.tearDown()
          Assert.AssertPass("TestCase:%s " % self.name)
        except Exception as error:
            print error
            self.tearDown()
            Assert.AssertFail("TestCase:%s " % self.name)
第三步,根据xml里定义的type来触发动作,我就简单的列了下:
    def execute(self,executor):
          _type=self._actions[‘Type‘]
          self.getBy(self._actions)
          try:
              if self.by!=None:
                  ele=self.findElement(executor)
                  Assert.AssertIsNotNull(ele,"   ".join("Find element by %s:%s" % (str(self.by),self.by_value)))
              if _type==‘Input‘:
                  ele.send_keys(self._actions[‘Content‘])
                  time.sleep(3)

              elif _type==‘Click‘:
                  ele.click()
              elif _type==‘Scroll‘:
                  webOperate.page_scroll(executor)
              elif _type==‘Back‘:
                  webOperate.goBack(executor)

              else:
                  print "   ",
                  Assert.AssertFail(self._name)
                  print "No such action:%s" % _type
              if self._expected is not None:
                 Assert.AssertIsTrue(self.isExpected(executor),"   ".join("Find element by %s:%s" % (str(self.by),self.by_value)))
              print "   ",
              Assert.AssertPass(self._name)
          except AssertionError:
              print "   ",
              Assert.AssertFail(self._name)
              raise AssertionError(self._name +" execute failed")
看一个运行的截图
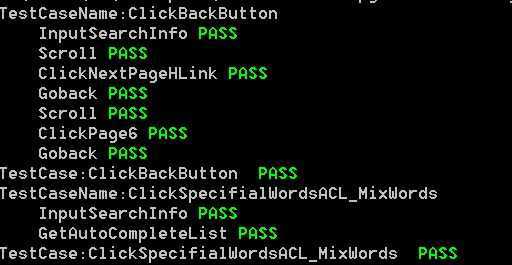
代码比较简单,原理也很清晰,就是解析XML文件,然后调用相应的selenium代码,但是如果我们再深入的想想,在解析这些XML的时候,是不是可以以更友好的方式来展示生成的代码呢,甚或者以UI的方式,一条条展示。然后再提供可编辑功能?甚或者再提供录制的方式来自动生成这些XML文件,再解析成代码,这不就是一个强大的自动化测试工具??
标签:
原文地址:http://www.cnblogs.com/baibai-tech/p/4290992.html