码迷,mamicode.com
首页 > 编程语言 > 详细

Spring Aop实例之xml配置

时间:2015-03-01 00:10:19      阅读:283      评论:0      收藏:0      [点我收藏+]

标签:

上篇博文《3幅图让你了解Spring AOP》中介绍了aop通知类型,AOP的配置方式有2种方式:xml配置和AspectJ注解方式。今天我们就来实践一下xml配置方式。

http://blog.csdn.net/xiaoxian8023/article/details/17258933


      我采用的jdk代理,所以首先将接口和实现类代码附上


[java] view plaincopy技术分享技术分享
 
  1. package com.tgb.aop;  
  2.   
  3. public interface UserManager {  
  4.   
  5.     public String findUserById(int userId);  
  6. }  
  7.   
  8.   
  9. package com.tgb.aop;  
  10.   
  11. public class UserManagerImpl implements UserManager {  
  12.   
  13.     public String findUserById(int userId) {  
  14.         System.out.println("---------UserManagerImpl.findUserById()--------");  
  15.         if (userId <= 0) {  
  16.             throw new IllegalArgumentException("该用户不存在!");   
  17.         }  
  18.         return "张三";  
  19.     }  
  20. }  


       单独写一个Advice通知类进行测试。这个通知类可以换成安全性检测、日志管理等等。


[java] view plaincopy技术分享技术分享
 
  1. package com.tgb.aop;  
  2.   
  3. import org.aspectj.lang.JoinPoint;  
  4. import org.aspectj.lang.ProceedingJoinPoint;  
  5.   
  6. /** 
  7.  * Advice通知类 
  8.  * 测试after,before,around,throwing,returning Advice. 
  9.  * @author Admin 
  10.  * 
  11.  */  
  12. public class XMLAdvice {  
  13.   
  14.     /** 
  15.      * 在核心业务执行前执行,不能阻止核心业务的调用。 
  16.      * @param joinPoint 
  17.      */  
  18.     private void doBefore(JoinPoint joinPoint) {  
  19.         System.out.println("-----doBefore().invoke-----");  
  20.         System.out.println(" 此处意在执行核心业务逻辑前,做一些安全性的判断等等");  
  21.         System.out.println(" 可通过joinPoint来获取所需要的内容");  
  22.         System.out.println("-----End of doBefore()------");  
  23.     }  
  24.       
  25.     /** 
  26.      * 手动控制调用核心业务逻辑,以及调用前和调用后的处理, 
  27.      *  
  28.      * 注意:当核心业务抛异常后,立即退出,转向After Advice 
  29.      * 执行完毕After Advice,再转到Throwing Advice 
  30.      * @param pjp 
  31.      * @return 
  32.      * @throws Throwable 
  33.      */  
  34.     private Object doAround(ProceedingJoinPoint pjp) throws Throwable {  
  35.         System.out.println("-----doAround().invoke-----");  
  36.         System.out.println(" 此处可以做类似于Before Advice的事情");  
  37.           
  38.         //调用核心逻辑  
  39.         Object retVal = pjp.proceed();  
  40.           
  41.         System.out.println(" 此处可以做类似于After Advice的事情");  
  42.         System.out.println("-----End of doAround()------");  
  43.         return retVal;  
  44.     }  
  45.   
  46.     /** 
  47.      * 核心业务逻辑退出后(包括正常执行结束和异常退出),执行此Advice 
  48.      * @param joinPoint 
  49.      */  
  50.     private void doAfter(JoinPoint joinPoint) {  
  51.         System.out.println("-----doAfter().invoke-----");  
  52.         System.out.println(" 此处意在执行核心业务逻辑之后,做一些日志记录操作等等");  
  53.         System.out.println(" 可通过joinPoint来获取所需要的内容");  
  54.         System.out.println("-----End of doAfter()------");  
  55.     }  
  56.       
  57.     /** 
  58.      * 核心业务逻辑调用正常退出后,不管是否有返回值,正常退出后,均执行此Advice 
  59.      * @param joinPoint 
  60.      */  
  61.     private void doReturn(JoinPoint joinPoint) {  
  62.         System.out.println("-----doReturn().invoke-----");  
  63.         System.out.println(" 此处可以对返回值做进一步处理");  
  64.         System.out.println(" 可通过joinPoint来获取所需要的内容");  
  65.         System.out.println("-----End of doReturn()------");  
  66.     }  
  67.       
  68.     /** 
  69.      * 核心业务逻辑调用异常退出后,执行此Advice,处理错误信息 
  70.      * @param joinPoint 
  71.      * @param ex 
  72.      */  
  73.     private void doThrowing(JoinPoint joinPoint,Throwable ex) {  
  74.         System.out.println("-----doThrowing().invoke-----");  
  75.         System.out.println(" 错误信息:"+ex.getMessage());  
  76.         System.out.println(" 此处意在执行核心业务逻辑出错时,捕获异常,并可做一些日志记录操作等等");  
  77.         System.out.println(" 可通过joinPoint来获取所需要的内容");  
  78.         System.out.println("-----End of doThrowing()------");  
  79.     }  
  80. }  


       只有Advice还不行,还需要在application-config.xml中进行配置:


[html] view plaincopy技术分享技术分享
 
  1. <?xml version="1.0" encoding="UTF-8"?>  
  2.   
  3. <beans xmlns="http://www.springframework.org/schema/beans"  
  4.          xmlns:xsi="http://www.w3.org/2001/XMLSchema-instance"  
  5.          xmlns:aop="http://www.springframework.org/schema/aop"  
  6.          xmlns:tx="http://www.springframework.org/schema/tx"  
  7.          xsi:schemaLocation="http://www.springframework.org/schema/beans http://www.springframework.org/schema/beans/spring-beans-2.0.xsd  
  8.            http://www.springframework.org/schema/aop http://www.springframework.org/schema/aop/spring-aop-2.0.xsd  
  9.            http://www.springframework.org/schema/tx http://www.springframework.org/schema/tx/spring-tx-2.0.xsd">  
  10.                
  11.       
  12.     <bean id="userManager" class="com.tgb.aop.UserManagerImpl"/>  
  13.       
  14.     <!--<bean id="aspcejHandler" class="com.tgb.aop.AspceJAdvice"/>-->  
  15.     <bean id="xmlHandler" class="com.tgb.aop.XMLAdvice" />  
  16.     <aop:config>  
  17.         <aop:aspect id="aspect" ref="xmlHandler">  
  18.             <aop:pointcut id="pointUserMgr" expression="execution(* com.tgb.aop.*.find*(..))"/>  
  19.               
  20.             <aop:before method="doBefore"  pointcut-ref="pointUserMgr"/>  
  21.             <aop:after method="doAfter"  pointcut-ref="pointUserMgr"/>  
  22.             <aop:around method="doAround"  pointcut-ref="pointUserMgr"/>  
  23.             <aop:after-returning method="doReturn"  pointcut-ref="pointUserMgr"/>  
  24.             <aop:after-throwing method="doThrowing" throwing="ex" pointcut-ref="pointUserMgr"/>  
  25.               
  26.         </aop:aspect>  
  27.     </aop:config>  
  28. </beans>  


       编一个客户端类进行测试一下:


[java] view plaincopy技术分享技术分享
 
    1. package com.tgb.aop;  
    2.   
    3. import org.springframework.beans.factory.BeanFactory;  
    4. import org.springframework.context.support.ClassPathXmlApplicationContext;  
    5.   
    6. public class Client {  
    7.   
    8.     public static void main(String[] args) {  
    9.         BeanFactory factory = new ClassPathXmlApplicationContext("applicationContext.xml");  
    10.         UserManager userManager = (UserManager)factory.getBean("userManager");  
    11.           
    12.         //可以查找张三  
    13.         userManager.findUserById(1);  
    14.           
    15.         System.out.println("=====我==是==分==割==线=====");  
    16.   
    17.         try {  
    18.             // 查不到数据,会抛异常,异常会被AfterThrowingAdvice捕获  
    19.             userManager.findUserById(0);  
    20.         } catch (IllegalArgumentException e) {  
    21.         }  
    22.     }  
    23. }    
    24. 结果如图:

技术分享

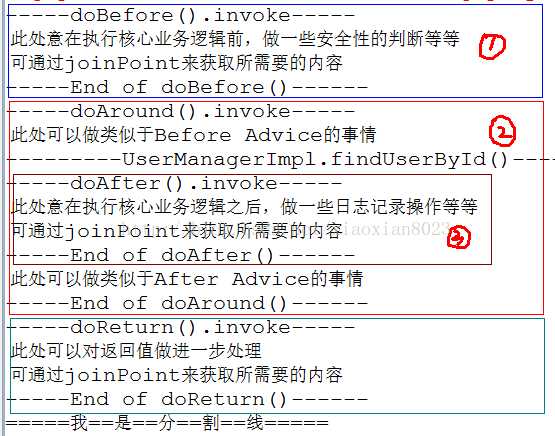
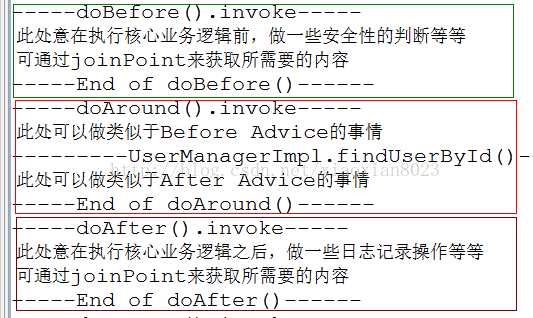
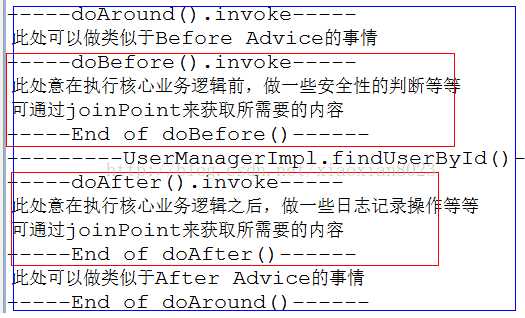
值得注意的是Around与Before和After的执行顺序。3者的执行顺序取决于在xml中的配置顺序。图中标记了3块,分别对应Before,Around,After。其中②中包含有③。这是因为aop:after配置到了aop:around的前面,如果2者调换一下位置,这三块就会分开独立显示。如果配置顺序是aop:after  -> aop:around ->aop:before,那么①和③都会包含在②中。这种情况的产生是由于Around的特殊性,它可以做类似于Before和After的操作。当安全性的判断不通过时,可以阻止核心业务逻辑的调用,这是Before做不到的。

技术分享

技术分享

使用xml可以对aop进行集中配置。很方便而简单。可以对所有的aop进行配置,当然也可以分开到单独的xml中进行配置。当需求变动时,不用修改代码,只要重新配置aop,就可以完成修改操作。

技术分享

Spring Aop实例之xml配置

标签:

原文地址:http://www.cnblogs.com/kailing-con/p/4306367.html

(0)
(0)
   
举报
评论 一句话评论(0
登录后才能评论!
© 2014 mamicode.com 版权所有  联系我们:gaon5@hotmail.com
迷上了代码!