标签:
In Spring MVC web application, it consist of 3 standard MVC (Model, Views, Controllers) components :
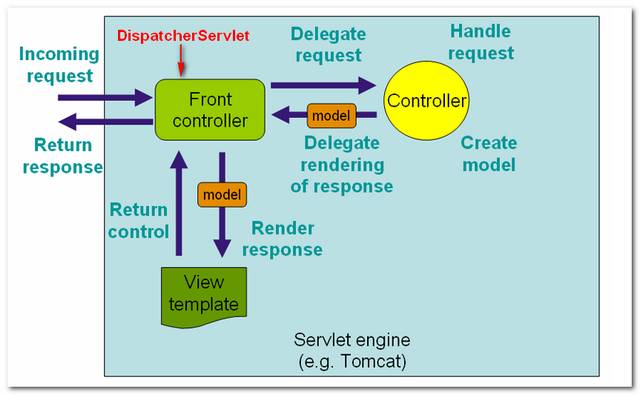
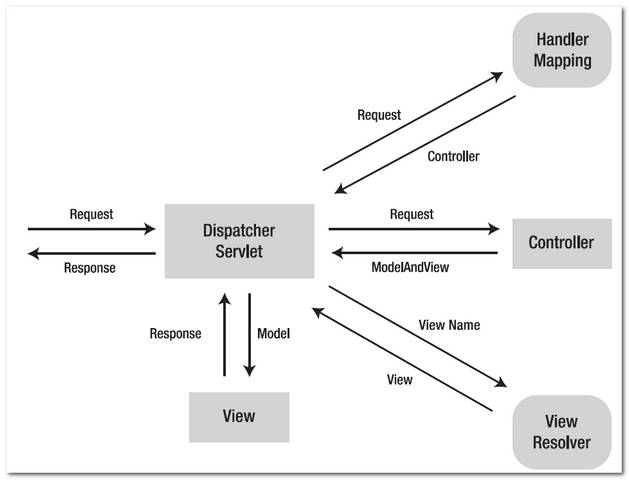
See following figures 1.1, 1.2 to demonstrate how Spring MVC web application handle a web request.
Figure 1.1 – Image copied from Spring MVC reference with slightly modification.

Figure 1.2 – P.S Image copied from book : Spring Recipes

In this tutorial, you will create a simple Spring MVC hello world web application in order to understand the basic concepts and configurations of this framework.
Technologies used in this tutorial.
Final directory structure of this tutorial.

Spring MVC required two core dependency libraries, spring-version.jar and spring-mvc-version.jar. If you are using JSP page with jstl, include the jstl.jar and standard.jar as well.
File : pom.xml
       <!-- Spring framework -->
	<dependency>
		<groupId>org.springframework</groupId>
		<artifactId>spring</artifactId>
		<version>2.5.6</version>
	</dependency>

        <!-- Spring MVC framework -->
	<dependency>
		<groupId>org.springframework</groupId>
		<artifactId>spring-webmvc</artifactId>
		<version>2.5.6</version>
	</dependency>

	<!-- JSTL -->
	<dependency>
		<groupId>javax.servlet</groupId>
		<artifactId>jstl</artifactId>
		<version>1.1.2</version>
	</dependency>

	<dependency>
		<groupId>taglibs</groupId>
		<artifactId>standard</artifactId>
		<version>1.1.2</version>
	</dependency>

	<!-- for compile only, your container should have this -->
	<dependency>
		<groupId>javax.servlet</groupId>
		<artifactId>servlet-api</artifactId>
		<version>2.5</version>
		<scope>provided</scope>
	</dependency>
Spring comes with many Controllers, normally, you just need to extend the AbstractController, if you do not have other special requirement, and override the handleRequestInternal() method and return a ModelAndView object.
File : HelloWorldController.java
package com.mkyong.common.controller;

import javax.servlet.http.HttpServletRequest;
import javax.servlet.http.HttpServletResponse;

import org.springframework.web.servlet.ModelAndView;
import org.springframework.web.servlet.mvc.AbstractController;

public class HelloWorldController extends AbstractController{

	@Override
	protected ModelAndView handleRequestInternal(HttpServletRequest request,
		HttpServletResponse response) throws Exception {

		ModelAndView model = new ModelAndView("HelloWorldPage");
		model.addObject("msg", "hello world");

		return model;
	}
}
In this case, “view” is a jSP page, you can display the value “hello world” that is store in the model “msg” via expression language (EL) ${msg}.
File : HelloWorldPage.jsp
<%@ taglib prefix="c" uri="http://java.sun.com/jsp/jstl/core"%>
<html>
<body>
	<h1>Spring MVC Hello World Example</h1>

	<h2>${msg}</h2>

</body>
</html>
In web.xml, declared a DispatcherServlet servlet, named “mvc-dispatcher“, and act as the front-controller to handle all the entire web request which end with “htm” extension.
File : web.xml
<web-app id="WebApp_ID" version="2.4"
	xmlns="http://java.sun.com/xml/ns/j2ee"
	xmlns:xsi="http://www.w3.org/2001/XMLSchema-instance"
	xsi:schemaLocation="http://java.sun.com/xml/ns/j2ee
	http://java.sun.com/xml/ns/j2ee/web-app_2_4.xsd">

  <display-name>Spring Web MVC Application</display-name>

  <servlet>
  	<servlet-name>mvc-dispatcher</servlet-name>
        <servlet-class>
                  org.springframework.web.servlet.DispatcherServlet
        </servlet-class>
        <load-on-startup>1</load-on-startup>
  </servlet>

  <servlet-mapping>
 	<servlet-name>mvc-dispatcher</servlet-name>
        <url-pattern>*.htm</url-pattern>
  </servlet-mapping>

</web-app>
Alternatively, you can explicitly specify the Spring configuration file in the “contextConfigLocation” servlet parameter, to ask Spring to load your configurations besides the default “mvc-dispatcher-servlet.xml“.
File : web.xml
<web-app id="WebApp_ID" version="2.4"
	xmlns="http://java.sun.com/xml/ns/j2ee"
	xmlns:xsi="http://www.w3.org/2001/XMLSchema-instance"
	xsi:schemaLocation="http://java.sun.com/xml/ns/j2ee
	http://java.sun.com/xml/ns/j2ee/web-app_2_4.xsd">

  <display-name>Spring Web MVC Application</display-name>

  <servlet>
  	<servlet-name>mvc-dispatcher</servlet-name>
        <servlet-class>
               org.springframework.web.servlet.DispatcherServlet
        </servlet-class>
        <load-on-startup>1</load-on-startup>
  </servlet>

  <servlet-mapping>
 	<servlet-name>mvc-dispatcher</servlet-name>
        <url-pattern>*.htm</url-pattern>
  </servlet-mapping>

  <context-param>
	<param-name>contextConfigLocation</param-name>
	<param-value>/WEB-INF/SpringMVCBeans.xml</param-value>
  </context-param>

  <listener>
        <listener-class>
		org.springframework.web.context.ContextLoaderListener
        </listener-class>
  </listener>

</web-app>
Declared the Spring Controller and viewResolver.
File : mvc-dispatcher-servlet.xml
<beans xmlns="http://www.springframework.org/schema/beans"
	xmlns:xsi="http://www.w3.org/2001/XMLSchema-instance"
	xsi:schemaLocation="http://www.springframework.org/schema/beans
	http://www.springframework.org/schema/beans/spring-beans-2.5.xsd">

    <bean name="/welcome.htm"
	class="com.mkyong.common.controller.HelloWorldController" />

    <bean id="viewResolver"
    	class="org.springframework.web.servlet.view.InternalResourceViewResolver" >
        <property name="prefix">
            <value>/WEB-INF/pages/</value>
        </property>
        <property name="suffix">
            <value>.jsp</value>
        </property>
    </bean>

</beans>
Run it and access via URL : http://localhost:8080/SpringMVC/welcome.htm , the “SpringMVC” is your project context name.

How it works?
Spring MVC Hello World Example(转)
标签:
原文地址:http://www.cnblogs.com/softidea/p/4309979.html