标签:c style class blog code java
iOS开发UI篇—以微博界面为例使用纯代码自定义cell程序编码全过程(一)
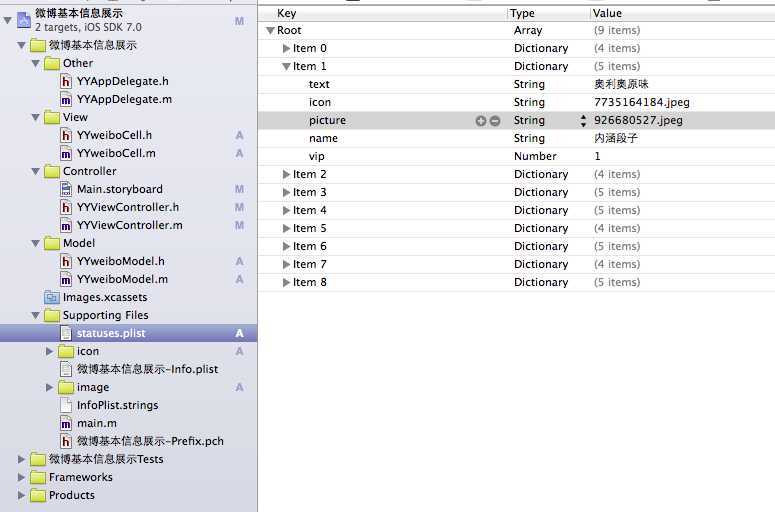
一、storyboard的处理
三、代码
视图部分
YYweiboCell.h文件

 1 //
 2 //  YYweiboCell.h
 3 //  微博基本信息展示
 4 //
 5 //  Created by 孔医己 on 14-6-2.
 6 //  Copyright (c) 2014年 itcast. All rights reserved.
 7 //
 8
 9 #import <UIKit/UIKit.h>
10
11 @class YYweiboModel;
12 @interface YYweiboCell : UITableViewCell
13
14 @property(nonatomic,strong)YYweiboModel *weibo;
15 @end
YYweiboCell.m文件
  1 //
  2 //  YYweiboCell.m
  3 //  微博基本信息展示
  4 //
  5 //  Created by 孔医己 on 14-6-2.
  6 //  Copyright (c) 2014年 itcast. All rights reserved.
  7 //
  8
  9 #import "YYweiboCell.h"
 10 #import "YYweiboModel.h"
 11
 12 @interface YYweiboCell()
 13 /**
 14  *  头像
 15  */
 16 @property(nonatomic,weak)UIImageView *iconView;
 17 /**
 18  *  vip图标
 19  */
 20 @property(nonatomic,weak)UIImageView *vipView;
 21 /**
 22  *  微博昵称
 23  */
 24 @property(nonatomic,weak)UILabel *nameLabel;
 25 /**
 26  *  配图
 27  */
 28 @property(nonatomic,weak)UIImageView *pictureView;
 29 /**
 30  *  正文
 31  */
 32 @property(nonatomic,weak)UILabel *textLab;
 33
 34 @end
 35
 36 @implementation YYweiboCell
 37
 38 //重写构造方法,让自定义的cell一创建出来就有五个子控件
 39 - (id)initWithStyle:(UITableViewCellStyle)style reuseIdentifier:(NSString *)reuseIdentifier
 40 {
 41     self = [super initWithStyle:style reuseIdentifier:reuseIdentifier];
 42     if (self) {
 43         //1.添加头像
 44         UIImageView *img=[[UIImageView alloc]init];
 45         [self.contentView addSubview:img];
 46         self.iconView=img;
 47
 48         //2.添加昵称
 49         UILabel *namelab=[[UILabel alloc]init];
 50         [self.contentView addSubview:namelab];
 51         self.nameLabel=namelab;
 52
 53         //3.vip
 54         UIImageView  *vipview=[[UIImageView alloc]init];
 55         [self.contentView addSubview:vipview];
 56         self.vipView=vipview;
 57
 58         //4.正文
 59         UILabel *textlab=[[UILabel alloc]init];
 60         [self.contentView addSubview:textlab];
 61         self.textLab=textlab;
 62
 63         //5.图片
 64         UIImageView *picture=[[UIImageView alloc]init];
 65         [self.contentView addSubview:picture];
 66         self.pictureView=picture;
 67     }
 68     return self;
 69 }
 70
 71 /**
 72  *  重写set方法
 73  *
 74  *  @param weibo 微博
 75  */
 76 -(void)setWeibo:(YYweiboModel *)weibo
 77 {
 78     //不要忘了,记录传递进来的模型
 79     _weibo=weibo;
 80     //给子控件赋值数据
 81     [self settingData];
 82     //设置子控件的frame
 83     [self settingFrame];
 84 }
 85
 86 /**
 87  *  对子控件的数据进行设置
 88  */
 89 -(void)settingData
 90 {
 91     //1.设置头像的数据
 92     self.iconView.image=[UIImage imageNamed:_weibo.icon];
 93
 94     //2.设置vip图标的数据
 95     self.vipView.image=[UIImage imageNamed:@"vip"];
 96
 97     //3.设置正文内容的数据
 98     self.textLab.text=_weibo.text;
 99
100     //4.设置配图的数据
101     self.pictureView.image=[UIImage imageNamed:_weibo.picture];
102
103     //5.设置微博昵称数据
104     self.nameLabel.text=_weibo.name;
105 }
106
107
108 /**
109  *  设置子控件的Frame
110  */
111 -(void)settingFrame
112 {
113     //1.设置头像的frame
114     CGFloat padding=10;
115     CGFloat iconViewX=padding;
116     CGFloat iconViewY=padding;
117     CGFloat iconViewW=30;
118     CGFloat iconViewH=30;
119
120     self.iconView.frame=CGRectMake(iconViewX, iconViewY, iconViewW, iconViewH);
121
122
123 #warning 未完成
124 }
125 @end
数据模型部分
YYweiboModel.h文件
 1 //
 2 //  YYweiboModel.h
 3 //  微博基本信息展示
 4 //
 5 //  Created by 孔医己 on 14-6-2.
 6 //  Copyright (c) 2014年 itcast. All rights reserved.
 7 //
 8
 9 #import <Foundation/Foundation.h>
10
11 @interface YYweiboModel : NSObject
12 /**
13  *  昵称
14  */
15 @property(nonatomic,copy)NSString *name;
16 /**
17  *  正文
18  */
19 @property(nonatomic,copy)NSString *text;
20 /**
21  *  头像
22  */
23 @property(nonatomic,copy)NSString *icon;
24 /**
25  *  配图
26  */
27 @property(nonatomic,copy)NSString *picture;
28 /**
29  *  是否是vip
30  */
31 @property(nonatomic,assign)BOOL vip;
32
33 //接口
34 -(instancetype)initWithDict:(NSDictionary *)dict;
35 +(instancetype)weiboModelWithDict:(NSDictionary *)dict;
36 @end
YYweiboModel.m文件
 1 //
 2 //  YYweiboModel.m
 3 //  微博基本信息展示
 4 //
 5 //  Created by 孔医己 on 14-6-2.
 6 //  Copyright (c) 2014年 itcast. All rights reserved.
 7 //
 8
 9 #import "YYweiboModel.h"
10
11 @implementation YYweiboModel
12
13 -(instancetype)initWithDict:(NSDictionary *)dict
14 {
15     if (self = [super init]) {
16         //使用KVC
17         [self setValuesForKeysWithDictionary:dict];
18     }
19     return self;
20 }
21
22 /**
23  *  工厂方法
24  *
25  *  @param dict 字典
26  *
27  *  @return 模型
28  */
29 +(instancetype)weiboModelWithDict:(NSDictionary *)dict
30 {
31     return [[self alloc]initWithDict:dict];
32 }
33 @end
主控制器部分
YYViewController.h文件
#import <UIKit/UIKit.h>

@interface YYViewController : UITableViewController

@end
YYViewController.m文件
 1 //
 2 //  YYViewController.m
 3 //  微博基本信息展示
 4 //
 5 //  Created by 孔医己 on 14-6-2.
 6 //  Copyright (c) 2014年 itcast. All rights reserved.
 7 //
 8
 9 #import "YYViewController.h"
10 #import "YYweiboModel.h"
11 #import "YYweiboCell.h"
12
13 @interface YYViewController ()
14 @property(nonatomic,strong)NSArray *weibos;
15
16 @end
17
18 @implementation YYViewController
19
20 - (void)viewDidLoad
21 {
22     [super viewDidLoad];
23 }
24
25 #pragma mark -懒加载
26 -(NSArray *)weibos
27 {
28     if (_weibos==Nil) {
29         NSString *fullpath=[[NSBundle mainBundle]pathForResource:@"statuses.plist" ofType:nil];
30         NSArray *arrayM=[NSArray arrayWithContentsOfFile:fullpath];
31
32         NSMutableArray *models=[NSMutableArray arrayWithCapacity:arrayM.count];
33         for (NSDictionary *dict in arrayM) {
34             YYweiboModel *weibomodel=[YYweiboModel weiboModelWithDict:dict];
35             [models addObject:weibomodel];
36         }
37         _weibos=[models copy];
38     }
39     return _weibos;

40 }
41
42 #pragma mark- 数据源方法
43 //返回多少组
44 //这里可以不写,默认返回一组
45 -(NSInteger)numberOfSectionsInTableView:(UITableView *)tableView
46 {
47     return 1;
48 }
49 //每组多少行
50 -(NSInteger)tableView:(UITableView *)tableView numberOfRowsInSection:(NSInteger)section
51 {
52     return self.weibos.count;
53 }
54 //每组每行的数据-设置cell
55 -(UITableViewCell *)tableView:(UITableView *)tableView cellForRowAtIndexPath:(NSIndexPath *)indexPath
56 {
57     //1.到缓存中去取cell
58     static NSString *ID=@"ID";
59      //2.没有则创建cell
60     YYweiboCell *cell=[tableView dequeueReusableCellWithIdentifier:ID];
61     if (cell==nil) {
62         cell=[[YYweiboCell alloc]initWithStyle:UITableViewCellStyleDefault reuseIdentifier:ID];
63     }
64
65     //3.设置cell的数据
66     cell.weibo=self.weibos[indexPath.row];
67     //4.返回cell
68     return cell;
69
70 }
71
72 #pragma mark- 隐藏状态栏
73 -(BOOL)prefersStatusBarHidden
74 {
75     return YES;
76 }
77 @end
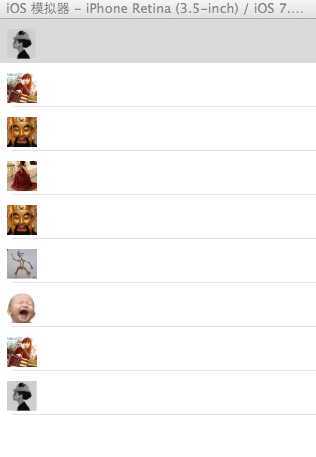
阶段性展示:
四、补充说明
1对于展示数据部分的补充说明:
iOS开发UI篇—以微博界面为例使用纯代码自定义cell程序编码全过程(一),布布扣,bubuko.com
iOS开发UI篇—以微博界面为例使用纯代码自定义cell程序编码全过程(一)
标签:c style class blog code java
原文地址:http://www.cnblogs.com/wendingding/p/3765031.html