标签:
在之前的一篇博文从JDBC到commons-dbutils 中,我曾经写到,对于获取数据库连接,有一个解决方案,那就是数据源。业界用到的比较普遍的开源数据源解决方案有很多,DBCP是其中一种,今天,我试图从源代码角度去解读这个解决方案。
全文分为三节,第一节介绍DBCP一般的用法,第二节按照第一节中给出的用法,从源代码角度看看,到底程序经过了哪些步骤,第三小节对全文做一个总结。
1、DBCP的一般用法
DBCP的用法其实很简单,一般就是new一个BasicDataSource,然后设置参数,当需要获取连接的时候,就调用getConnection()方法。代码如下:
//1 初始化一个DBCP数据源

public static void initDS(String connectURI, String username, String pswd, String driverClass, int initialSize,
            int maxActive, int maxIdle, int maxWait) {
        BasicDataSource ds = new BasicDataSource();
        ds.setDriverClassName(driverClass);
        ds.setUsername(username);
        ds.setPassword(pswd);
        ds.setUrl(connectURI);
        ds.setInitialSize(initialSize);
        ds.setMaxActive(maxActive);
        ds.setMaxIdle(maxIdle);
        ds.setMaxWait(maxWait);
        DS = ds;
    }

//......................
//2 获取连接
DS.getConnection();
其中driverClass是数据库驱动的类名,username是数据库用户名,pswd是数据库密码,connectURI是连接数据库的URI,initiialSize是初始化的时候创建的连接数
maxActive是允许活动的最大连接数,maxIdle是最大闲置连接数,maxWait是获取一个连接时最大的等待时间(毫秒)
2、对上述情景的源代码分析
在构造BasicDataSource以及为它设置参数的时候(上述第一步),其实BasicDataSource并没有构造完成,只有当第一次调用getConnection方法的时候,才会去构造真正的数据源,具体可以从代码看出:
/**
     * Create (if necessary) and return a connection to the database.
     *
     * @throws SQLException if a database access error occurs
     * @return a database connection
     */
    public Connection getConnection() throws SQLException {
        return createDataSource().getConnection();
    }
从源代码可以看出,获取连接之前先要创建数据源,创建的数据源将作为BasicDataSource内部的数据源,为获取连接提供服务。下面对这个createDataSource()方法进行解释,先看它的源代码:
/**
     * <p>Create (if necessary) and return the internal data source we are
     * using to manage our connections.</p>
     *
     * <p><strong>IMPLEMENTATION NOTE</strong> - It is tempting to use the
     * "double checked locking" idiom in an attempt to avoid synchronizing
     * on every single call to this method.  However, this idiom fails to
     * work correctly in the face of some optimizations that are legal for
     * a JVM to perform.</p>
     *
     * @throws SQLException if the object pool cannot be created.
     */
    protected synchronized DataSource createDataSource()
        throws SQLException {
        if (closed) {
            throw new SQLException("Data source is closed");
        }

        // Return the pool if we have already created it
        if (dataSource != null) {
            return (dataSource);
        }

        // create factory which returns raw physical connections
        ConnectionFactory driverConnectionFactory = createConnectionFactory();

        // create a pool for our connections
        createConnectionPool();

        // Set up statement pool, if desired
        GenericKeyedObjectPoolFactory statementPoolFactory = null;
        if (isPoolPreparedStatements()) {
            statementPoolFactory = new GenericKeyedObjectPoolFactory(null,
                        -1, // unlimited maxActive (per key)
                        GenericKeyedObjectPool.WHEN_EXHAUSTED_FAIL,
                        0, // maxWait
                        1, // maxIdle (per key)
                        maxOpenPreparedStatements);
        }

        // Set up the poolable connection factory
        createPoolableConnectionFactory(driverConnectionFactory, statementPoolFactory, abandonedConfig);

        // Create and return the pooling data source to manage the connections
        createDataSourceInstance();

        try {
            for (int i = 0 ; i < initialSize ; i++) {
                connectionPool.addObject();
            }
        } catch (Exception e) {
            throw new SQLNestedException("Error preloading the connection pool", e);
        }

        return dataSource;
    }
从源代码可以看出,createDataSource()方法通过7步,逐步构造出一个数据源,下面是详细的步骤:
1、检查数据源是否关闭或者是否创建完成,如果关闭了就抛异常,如果已经创建完成就直接返回。
2、调用createConnectionFactory()创建JDBC连接工厂driverConnectionFactory,这个工厂使用数据库驱动来创建最底层的JDBC连接
3、调用createConnectionPool()创建数据源使用的连接池,连接池顾名思义就是缓存JDBC连接的地方。
4、如果需要就设置statement的缓存池,这个一般不需要设置
5、调用createPoolableConnectionFactory创建PoolableConnection的工厂,这个工厂使用上述driverConnectionFactory来创建底层JDBC连接,然后包装出一个PoolableConnection,这个PoolableConnection与连接池设置了一对多的关系,也就是说,连接池中存在多个PoolableConnection,每个PoolableConnection都关联同一个连接池,这样的好处是便于该表PoolableConnection的close方法的行为,具体会在后面详细分析。
6、调用createDataSourceInstance()创建内部数据源
7、为连接池中添加PoolableConnection
经过以上7步,一个数据源就形成了,这里明确一点,一个数据源本质就是连接池+连接+管理策略。下面,将对每一步做详细的分析。
2.1 JDBC连接工厂driverConnectionFactory的创建过程
先上源代码:
/**
     * Creates a JDBC connection factory for this datasource.  This method only
     * exists so subclasses can replace the implementation class.
     */
    protected ConnectionFactory createConnectionFactory() throws SQLException {
        // Load the JDBC driver class
        Class driverFromCCL = null;
        if (driverClassName != null) {
            try {
                try {
                    if (driverClassLoader == null) {
                        Class.forName(driverClassName);
                    } else {
                        Class.forName(driverClassName, true, driverClassLoader);
                    }
                } catch (ClassNotFoundException cnfe) {
                    driverFromCCL = Thread.currentThread(
                            ).getContextClassLoader().loadClass(
                                    driverClassName);
                }
            } catch (Throwable t) {
                String message = "Cannot load JDBC driver class ‘" +
                    driverClassName + "‘";
                logWriter.println(message);
                t.printStackTrace(logWriter);
                throw new SQLNestedException(message, t);
            }
        }

        // Create a JDBC driver instance
        Driver driver = null;
        try {
            if (driverFromCCL == null) {
                driver = DriverManager.getDriver(url);
            } else {
                // Usage of DriverManager is not possible, as it does not
                // respect the ContextClassLoader
                driver = (Driver) driverFromCCL.newInstance();
                if (!driver.acceptsURL(url)) {
                    throw new SQLException("No suitable driver", "08001");
                }
            }
        } catch (Throwable t) {
            String message = "Cannot create JDBC driver of class ‘" +
                (driverClassName != null ? driverClassName : "") +
                "‘ for connect URL ‘" + url + "‘";
            logWriter.println(message);
            t.printStackTrace(logWriter);
            throw new SQLNestedException(message, t);
        }

        // Can‘t test without a validationQuery
        if (validationQuery == null) {
            setTestOnBorrow(false);
            setTestOnReturn(false);
            setTestWhileIdle(false);
        }

        // Set up the driver connection factory we will use
        String user = username;
        if (user != null) {
            connectionProperties.put("user", user);
        } else {
            log("DBCP DataSource configured without a ‘username‘");
        }

        String pwd = password;
        if (pwd != null) {
            connectionProperties.put("password", pwd);
        } else {
            log("DBCP DataSource configured without a ‘password‘");
        }

        ConnectionFactory driverConnectionFactory = new DriverConnectionFactory(driver, url, connectionProperties);
        return driverConnectionFactory;
    }
上面一连串代码干了什么呢?其实就干了两件事:1、获取数据库驱动 2、使用驱动以及参数(url、username、password)构造一个工厂。一旦这个工厂构建完毕了,就可以来生成连接,而这个连接的生成其实是驱动加上配置来完成的,下面是这个过程的时序图
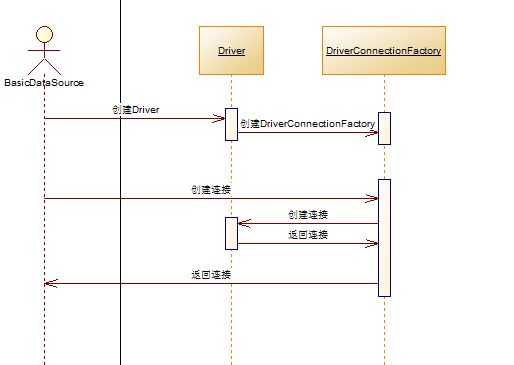
获取驱动的时候,使用了两种方法:一种是Class.forName,一种是DriverManager.getDriver(url),获取到驱动后再获取用户名密码以及URL这些参数,最后创建DriverConnectionFactory,而DriverConnectionFactory生成连接的方式可以从源代码看出:
 public DriverConnectionFactory(Driver driver, String connectUri, Properties props) {
        _driver = driver;
        _connectUri = connectUri;
        _props = props;
    }

    public Connection createConnection() throws SQLException {
        return _driver.connect(_connectUri,_props);
    }
就是用驱动和配置参数获取。
2.2 创建连接池的过程
先看源代码:
 /**
     * Creates a connection pool for this datasource.  This method only exists
     * so subclasses can replace the implementation class.
     */
    protected void createConnectionPool() {
        // Create an object pool to contain our active connections
        GenericObjectPool gop;
        if ((abandonedConfig != null) && (abandonedConfig.getRemoveAbandoned())) {
            gop = new AbandonedObjectPool(null,abandonedConfig);
        }
        else {
            gop = new GenericObjectPool();
        }
        gop.setMaxActive(maxActive);
        gop.setMaxIdle(maxIdle);
        gop.setMinIdle(minIdle);
        gop.setMaxWait(maxWait);
        gop.setTestOnBorrow(testOnBorrow);
        gop.setTestOnReturn(testOnReturn);
        gop.setTimeBetweenEvictionRunsMillis(timeBetweenEvictionRunsMillis);
        gop.setNumTestsPerEvictionRun(numTestsPerEvictionRun);
        gop.setMinEvictableIdleTimeMillis(minEvictableIdleTimeMillis);
        gop.setTestWhileIdle(testWhileIdle);
        connectionPool = gop;
    }
在创建连接池的时候,用到了common-pool里的GenericObjectPool,今天不解读common-pool,所以不做深入分析,我们只需知道,对于JDBC连接的缓存以及管理其实是交给GenericObjectPool的,DBCP其实只是负责创建这样一种pool然后使用它而已。
2.3 创建statement缓存池
一般来说,statement并不是重量级的对象,创建过程消耗的资源并不像JDBC连接那样重,所以没必要做缓存池化,这里为了简便起见,对此不做分析。
2.4 创建PoolableConnectionFactory
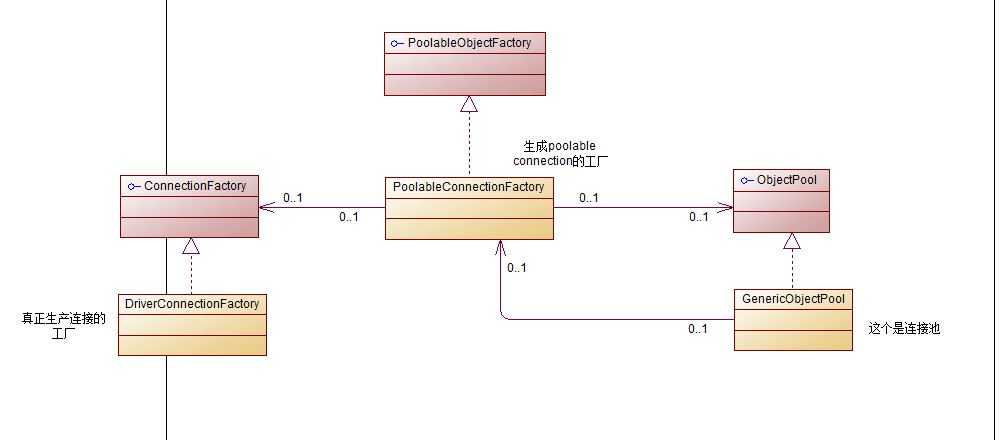
这一步是一个承上启下的过程,承上在于利用上面两部创建的连接工厂和连接池,构建PoolableConnectionFactory,启下则在于为后面的向连接池里添加连接做准备。
下面先上一张静态的类关系图:
然后是源代码:
/**
     * Creates the PoolableConnectionFactory and attaches it to the connection pool.  This method only exists
     * so subclasses can replace the default implementation.
     *
     * @param driverConnectionFactory JDBC connection factory
     * @param statementPoolFactory statement pool factory (null if statement pooling is turned off)
     * @param configuration abandoned connection tracking configuration (null if no tracking)
     * @throws SQLException if an error occurs creating the PoolableConnectionFactory
     */
    protected void createPoolableConnectionFactory(ConnectionFactory driverConnectionFactory,
            KeyedObjectPoolFactory statementPoolFactory, AbandonedConfig configuration) throws SQLException {
        PoolableConnectionFactory connectionFactory = null;
        try {
            connectionFactory =
                new PoolableConnectionFactory(driverConnectionFactory,
                                              connectionPool,
                                              statementPoolFactory,
                                              validationQuery,
                                              validationQueryTimeout,
                                              connectionInitSqls,
                                              defaultReadOnly,
                                              defaultAutoCommit,
                                              defaultTransactionIsolation,
                                              defaultCatalog,
                                              configuration);
            validateConnectionFactory(connectionFactory);
        } catch (RuntimeException e) {
            throw e;
        } catch (Exception e) {
            throw new SQLNestedException("Cannot create PoolableConnectionFactory (" + e.getMessage() + ")", e);
        }
    }
可以看见,在创建PoolableConnectionFactory的时候,需要用到前面创建的driverConnectionFactory以及连接池connectionPool,那么那个构造函数到底干了先什么呢?
 public PoolableConnectionFactory(
        ConnectionFactory connFactory,
        ObjectPool pool,
        KeyedObjectPoolFactory stmtPoolFactory,
        String validationQuery,
        int validationQueryTimeout,
        Collection connectionInitSqls,
        Boolean defaultReadOnly,
        boolean defaultAutoCommit,
        int defaultTransactionIsolation,
        String defaultCatalog,
        AbandonedConfig config) {

        _connFactory = connFactory;
        _pool = pool;
        _config = config;
        _pool.setFactory(this);
        _stmtPoolFactory = stmtPoolFactory;
        _validationQuery = validationQuery;
        _validationQueryTimeout = validationQueryTimeout;
        _connectionInitSqls = connectionInitSqls;
        _defaultReadOnly = defaultReadOnly;
        _defaultAutoCommit = defaultAutoCommit;
        _defaultTransactionIsolation = defaultTransactionIsolation;
        _defaultCatalog = defaultCatalog;
    }
它在内部保存了真正的JDBC 连接的工厂以及连接池,然后,通过一句_pool.setFactory(this); 将它自己设置给了连接池。这行代码十分重要,要理解这行代码,首先需要明白common-pool中的GenericObjectPool添加内部元素的一般方法,没错,那就是必须要传入一个工厂Factory。GenericObjectPool添加内部元素时会调用addObject()这个方法,内部其实是调用工厂的makeObejct()方法来创建元素,然后再加入到自己的池中。_pool.setFactory(this)这句代码其实起到了启下的作用,没有它,后面的为连接池添加连接也就不可能完成。
当创建完工厂后,会有个validateConnectionFactory(connectionFactory);这个方法的作用仅仅是用来验证数据库连接可使用,看代码:
protected static void validateConnectionFactory(PoolableConnectionFactory connectionFactory) throws Exception {
        Connection conn = null;
        try {
            conn = (Connection) connectionFactory.makeObject();
            connectionFactory.activateObject(conn);
            connectionFactory.validateConnection(conn);
            connectionFactory.passivateObject(conn);
        }
        finally {
            connectionFactory.destroyObject(conn);
        }
    }
先是用makeObject方法来创建一个连接,然后做相关验证(就是用一些初始化sql来试着执行一下,看看能不能连接到数据库),然后销毁连接,这里并没有向连接池添加连接,真正的添加连接在后面,不过,我们可以先通过下面一张时序图来看看makeObject方法到底做了什么。
下面是一张整体流程的时序图:
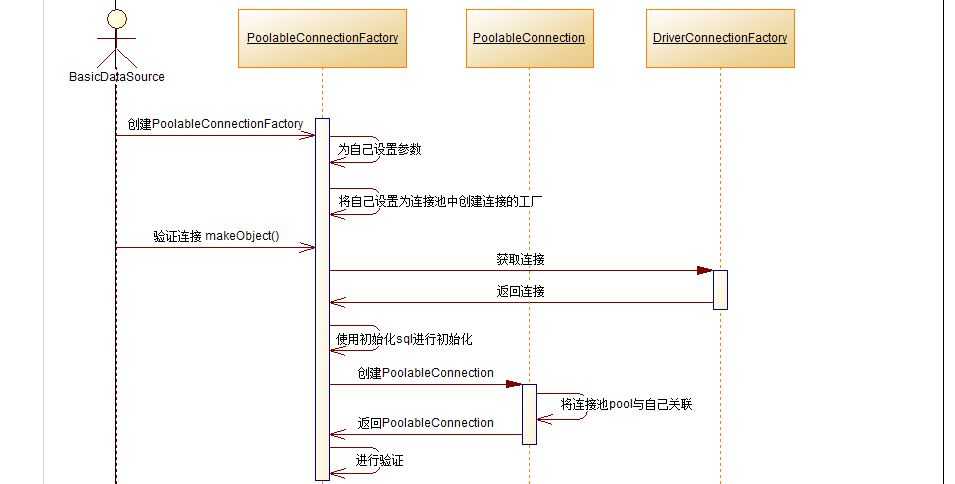
从图中可以看出,makeObject方法的大致流程:从driverConnectionFactory那里拿到底层连接,初始化验证,然后创建PoolableConnection,在创建这个PoolableConnection的时候,将PoolableConnection与连接池关联了起来,真正做到了连接池和连接之间的一对多的关系,这也为改变PoolableConnection的close方法提供了方便。
下面是makeObject方法的源代码:
public Object makeObject() throws Exception {
        Connection conn = _connFactory.createConnection();
        if (conn == null) {
            throw new IllegalStateException("Connection factory returned null from createConnection");
        }
        initializeConnection(conn); //初始化,这个过程可有可无
        if(null != _stmtPoolFactory) {
            KeyedObjectPool stmtpool = _stmtPoolFactory.createPool();
            conn = new PoolingConnection(conn,stmtpool);
            stmtpool.setFactory((PoolingConnection)conn);
        }
        //这里是关键
        return new PoolableConnection(conn,_pool,_config);
    }
其中PoolableConnection的构造函数如下:
/**
     *
     * @param conn my underlying connection
     * @param pool the pool to which I should return when closed
     * @param config the abandoned configuration settings
     */
    public PoolableConnection(Connection conn, ObjectPool pool, AbandonedConfig config) {
        super(conn, config);
        _pool = pool;
    }
内部关联了一个连接池,这个连接池的作用体现在PoolableConnection的close方法中:
  /**
     * Returns me to my pool.
     */
     public synchronized void close() throws SQLException {
        if (_closed) {
            // already closed
            return;
        }

        boolean isUnderlyingConectionClosed;
        try {
            isUnderlyingConectionClosed = _conn.isClosed();
        } catch (SQLException e) {
            try {
                _pool.invalidateObject(this); // XXX should be guarded to happen at most once
            } catch(IllegalStateException ise) {
                // pool is closed, so close the connection
                passivate();
                getInnermostDelegate().close();
            } catch (Exception ie) {
                // DO NOTHING the original exception will be rethrown
            }
            throw (SQLException) new SQLException("Cannot close connection (isClosed check failed)").initCause(e);
        }

        if (!isUnderlyingConectionClosed) {
            // Normal close: underlying connection is still open, so we
            // simply need to return this proxy to the pool
            try {
                _pool.returnObject(this); // XXX should be guarded to happen at most once
            } catch(IllegalStateException e) {
                // pool is closed, so close the connection
                passivate();
                getInnermostDelegate().close();
            } catch(SQLException e) {
                throw e;
            } catch(RuntimeException e) {
                throw e;
            } catch(Exception e) {
                throw (SQLException) new SQLException("Cannot close connection (return to pool failed)").initCause(e);
            }
        } else {
            // Abnormal close: underlying connection closed unexpectedly, so we
            // must destroy this proxy
            try {
                _pool.invalidateObject(this); // XXX should be guarded to happen at most once
            } catch(IllegalStateException e) {
                // pool is closed, so close the connection
                passivate();
                getInnermostDelegate().close();
            } catch (Exception ie) {
                // DO NOTHING, "Already closed" exception thrown below
            }
            throw new SQLException("Already closed.");
        }
    }
一行_pool.returnObject(this)表明并非真的关闭了,而是返还给了连接池。
到这里, PoolableConnectionFactory创建好了,它使用driverConnectionFactory来创建底层连接,通过makeObject来创建PoolableConnection,这个PoolableConnection通过与connectionPool关联来达到改变close方法的作用,当PoolableConnectionFactory创建好的时候,它自己已经作为一个工厂类被设置到了connectionPool,后面connectionPool会使用这个工厂来生产PoolableConnection,而生成的所有的PoolableConnection都与connectionPool关联起来了,可以从connectionPool取出,也可以还给connectionPool。接下来,让我们来看一看到底怎么去初始化connectionPool。
2.5 创建数据源并初始化连接池
对应代码如下:
 createDataSourceInstance();

 try {
       for (int i = 0 ; i < initialSize ; i++) {
           connectionPool.addObject();
      }
     } catch (Exception e) {
            throw new SQLNestedException("Error preloading the connection pool", e);
     }
我们先看 createDataSourceInstance();
/**
     * Creates the actual data source instance.  This method only exists so
     * subclasses can replace the implementation class.
     *
     * @throws SQLException if unable to create a datasource instance
     */
    protected void createDataSourceInstance() throws SQLException {
        PoolingDataSource pds = new PoolingDataSource(connectionPool);
        pds.setAccessToUnderlyingConnectionAllowed(isAccessToUnderlyingConnectionAllowed());
        pds.setLogWriter(logWriter);
        dataSource = pds;
    }
其实就是创建一个PoolingDataSource,作为底层真正的数据源,这个PoolingDataSource比较简单,这里不做详细介绍
接下来是一个for循环,通过调用connectionPool.addObject();来为连接池添加数据库连接,下面是一张时序图:
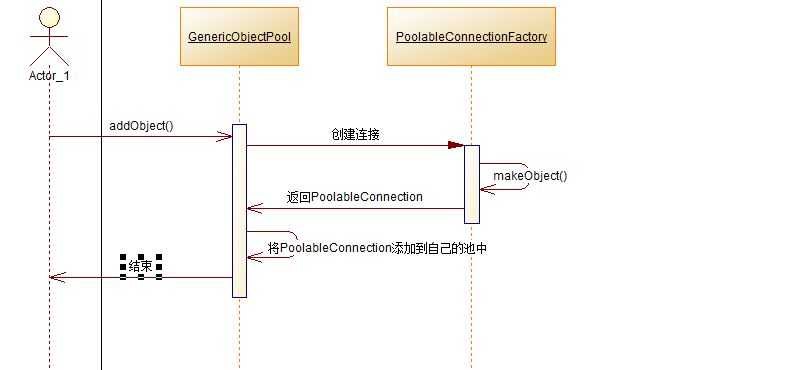
可以看出,在2.4中创建的PoolableConnectionFactory在这里起作用了,addObject依赖的正是makeObject,而makeObject在上面也介绍过了。
到此为止,数据源创建好了,连接池里也有了可以使用的连接,而且每个连接和连接池都做了关联,改变了close的行为。这个时候BasicDataSource正是可以工作了,调用getConnection的时候,实际是调用底层数据源的getConnection,而底层数据源其实就是从连接池中获取的连接。
3、总结
整个数据源最核心的其实就三个东西:一个是连接池,在这里体现为common-pool中的GenericObjectPool,它负责缓存和管理连接,所有的配置策略都是由它管理。第二个是连接,这里的连接就是PoolableConnection,当然它是对底层连接进行了封装。第三个则是连接池和连接的关系,在此表现为一对多的互相引用。对数据源的构建则是对连接池,连接以及连接池与连接的关系的构建,掌握了这些点,就基本能掌握数据源的构建。
对于DBCP的构建,个人觉得比较精妙的是通过构建连接和连接池的关联关系来实现代理的作用,不足之处则是没有把构建过程抽象出来。其实,完全可以使用建造者模式对BasicDataSource的构建过程进行抽象,从而使构建过程更具有扩展性。
最后,我分析的DBCP是1.4版本,最新的是2.X版本,应该对整个代码架构做了重大的调整,有机会我再分析。另外,数据源中真正的复杂的部分其实是对连接的缓存和管理,这部分由common-pool解决了,有机会我一定会好好分析。
标签:
原文地址:http://www.cnblogs.com/biakia/p/4352197.html