标签:
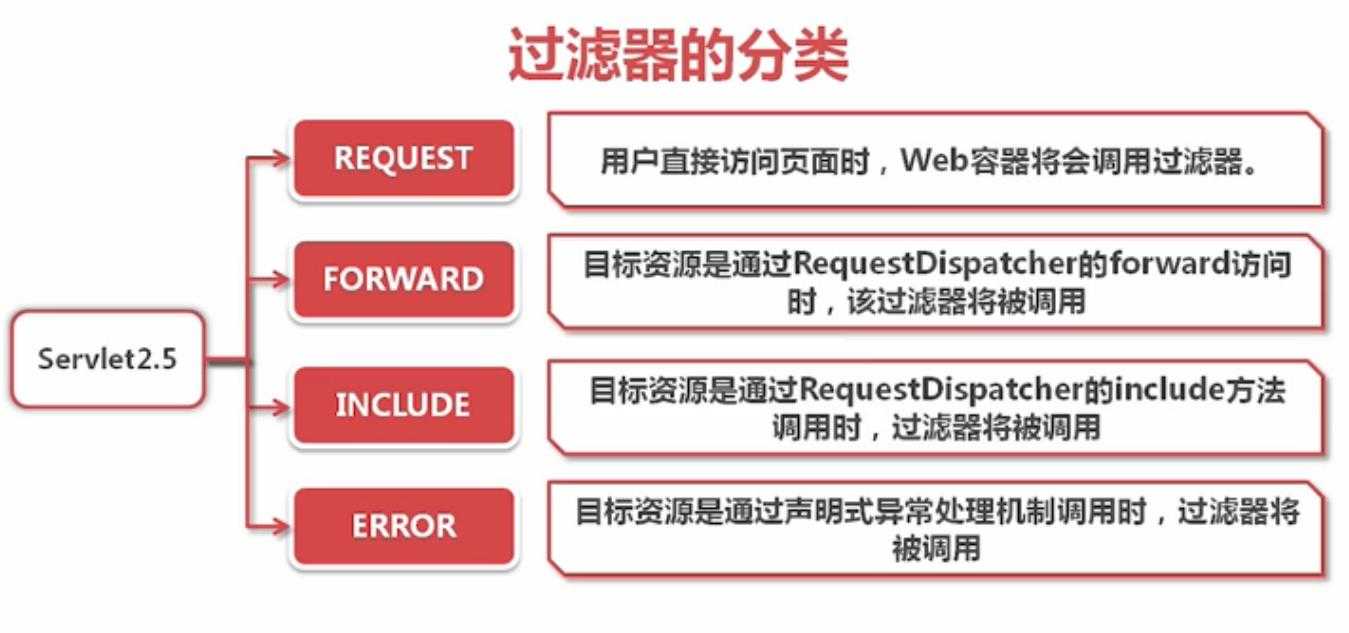
继上一篇关于过滤器连总结后,本篇为大家详细介绍一下过滤器中过滤规则的dispatcher属性的使用,在servlet2.5中dispatcher的属性有四种,其中上一篇已经为大家介绍了error属性的使用,本篇将详细介绍一下剩余的三个属性的作用。
1、servlet2.5中的dispatcher属性:

servlet3.0中增加了一个异步操作属性,由于博主现在使用的是servlet2.5所以对于这个属性暂时先不为大家总结了。
2、转发与重定向:(推荐博客:http://blog.163.com/yea_love/blog/static/183356380201323034842605/)
转发:request.getRequestDispatcher("a.jsp").forward(request,response)或request.getRequestDispatcher("a.jsp").include(request,response)
重定向:response.sendRedirect("a.jsp")
区别:a、转发在服务器端完成的;重定向是在客户端完成的 ;
b、.转发的速度快;重定向速度慢;
c、转发的是同一次请求;重定向是两次不同请求 ;
d、转发不会执行转发后的代码;重定向会执行重定向之后的代码 ;
e、转发地址栏没有变化;重定向地址栏有变化 ;
f、转发必须是在同一台服务器下完成;重定向可以在不同的服务器下完成 。
3、添加过滤规则:
在web.xml中为我们之前创建的过滤器,在增加一个过滤规则:
<filter-mapping>
  <filter-name>firstFilter</filter-name>
  <url-pattern>/main.jsp</url-pattern>
  <dispatcher>REQUEST</dispatcher>
 </filter-mapping>
4、添加重定向:
在我们的firstFilter类中添加一个重定向:
public class firstFilter implements Filter {

    public void destroy() {
        System.out.println("Destory-----first");
    }

    public void doFilter(ServletRequest request, ServletResponse response,
            FilterChain arg) throws IOException, ServletException {
        System.out.println("start-----first");
        //arg.doFilter(request, response);//没有该方法,页面将一直处于加载状态。

        HttpServletRequest req = (HttpServletRequest)request;
        HttpServletResponse res = (HttpServletResponse)response;
        //重定向
        res.sendRedirect(req.getContextPath()+"/mian.jsp");
        //forward方式转发
        //req.getRequestDispatcher("/main.jsp").forward(request, response);
        //include方式转发
        //req.getRequestDispatcher("/main.jsp").include(request, response);

        System.out.println("end-----first");
    }

    public void init(FilterConfig arg0) throws ServletException {
        System.out.println("Init-----first");
    }

}
5、部署工程,测试:
在浏览器地址栏输入我们的工程名:(例如:http://localhost:8080/HelloWord/index.jsp)

6、添加转发:
一、forward方式转发:
a:通过Filter类实现。(代码部分见4)
b:通过jsp页面完成。
<%@ page language="java" import="java.util.*" pageEncoding="utf-8"%>
<%
String path = request.getContextPath();
String basePath = request.getScheme()+"://"+request.getServerName()+":"+request.getServerPort()+path+"/";
System.out.println("index.jsp已加载");
%>
<jsp:forward page="/main.jsp"></jsp:forward><!-- forward方式转发 -->
<!--<jsp:include page="/main.jsp"></jsp:include> include方式转发 -->
<!DOCTYPE HTML PUBLIC "-//W3C//DTD HTML 4.01 Transitional//EN">
<html>
  <head>
    <base href="<%=basePath%>">

    <title>my one web</title>
    <meta http-equiv="pragma" content="no-cache">
    <meta http-equiv="cache-control" content="no-cache">
    <meta http-equiv="expires" content="0">
    <meta http-equiv="keywords" content="keyword1,keyword2,keyword3">
    <meta http-equiv="description" content="This is my one web!">
  </head>

  <body>
    <p>HelloWord!</p>
  </body>
</html>
二、include方式:
a:通过Filter类实现。(代码部分见4)
b:通过jsp页面完成。(代码部分见6.一.b)
7、添加过滤器规则:
在web.xml中添加过滤转发事件的规则,只需要修改<dispatcher>的属性就可以了。
好了,关于dispatcher属性的总结就为大家分享到这里,如有疑问,欢迎留言讨论。
标签:
原文地址:http://www.cnblogs.com/AndroidJotting/p/4353233.html