标签:
线性布局:
线性布局就是将各种控件按照行或者列依次进行排列。
其中本实验用到的各控件的属性解释如下:
android:layout_weight属性是指不同的控件在activity中占有体积大小的比例。
android:paddingLeft指内边距左的距离,即控件内文字离控件左边边界的距离。其它的类推。
android:gravity指控件内文字相对于控件本身的方向属性,长度为dip,与像素独立的长度。
android:background为控件内文字颜色的背景色,颜色采用rgb时前面需用”#”号.
android:textSize为文本的大小,单位为pt,即镑。
android:id为该控件的id,即在此处可以设置控件的id。
android:layout_width为控件本身的宽度属性,其它的类似。
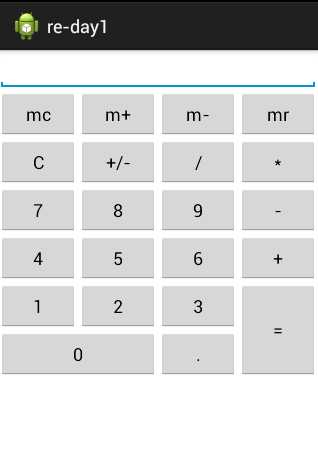
一个计算器的布局文件

<?xml version="1.0" encoding="utf-8"?>
<LinearLayout xmlns:android="http://schemas.android.com/apk/res/android"
    android:layout_width="match_parent"
    android:layout_height="match_parent"
    android:orientation="vertical" >

    <LinearLayout
        android:layout_width="match_parent"
        android:layout_height="wrap_content"
        android:orientation="vertical" >

        <EditText
            android:id="@+id/msgbox"
            android:layout_width="match_parent"
            android:layout_height="wrap_content" >
        </EditText>

    </LinearLayout>
    <!-- 显示框 -->
    <LinearLayout
        android:layout_width="match_parent"
        android:layout_height="wrap_content"
        android:orientation="horizontal" >
        <Button android:id="@+id/btn1"
        android:layout_weight="1"
        android:layout_width="match_parent"
        android:layout_height="wrap_content"
        android:text="mc"
    />
       <Button android:id="@+id/btn2"
        android:layout_weight="1"
        android:layout_width="match_parent"
        android:layout_height="wrap_content"
        android:text="m+"
    />

       <Button android:id="@+id/btn3"
        android:layout_weight="1"
        android:layout_width="match_parent"
        android:layout_height="wrap_content"
        android:text="m-"
    />

       <Button android:id="@+id/btn4"
        android:layout_weight="1"
        android:layout_width="match_parent"
        android:layout_height="wrap_content"
        android:text="mr"
    />

       </LinearLayout>
       <LinearLayout
        android:layout_width="match_parent"
        android:layout_height="wrap_content"
        android:orientation="horizontal" >
        <Button android:id="@+id/btn5"
        android:layout_weight="1"
        android:layout_width="match_parent"
        android:layout_height="wrap_content"
        android:text="C"
    />
       <Button android:id="@+id/btn6"
        android:layout_weight="1"
        android:layout_width="match_parent"
        android:layout_height="wrap_content"
        android:text="+/-"
    />

       <Button android:id="@+id/btn7"
        android:layout_weight="1"
        android:layout_width="match_parent"
        android:layout_height="wrap_content"
        android:text="/"
    />

       <Button android:id="@+id/btn8"
        android:layout_weight="1"
        android:layout_width="match_parent"
        android:layout_height="wrap_content"
        android:text="*"
    />

       </LinearLayout>

       <LinearLayout
        android:layout_width="match_parent"
        android:layout_height="wrap_content"
        android:orientation="horizontal" >
        <Button android:id="@+id/btn9"
        android:layout_weight="1"
        android:layout_width="match_parent"
        android:layout_height="wrap_content"
        android:text="7"
    />
       <Button android:id="@+id/btn10"
        android:layout_weight="1"
        android:layout_width="match_parent"
        android:layout_height="wrap_content"
        android:text="8"
    />

       <Button android:id="@+id/btn11"
        android:layout_weight="1"
        android:layout_width="match_parent"
        android:layout_height="wrap_content"
        android:text="9"
    />

       <Button android:id="@+id/btn12"
        android:layout_weight="1"
        android:layout_width="match_parent"
        android:layout_height="wrap_content"
        android:text="-"
    />

       </LinearLayout>

    <LinearLayout
        android:layout_width="match_parent"
        android:layout_height="wrap_content"
        android:orientation="horizontal" >

        <Button
            android:id="@+id/btn13"
            android:layout_width="match_parent"
            android:layout_height="wrap_content"
            android:layout_weight="1"
            android:text="4" />

        <Button
            android:id="@+id/btn14"
            android:layout_width="match_parent"
            android:layout_height="wrap_content"
            android:layout_weight="1"
            android:text="5" />

        <Button
            android:id="@+id/btn15"
            android:layout_width="match_parent"
            android:layout_height="wrap_content"
            android:layout_weight="1"
            android:text="6" />

        <Button
            android:id="@+id/btn16"
            android:layout_width="match_parent"
            android:layout_height="wrap_content"
            android:layout_weight="1"
            android:text="+" />
    </LinearLayout>
    <LinearLayout

        android:orientation="horizontal"
        android:layout_width="match_parent"
        android:layout_height="wrap_content"
        android:baselineAligned="false">

        <LinearLayout
            android:layout_width="wrap_content"
            android:layout_height="wrap_content"
            android:layout_weight="3"
            android:orientation="vertical" >

            <LinearLayout
                android:orientation="horizontal"
                android:layout_width="match_parent"
                android:layout_height="wrap_content"
                 >

                <Button
                    android:id="@+id/btn17"
                    android:layout_width="wrap_content"
                    android:layout_height="wrap_content"
                    android:layout_weight="1"
                    android:text="1" />

                <Button
                    android:id="@+id/btn18"
                    android:layout_width="wrap_content"
                    android:layout_height="wrap_content"
                    android:layout_weight="1"
                    android:text="2" />

                <Button
                    android:id="@+id/btn19"
                    android:layout_width="wrap_content"
                    android:layout_height="wrap_content"
                    android:layout_weight="1"
                    android:text="3" />

            </LinearLayout>
             <LinearLayout
                android:orientation="horizontal"
                android:layout_width="match_parent"
                android:layout_height="wrap_content"
                 >
                <Button
                  android:layout_weight="2"
                    android:id="@+id/btn20"
                    android:layout_width="0px"
                    android:layout_height="wrap_content"
                    android:text="0" />
                <Button
                    android:layout_weight="1"
                    android:id="@+id/btn21"
                    android:layout_width="0px"

                    android:layout_height="wrap_content"
                    android:text="." />

                 </LinearLayout>
        </LinearLayout>

       <LinearLayout
           android:layout_width="wrap_content"
           android:layout_height="match_parent"
           android:layout_weight="1"
           android:orientation="horizontal" >

              <Button

                    android:id="@+id/btn22"
                    android:layout_width="match_parent"
                    android:layout_height="match_parent"
                    android:text="=" />
          </LinearLayout>

    </LinearLayout>

</LinearLayout>
框架布局
框架布局
框架布局是最简单的布局方式,所有的试视图都是以层叠的方式显示。第一个添加到框架布局的视图会先是在最底层,最后一个放在最高层,上层会覆盖下层。类似堆栈布局。
|
属性值 |
描述 |
|
Top |
置于顶端 |
|
Buttom |
置于最低端 |
|
Left |
置于左侧 |
|
Right |
置于右侧 |
|
Center_vertical |
垂直方向居中 |
|
Horizontal_vertical |
水平方向居中 |

<FrameLayout xmlns:android="http://schemas.android.com/apk/res/android"
    xmlns:tools="http://schemas.android.com/tools"
    android:layout_width="match_parent"
    android:layout_height="match_parent"
    android:orientation="vertical" >

    <ImageView
        android:layout_width="wrap_content"
        android:layout_height="wrap_content"
        android:layout_gravity="center"
        android:background="@drawable/gg" />

    <ImageView
        android:layout_width="80dp"
        android:layout_height="80dp"
        android:layout_gravity="center"
        android:layout_marginLeft="80dp"
        android:layout_marginTop="80dp"
        android:background="@drawable/ll" />

</FrameLayout>
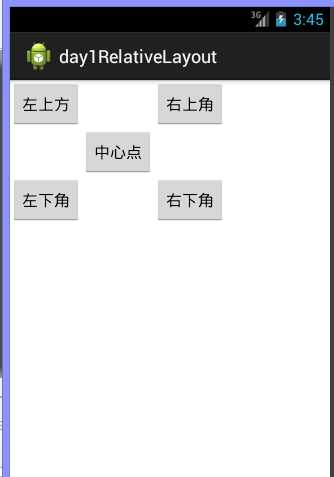
相对布局 RelativeLayout
以一个元素为参照物,其他元素围绕展开
|
属性 |
说明 |
|
android:layout_below="" |
在某元素下面 |
|
android:layout_above="" |
在某元素上面 |
|
android:layout_toLeftOf="" |
在某元素左侧 |
|
android:layout_toRightOf="" |
再某元素右侧 |

<RelativeLayout xmlns:android="http://schemas.android.com/apk/res/android"
    xmlns:tools="http://schemas.android.com/tools"
    android:layout_width="match_parent"
    android:layout_height="match_parent"
    android:orientation="vertical" >
<Button
    android:id="@+id/btnzuoshang"
    android:layout_width="wrap_content"
    android:layout_height="wrap_content"
    android:text="左上方"
    android:textSize="16dp"
    />
<Button
    android:id="@+id/btncenter"
    android:layout_width="wrap_content"
    android:layout_height="wrap_content"
    android:layout_toRightOf="@id/btnzuoshang"
    android:layout_below="@id/btnzuoshang"
    android:text="中心点"
    android:textSize="16dp"
    />
<Button
    android:id="@+id/btnyouxia"
    android:layout_width="wrap_content"
    android:layout_height="wrap_content"
    android:layout_toRightOf="@id/btncenter"
    android:layout_below="@id/btncenter"
    android:text="右下角"
    android:textSize="16dp"
    />
  <Button
    android:id="@+id/btnzuoxia"
    android:layout_width="wrap_content"
    android:layout_height="wrap_content"
    android:layout_toLeftOf="@id/btncenter"
    android:layout_below="@id/btncenter"
    android:text="左下角"
    android:textSize="16dp"
    />

  <Button
    android:id="@+id/btnyoushang"
    android:layout_width="wrap_content"
    android:layout_height="wrap_content"
    android:layout_toRightOf="@id/btncenter"
    android:layout_above="@id/btncenter"
    android:text="右上角"
    android:textSize="16dp"
    />


</RelativeLayout>
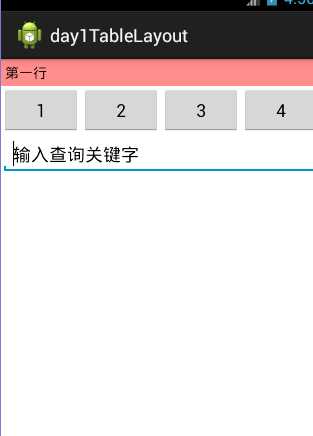
表格布局 TableLayout
TableLayout属性:
Shrinkable 如果一个列被标识为shrinkable 则该列宽度可以收缩,使表哥能够适应其父容器大小。
Stretchable如果一个列被标识为Stretchable则该列宽度可以进行拉伸,使其填满表格中的空闲空间
Collapsed 如果一个列被标识为Collapsed 则该列会被隐藏
一个列可以同时具有Shrinkable以及Stretchable属性,该列宽度可以任意拉伸和收缩以适应父容器大小。
TableLayout继承了linearlayout类,除了父类的方法还有一下属性以及方法
|
属性 |
方法 |
|
android:collapseColums |
设置指定列号属性为Collapsed |
|
android:shrinkColums |
设置指定列号属性为Shrinkable |
|
android:stretchColums |
设置指定列号属性为Stretchable |
Tablelayout列号从0开始
setShtinkAllcolums和setStretchAllcolums把表格所有的列设置为Shrinkable以及Stretchable

<LinearLayout xmlns:android="http://schemas.android.com/apk/res/android"
    xmlns:tools="http://schemas.android.com/tools"
    android:layout_width="fill_parent"
    android:layout_height="fill_parent"
    android:orientation="vertical" >

    <TableLayout
        android:id="@+id/table1"
        android:layout_width="fill_parent"
        android:layout_height="wrap_content"
        android:background="#FFFFFF"
        android:stretchColumns="0" >

        <TableRow
            android:id="@+id/row1"
            android:layout_width="fill_parent"
            android:layout_height="wrap_content" >

            <TextView
                android:layout_width="fill_parent"
                android:layout_height="wrap_content"
                android:layout_centerInParent="true"
                android:background="#fd8d8d"
                android:padding="4px"
                android:text="第一行"
                android:textColor="#000000" />
        </TableRow>
    </TableLayout>

    <TableLayout
        android:id="@+id/table2"
        android:layout_width="match_parent"
        android:layout_height="wrap_content"
        android:stretchColumns="0,1,2,3" >

        <TableRow
            android:id="@+id/row2"
            android:layout_width="fill_parent"
            android:layout_height="wrap_content" >

            <Button
                android:id="@+id/btn1"
                android:layout_width="wrap_content"
                android:layout_height="wrap_content"
                android:text="button1" />

            <Button
                android:id="@+id/btn2"
                android:layout_width="wrap_content"
                android:layout_height="wrap_content"
                android:text="button1" />

            <Button
                android:id="@+id/btn3"
                android:layout_width="wrap_content"
                android:layout_height="wrap_content"
                android:text="button1" />

            <Button
                android:id="@+id/btn4"
                android:layout_width="wrap_content"
                android:layout_height="wrap_content"
                android:text="button1" />
        </TableRow>
    </TableLayout>

    <TableLayout
        android:id="@+id/table3"
        android:layout_width="fill_parent"
        android:layout_height="wrap_content"
        android:background="#FFFFFF"
        android:stretchColumns="0" >

        <TableRow
            android:id="@+id/row3"
            android:layout_width="fill_parent"
            android:layout_height="wrap_content" >

            <EditText
                android:id="@+id/ed1"
                android:layout_width="fill_parent"
                android:layout_height="wrap_content"
                android:text="输入查询关键字" />
        </TableRow>
    </TableLayout>

</LinearLayout>
标签:
原文地址:http://www.cnblogs.com/ilsk/p/4389760.html