标签:style class blog code java http
xfire webServeic 例子,参考网上众多例子,自己写得完成了,给大家分享
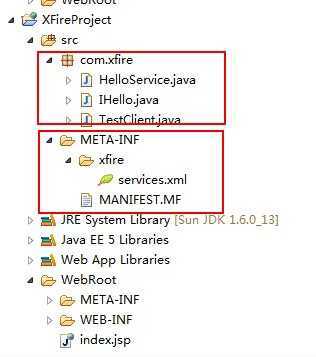
大家只要按这个目录去建文件就可以了,然后运行,至于其中原理慢慢理会吧
环境:myeclipse 10 +xfire1.1.6
目录

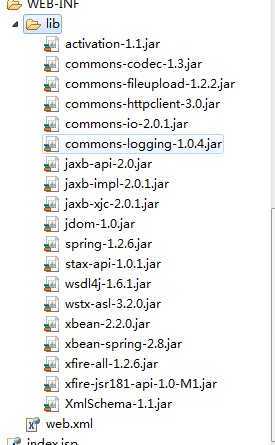
架包:
.
下面就是文件的添加或修改:
web.xml
<?xml version="1.0" encoding="UTF-8"?>
<web-app version="2.5"
    xmlns="http://java.sun.com/xml/ns/javaee"
    xmlns:xsi="http://www.w3.org/2001/XMLSchema-instance"
    xsi:schemaLocation="http://java.sun.com/xml/ns/javaee
    http://java.sun.com/xml/ns/javaee/web-app_2_5.xsd">
  <display-name></display-name>

  <servlet>
    <servlet-name>XFireServlet</servlet-name>
    <display-name>XFire Servlet</display-name>
    <servlet-class>
        org.codehaus.xfire.transport.http.XFireConfigurableServlet
    </servlet-class>
  </servlet>

  <servlet-mapping>
    <servlet-name>XFireServlet</servlet-name>
    <url-pattern>/servlet/XFireServlet/*</url-pattern>
  </servlet-mapping>

  <servlet-mapping>
    <servlet-name>XFireServlet</servlet-name>
    <url-pattern>/services/*</url-pattern>
  </servlet-mapping>

  <listener-class>
    org.springframework.web.context.ContextLoaderListener
   </listener-class>

  <welcome-file-list>
    <welcome-file>index.jsp</welcome-file>
  </welcome-file-list>
</web-app>
services.xml
<!-- START SNIPPET: services -->
<beans xmlns="http://xfire.codehaus.org/config/1.0">
  <service>
    <name>HelloService</name>
      <namespace>http://com.xfireDemo/HelloService</namespace>
      <serviceClass>com.xfire.IHello</serviceClass>
      <implementationClass>com.xfire.HelloService</implementationClass>
      <scope>request</scope>
  </service>
</beans>
<!-- END SNIPPET: services -->
接口HelloService实现:
package com.xfire;

import java.io.File;
import java.io.FileOutputStream;
import java.util.ArrayList;
import java.util.List;
import java.util.UUID;

public class HelloService implements IHello{
    public String sayHello(String name){
        return name+",你好!";
    }

    public List<String> uploadFile() {
        List<String> list=new ArrayList<String>();
        list.add("1");
        list.add("2");
        list.add("3");
        return list;
    }

    /**
     * 文件上传 zpf
     * @param classType 目录类型如:产品,头像
     * @param fileUrls 文件路径
     * @param img_urlFileName 文件名字
     * @param resouceType 资源类型如:image,vedio,doc
     * @param objName 产品下新目录。null表示无用
     * @return
     */

    public String remoteFileUpload(String classType, byte[] filebytes,String img_urlFileName, String resouceType, String objName) {
        String path=getPorjectPath();
        String serverPath="";
        if (filebytes!=null && filebytes.length > 0) {
             try{
                   if(filebytes!=null&&filebytes.length>0){
                    String ext = img_urlFileName.substring(img_urlFileName.lastIndexOf("."));
                    String fname = UUID.randomUUID().toString();
                    String savePath="";
                    //放入文件目录
                    if (objName != null) {
                        savePath = path+"\\files"+ "\\" + classType + "\\" + objName + "\\"
                                + resouceType + "\\";
                        serverPath="\\files"+ "\\"+ classType + "\\" + objName + "\\"+ resouceType + "\\" + fname + ext;
                        /*savePath = path+"\\files"+ "\\";
                        serverPath="\\files"+ classType + "\\" + objName + "\\"+ resouceType + "\\" + fname + ext;*/
                    } else {
                        savePath = path+"\\files" + "\\" + classType + "\\" + resouceType + "\\";
                        serverPath ="\\files"+ "\\"+classType + "\\" + resouceType + "\\"+ fname + ext;
                        /*savePath = path+"\\files" + "\\";
                        serverPath ="\\files"+classType + "\\" + resouceType + "\\"+ fname + ext;*/
                    }


                    System.out.println("savePath:"+savePath);
                    File filePath=new File(savePath);
                    if (!filePath.exists()) {
                        filePath.mkdirs();
                    }

                    File file = new File(savePath+ fname + ext);
                    file.createNewFile();

                    FileOutputStream fos=new FileOutputStream(file);
                    fos.write(filebytes);
                    fos.close();
                    path=file.getAbsolutePath();
                    System.out.println(path);
                    file=null;
                   }

                 }catch(Exception ex){
                     ex.printStackTrace();
                 }
        }


        return serverPath;
    }


    private String projectName="XFireProject";        //  你项目的名称
    //获取当前项目的绝对路径
      public String getPorjectPath(){
       String nowpath;             //当前tomcat的bin目录的路径 如 D:\java\software\apache-tomcat-6.0.14\bin
       String tempdir;
       nowpath=System.getProperty("user.dir");
       tempdir=nowpath.replace("bin", "webapps");  //把bin 文件夹变到 webapps文件里面
       tempdir+="\\"+projectName;  //拼成D:\java\software\apache-tomcat-6.0.14\webapps\sz_pro
       return tempdir;
      }

}
接口IHello:
package com.xfire;

import java.util.List;

public interface IHello {
    public String sayHello(String name);
    public List<String> uploadFile();
    public String remoteFileUpload(String classType, byte[] data,String img_urlFileName, String resouceType, String objName);
}
下面就是写得测试类了:
TestClient
package com.xfire;

import java.net.MalformedURLException;

import org.codehaus.xfire.XFire;
import org.codehaus.xfire.XFireFactory;
import org.codehaus.xfire.client.XFireProxyFactory;
import org.codehaus.xfire.service.Service;
import org.codehaus.xfire.service.binding.ObjectServiceFactory;

/**
 * 通过XFire生成的客户端进行调用
 *
 * TestClient.java
 * com.liuxiang.xfire
 * XFireProject
 * @author liuxiang mailto:juxtapose@163.com
 * 2007-9-9 下午06:54:36
 *
 */
public class TestClient {
    public static void main(String[] args) {
    Service serviceModel = new ObjectServiceFactory().create(IHello.class);
    XFire xfire=XFireFactory.newInstance().getXFire();
    XFireProxyFactory factory=new XFireProxyFactory(xfire);
    String serviceUrl = "http://localhost:8080/XFireProject/services/HelloService";
      IHello ds= null;
      try {
       ds=(IHello)factory.create(serviceModel, serviceUrl);
      } catch (MalformedURLException e) {
       e.printStackTrace();
      }
      System.out.println(ds.sayHello("Tom"));
}  }
运行Main方法就可以执行
URL可以运行 http://localhost:8080/XFireProject/services/HelloService
代码没问题都是经过测试的
源码:http://download.csdn.net/detail/zpf5126/7457087
xfire webServeic 例子,布布扣,bubuko.com
标签:style class blog code java http
原文地址:http://www.cnblogs.com/W203654/p/3772675.html