标签:
目标:制作一个人员列表,可通过人员的id进行修改。
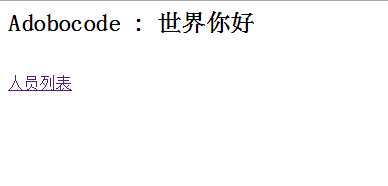
界面1:

界面2:

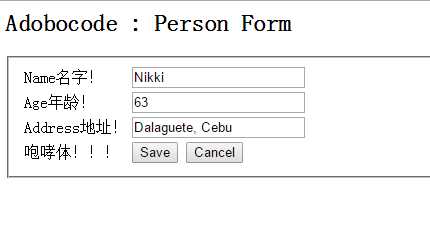
界面3:

一.利用myEclipse导入spring的特性后,让applicationContext.xml在WebRoot下。
二.过程:
1.建立index.jsp界面,使用jstl注解。(知识点C标签)
 1 <%@ page language="java" import="java.util.*" pageEncoding="utf-8"%>
 2 <%
 3 String path = request.getContextPath();
 4 String basePath = request.getScheme()+"://"+request.getServerName()+":"+request.getServerPort()+path+"/";
 5 %>
 6 <%@ taglib prefix="c" uri="http://java.sun.com/jsp/jstl/core" %>
 7 <!DOCTYPE HTML PUBLIC "-//W3C//DTD HTML 4.01 Transitional//EN">
 8 <html>
 9   <head>
10     <base href="<%=basePath%>">
11
12     <title>My JSP ‘index.jsp‘ starting page</title>
13     <meta http-equiv="pragma" content="no-cache">
14     <meta http-equiv="cache-control" content="no-cache">
15     <meta http-equiv="expires" content="0">
16     <meta http-equiv="keywords" content="keyword1,keyword2,keyword3">
17     <meta http-equiv="description" content="This is my page">
18   </head>
19
20   <body>
21       <h2>Adobocode : 世界你好</h2>
22      <br/>
23      <a href="<c:url value="personDisplay.htm"/>">人员列表</a>
24   </body>
25 </html>
2.在web.xml配置分发器,走htm后缀的方法
 1 <?xml version="1.0" encoding="UTF-8"?>
 2 <web-app version="2.5"
 3     xmlns="http://java.sun.com/xml/ns/javaee"
 4     xmlns:xsi="http://www.w3.org/2001/XMLSchema-instance"
 5     xsi:schemaLocation="http://java.sun.com/xml/ns/javaee
 6     http://java.sun.com/xml/ns/javaee/web-app_2_5.xsd">
 7
 8   <servlet>
 9       <servlet-name>springMVC</servlet-name>
10       <servlet-class>org.springframework.web.servlet.DispatcherServlet</servlet-class>
11       <load-on-startup>1</load-on-startup>
12   </servlet>
13
14   <servlet-mapping>
15       <servlet-name>springMVC</servlet-name>
16       <url-pattern>*.htm</url-pattern>
17   </servlet-mapping>
18
19   <welcome-file-list>
20     <welcome-file>index.jsp</welcome-file>
21   </welcome-file-list>
22 </web-app>
3.配置springMVC-servlet.xml:第一次搭建时,报404错误,原来是下面这一行配置有误,prefix为路径的前缀,要扫描的view层是放在jsp文件下的,所以是value为/jsp/,只要路径弄错了就会报404.
<property name="prefix"><value>/jsp/</value></property>
 1 <?xml version="1.0" encoding="UTF-8"?>
 2
 3 <beans xmlns="http://www.springframework.org/schema/beans"
 4     xmlns:xsi="http://www.w3.org/2001/XMLSchema-instance" xmlns:p="http://www.springframework.org/schema/p"
 5     xmlns:context="http://www.springframework.org/schema/context"
 6     xsi:schemaLocation="
 7 http://www.springframework.org/schema/beans
 8 http://www.springframework.org/schema/beans/spring-beans-3.0.xsd
 9 http://www.springframework.org/schema/context
10 http://www.springframework.org/schema/context/spring-context-3.0.xsd">
11      <bean class="org.springframework.web.servlet.mvc.annotation.DefaultAnnotationHandlerMapping"/>
12      <bean class="org.springframework.web.servlet.mvc.annotation.AnnotationMethodHandlerAdapter"/>
13      <context:component-scan base-package="paul.sydney.controller"/>
14      <context:component-scan base-package="paul.sydney.service"/>
15      <bean id="viewResolver" class="org.springframework.web.servlet.view.InternalResourceViewResolver">
       <!-- 视图解释类:将在Controller返回的ModelAndView的基础上,加上目录前缀/WEB-INF/jsp/, 加后文件名称后缀.jsp,由此等待下个页面 -->
16          <property name="viewClass"><value>org.springframework.web.servlet.view.JstlView</value></property>
17          <property name="prefix"><value>/jsp/</value></property>
18          <property name="suffix"><value>.jsp</value></property>
19      </bean>
20 </beans>
DispatcherServlet默认在/WEB-INF/中查找<servlet-name>-servlet.xml,使用该配置文件初始化DispatcherServlet上下文对应的子spring容器,spring mvc3可以在-servlet.xml,自动扫描各个包,在此扫描controller/service两个包,返回视图层:jsp文件夹下面的.jsp后缀文件。有篇很好的介绍:http://www.open-open.com/lib/view/open1402751642806.html
4.model层,bean
 1 package paul.sydney.model;
 2
 3 public class Person {
 4     private int id;
 5     private String name;
 6     private int age;
 7     private String address;
 8
 9     public int getId() {
10         return id;
11     }
12
13     public void setId(int id) {
14         this.id = id;
15     }
16
17     public String getName() {
18         return name;
19     }
20
21     public void setName(String name) {
22         this.name = name;
23     }
24
25     public int getAge() {
26         return age;
27     }
28
29     public void setAge(int age) {
30         this.age = age;
31     }
32
33     public String getAddress() {
34         return address;
35     }
36
37     public void setAddress(String address) {
38         this.address = address;
39     }
40
41     @Override
42     public String toString() {
43         StringBuilder sb = new StringBuilder();
44         sb.append("\nname:" + this.name);
45         sb.append("\nage:" + this.age);
46         sb.append("\naddress:" + this.address);
47
48         return sb.toString();
49
50     }
51 }
5.servlet层,这里使用一些伪造的数据
 1 package paul.sydney.service;
 2
 3 import java.util.ArrayList;
 4 import java.util.List;
 5
 6 import org.springframework.stereotype.Service;
 7
 8 import paul.sydney.model.Person;
 9
10 @Service
11 public class DummyService {
12     public List<Person> getDummyList() {
13         System.err.println("111111");
14         List<Person> list = new ArrayList<Person>();
15         Person p1 = new Person();
16         p1.setId(123);
17         p1.setName("ami");
18         p1.setAge(23);
19         p1.setAddress("Nzland");
20         Person p2 = new Person();
21         p2.setId(321);
22         p2.setName("heha");
23         p2.setAge(21);
24         p2.setAddress("England");
25         list.add(p1);
26         list.add(p2);
27
28         return list;
29     }
30     public Person retrievePerson(int id) {
31         System.err.println("123456");
32         Person person = new Person();
33         person.setId(56789);
34         person.setName("Nikki");
35         person.setAge(63);
36         person.setAddress("Dalaguete, Cebu");
37         return person;
38     }
39
40      public void savePerson(Person person) {
41             System.out.println("\n\nSaving" + person);
42         }
43 }
6.controller层,有两个控制器:
数据的获取:
 1 package paul.sydney.controller;
 2
 3 import org.springframework.beans.factory.annotation.Autowired;
 4 import org.springframework.stereotype.Controller;
 5 import org.springframework.ui.ModelMap;
 6 import org.springframework.web.bind.annotation.RequestMapping;
 7
 8 import paul.sydney.service.DummyService;
 9
10 @Controller
11 public class PersonDisplay {
12
13     private final DummyService dummyService;
14
15     @Autowired
16     public PersonDisplay(DummyService dummyService) {
17
18         this.dummyService = dummyService;
19     }
20
21     @RequestMapping("/personDisplay.htm")
22     public ModelMap defaultHandler() {
23         return new ModelMap("personList", this.dummyService.getDummyList());
24     }
25 }
index.jsp的地址映射/personDisplay.htm,将从数据层找到的数据存储在ModelMap内,类似kv的数据结构。
点击id,进入数据的form:
 1 package paul.sydney.controller;
 2
 3 import javax.net.ssl.SSLEngineResult.Status;
 4
 5 import org.springframework.beans.factory.annotation.Autowired;
 6 import org.springframework.stereotype.Controller;
 7 import org.springframework.ui.ModelMap;
 8 import org.springframework.validation.BindingResult;
 9 import org.springframework.web.bind.annotation.ModelAttribute;
10 import org.springframework.web.bind.annotation.RequestMapping;
11 import org.springframework.web.bind.annotation.RequestMethod;
12 import org.springframework.web.bind.annotation.RequestParam;
13 import org.springframework.web.bind.annotation.SessionAttributes;
14 import org.springframework.web.bind.support.SessionStatus;
15
16 import paul.sydney.model.Person;
17 import paul.sydney.service.DummyService;
18
19
20 @Controller
21 @RequestMapping("/personForm.htm")
22 @SessionAttributes("person")
23 public class PersonForm {
24
25     private final DummyService dummyService;
26
27     @Autowired
28     public PersonForm(DummyService dummyService) {
29         this.dummyService = dummyService;
30     }
31
32     @RequestMapping(method = RequestMethod.GET)
33     public String setupForm(@RequestParam("personId") int id, ModelMap model) { //用requestparam绑定personId这个url值,赋给id
34         Person person = this.dummyService.retrievePerson(id);
35         model.addAttribute("person", person);
36         return "personForm";
37     }
38
39     @RequestMapping(method = RequestMethod.POST)
40     public String processSubmit(@ModelAttribute("person") Person person,
41             BindingResult result, SessionStatus status) {
42         System.err.println("redirect");
43         this.dummyService.savePerson(person);
44         status.setComplete();
45         return "redirect:personDisplay.htm";
46     }
47 }
7.在WebRoot下建jsp文件夹:建两个jsp文件:personDisplay.jsp personForm.jsp
personDisplay.jsp
1 <%@ page language="java" session="false" 2 contentType="text/html; charset=UTF-8"%> 3 4 <%@ taglib uri="http://java.sun.com/jsp/jstl/core" prefix="c"%> 5 6 <jsp:useBean id="personList" scope="request" 7 type="java.util.List<paul.sydney.model.Person>" /> 8 <html> 9 <head> 10 <title>Adobocode : Sample Spring MVC using JSTL iteration</title> 11 </head> 12 <body> 13 <h2> 14 Adobocode : Person List 明明用了JSTL啊! 15 </h2> 16 <table border="1"> 17 <tr> 18 <th> 19 Id 20 </th> 21 <th> 22 Name 23 </th> 24 <th> 25 Age 26 </th> 27 <th> 28 Address 29 </th> 30 </tr> 31 <c:forEach var="p" items="${personList}"> 32 <tr> 33 <td> 34 <c:url var="editUrl" value="personForm.htm"> 35 <c:param name="personId" value="${p.id}" /> 36 </c:url> 37 <a href=‘<c:out value="${editUrl}"/>‘>${p.id}</a> 38 </td> 39 <td> 40 ${p.name} 41 </td> 42 <td> 43 ${p.age} 44 </td> 45 <td> 46 ${p.address} 47 </td> 48 </tr> 49 </c:forEach> 50 </table> 51 </body> 52 </html>
personForm.jsp
 1 <%@ page language="java" session="false"
 2     contentType="text/html; charset=UTF-8"%>
 3 <%@ taglib prefix="spring" uri="http://www.springframework.org/tags"%>
 4 <%@ taglib prefix="form" uri="http://www.springframework.org/tags/form"%>
 5 <html>
 6     <head>
 7         <title>Adobocode : Sample Spring MVC using Forms</title>
 8     </head>
 9
10     <body>
11         <h2>
12             Adobocode : Person Form
13         </h2>
14         <form:form modelAttribute="person">
15             <form:hidden path="id" />
16             <fieldset>
17                 <table>
18                     <tr>
19                         <td>
20                             Name名字!
21                         </td>
22                         <td>
23                             <form:input path="name" />
24                         </td>
25                     </tr>
26                     <tr>
27                         <td>
28                             Age年龄!
29                         </td>
30                         <td>
31                             <form:input path="age" />
32                         </td>
33                     </tr>
34                     <tr>
35                         <td>
36                             Address地址!
37                         </td>
38                         <td>
39                             <form:input path="address" />
40                         </td>
41                     </tr>
42                     <tr>
43                         <td>
44                             咆哮体!!!
45                         </td>
46                         <td>
47                             <input type="submit" id="save" name="_eventId_save" value="Save" />
48                             <input type="submit" onClick="history.go(-1);"
49                                 name="_eventId_cancel" value="Cancel" />
50                         </td>
51                     </tr>
52                 </table>
53             </fieldset>
54         </form:form>
55     </body>
56 </html>
8.部署在tomcat下运行。
标签:
原文地址:http://www.cnblogs.com/romanhzzz/p/4411599.html