标签:
开篇: 问题和解决思路
在使用一些基础IDE时,工具经常会在我们建立特定文件时给我们一个已经有了一些特定代码的模板文件,但是在linux开发时,没有这样的IDE,怎么办?虽然代码量不是很多,但是能一次简化它和IDE一样也是一件让人心情愉悦的事情
html文件中:
|
1
2
3
4
5
6
7
8
9
10
|
<!DOCTYPE html PUBLIC "-//W3C//DTD HTML 4.01 Transitional//EN" "http://www.w3.org/TR/html4/loose.dtd"><html><head><meta http-equiv="Content-Type" content="text/html; charset=UTF-8"><title>Insert title here</title></head><body></body></html> |
php文件中:
|
1
2
3
4
5
|
<?php filename:***** author :***** |
或者这样:
shell文件中:
|
1
|
#!/bin/bash |
Perl文件中:
|
1
|
#!/usr/bin/perl |
Python文件中:
|
1
|
#!/usr/bin/python |
每次都写这么无聊的东西 实在是浪费时间,我也相信那就话:不懒的程序员不是一个好的程序员,
所以让我们自己动手写一个数据自己的命令,我们的思路还是那样,利用linux启动加载的机制:
利用login
login shell:取得 bash 时需要完整的登陆流程的,就称为 login shell
/etc/profile -> ~/.bash_profile(~/.bash_login、~/.profile,bash 的 login shell 配置只会读取上面三个文件的其中一个,顺序从左到右)
/etc/profile文件:
~/.bash_profile文件: 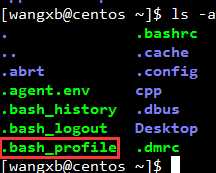
这里注意这几个文件: 这是一个可以让我们自由定制属于自己的bash的配置文件(例如这里你可以 alias 设置属于你自己的别名)、面向全系统的配置那就是 /etc/bashrc 了
那这个文件如何加载到bash环境中?
再来看看我们 ~/.bash_profile 中 写了什么,所以你在 .bashrc 中定义的alias别名才会在系统开机时加载到环境中

 这是一个当你退出shell环境是执行的一些操作的设置
 这是记录你执行过bash命令的一个历史记录文件
过程的错误
注意:这里我犯了一个严重的错误,我将我的new.sh文件放到 /etc/profile.d/ 目录下,结果就是我无法登录了!!!! 最后使用救援模式才把系统救了回来,看到这里大家一定要注意,++中间的是错误的
好了,我们分析一下为什么?
现象是:我已输入用户名/密码 系统就立即exit到了登录界面
当我在救援模式下删除了/etc/profile.d下的new.sh文件时,我才意识到:/etc/profile文件中


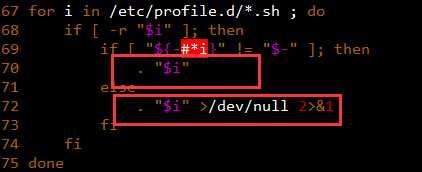
这段代码意思是:当登录时会执行 /etc/profile.d/ 目录下所有的 .sh文件,当系统执行我的new.sh文件时,我的new.sh文件要求 参数没有的话就 exit退出了,哎,就是这么粗心的问题
那么正确的思路应该是:
echo $PATH

我选择将文件放到 /usr/local/bin 目录下
++++++++++++++++++++++++++++++++++++++++++++++++++++++++++++++++++++++++++++++++++++++++++++++++++++++++++++++++
由于我们想让我们写的这些命令可以被系统中所有用户使用,那我们就要对 /etc/profile 这个文件下手了!!!
看看 /etc/profile/ 中的内容就会明白,这个文件里面是一系列关于登录用户取得shell后的环境信息,我们可以将我们的这个执行命令放到这个文件中
但是最好还是别修改这个 文件,我们有更好的办法;这个文件在最后有一个处理就是将 /etc/profile.d文件夹下的所有可执行的 *.sh 文件加入shell
环境中去,所以我们的思路就是把我们写好的 shell 脚本放到这个目录下去
让我们看看 /etc/profile 这个文件中关于 profile.d中文件的加载
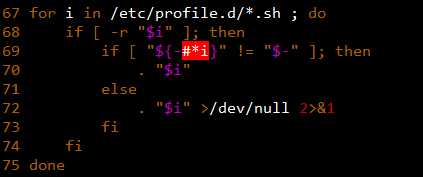
再来看看 /etc/profile.d/文件夹下文件

++++++++++++++++++++++++++++++++++++++++++++++++++++++++++++++++++++++++++++++++++++++++++++++++++++++++++++++++++
注意将我们写好的 shell脚本所有用户可读和可执行权限
实现篇:
根据我们上面了解知识和思路,我们开始我们的实现步骤,详细过程就不说了,太繁琐了,我就简单的在代码中注释了,本身没有什么难道,有点基础的相信都没问题
设置命令格式:

代码实现:
新建一个new.sh文件
|
1
2
3
4
5
6
7
8
9
10
11
12
13
14
15
16
17
18
19
20
21
22
23
24
25
26
27
28
29
30
31
32
33
34
35
36
37
38
39
40
41
42
43
44
45
46
47
48
49
50
51
52
53
54
55
56
57
58
59
60
61
62
63
64
65
66
67
68
69
70
71
72
73
74
75
76
77
78
79
80
81
82
83
84
85
86
87
88
89
90
91
92
93
94
95
96
97
98
99
100
101
102
103
104
105
106
107
108
109
110
111
112
113
114
115
116
117
118
119
120
121
122
123
124
125
126
127
128
129
130
131
132
133
134
135
136
137
138
139
140
141
142
143
144
145
146
147
148
149
150
151
152
153
154
155
156
157
158
159
160
161
162
163
164
165
166
167
168
169
170
171
172
173
174
175
176
177
178
179
180
181
182
183
184
185
186
187
188
189
190
191
192
193
194
195
196
197
198
199
|
#!/bin/bash#+++++++++++++++++++++++++++++++++++# filename: new.sh# author: wangxb# date: 2015-04-11 00:08:59#+++++++++++++++++++++++++++++++++++#------------------------------------------------------------------------------------------------------------------------------------------# 由于在linux下开发时经常需要在新建文件后,输入一下信息,类似于这样:# <?php# filename:*****# author :*****# 或者这样:# shell文件中: #!/bin/bash# Perl文件中: #!/usr/bin/perl# Python文件中:#!/usr/bin/python# 每次都写这么无聊的东西 实在是浪费时间,我也相信那就话:不懒的程序员不是一个好的程序员,# 所以让我们自己动手写一个数据自己的命令,我们的思路还是那样,利用linux启动加载的机制:# 利用login# login shell:取得 bash 时需要完整的登陆流程的,就称为 login shell# /etc/profile -> ~/.bash_profile(~/.bash_login、~/.profile,bash 的 login shell 配置只会读取上面三个文件的其中一个,顺序从左到右)# 由于我们想让我们写的这些命令可以被系统中所有用户使用,那我们就要对 /etc/profile 这个文件下手了!!!# 看看 /etc/profile/ 中的内容就会明白,这个文件里面是一系列关于登录用户取得shell后的环境信息,我们可以将我们的这个执行命令放到这个文件中# 但是最好还是别修改这个 文件,我们有更好的办法;这个文件在最后有一个处理就是将 /etc/profile.d文件夹下的所有可执行的 *.sh 文件加入shell# 环境中去,所以我们的思路就是把我们写好的 shell 脚本放到这个目录下去# 注意将我们写好的 shell脚本所有用户可读和可执行权限# -----------------------------------------------------------------------------------------------------------------------------------------# 设置模板文件存放路径TPL_DIR="/root/mylinux/myCommand/newtpl/tpl"# 这里是根据命令的第一个参数来确定调用什么样的模板文件和默认的生成文件的后缀名case $1 in ‘html‘) TPL_NAME="html.tpl" suffix="html" ;; ‘html5‘) TPL_NAME="html5.tpl" suffix="html" ;; ‘php‘) TPL_NAME="php.tpl" suffix="php" ;; ‘css‘) TPL_NAME="css.tpl" suffix="css" ;; ‘js‘) TPL_NAME="jss.tpl" suffix="js" ;; ‘py‘) TPL_NAME="py.tpl" suffix="py" ;; ‘pl‘) TPL_NAME="pl.tpl" suffix="pl" ;; ‘rb‘) TPL_NAME="rb.tpl" suffix="rb" ;; ‘sh‘) TPL_NAME="sh.tpl" suffix="sh" ;; *) echo "command type now exist" exit ;;esacexport TPL_DIRexport TPL_NAME# 根据特定格式模板文件创建一个我们想要的文件的方法function createTpl() { filename="$1.$2" # 设置文件名 localdir=${3} # 设置文件目录 # 判断在目标目录下是否存在同名文件,对于[存在/不存在]进行相应处理 if [ -f $localdir/$filename ]; then create_date=$(date +"%Y%m%d%H%M%S") read -p "${filename} is exist, Do you want to ${1}_${create_date}.${suffix}.(y/n)" yes_no if [ "$yes_no" = ‘y‘ ] || [ "$yes_no" = "Y" ] || [ "$yes_no" = "yes" ] || [ "$yes_no" = "YES" ]; then filename=${1}_${create_date}.${suffix} elif [ "$yes_no" = ‘n‘ ] || [ "$yes_no" = "N" ] || [ "$yes_no" = "no" ] || [ "$yes_no" = "NO" ]; then exit fi fi # 判断模板文件是否存在 # 存在:根据模板文件生成我们的文件,并自动替换其中的文件名、时间和创建者 if [ -e ${TPL_DIR}/${TPL_NAME} ]; then touch $localdir/$filename > /dev/null 2>&1 cat $TPL_DIR/$TPL_NAME > $localdir/$filename 2> /dev/null cdate=$(date +"%Y_%m_%d %H:%M:%S") sed -i "s/@filename/$filename/g" $localdir/$filename sed -i "s/@cdate/$cdate/g" $localdir/$filename if [ $# -eq 4 ]; then sed -i "s/@author/$4/g" $localdir/$filename else who=$(whoami) sed -i "s/@author/$who/g" $localdir/$filename fi vim $localdir/$filename else # 不存在:就创建一个空文件即可touch $localdir/$filename > /dev/null 2>&1 vim $localdir/$filename fi}# 检查数据目录是否是一个有效的目录function checkDir() { if [ "$1" = "" ]; then localdir=$(pwd) else $(cd $1 > /dev/null 2>&1) && cd $1 > /dev/null 2>&1 || exit localdir=$(pwd) fi echo $localdir}# 检查输入的文件后缀是否符合要求function checkSuffix() { suffix=‘‘ if [[ "$1" =~ ^[a-zA-Z0-9]+$ ]]; then suffix=$1 fi echo $suffix}# 左移我们的参数列表shift# 检查必填参数文件名情况if [ "$#" -lt 1 ] || [ "$1" = "" ]; then echo "Command request file name(not allow empty) as first options" exitfi# 对于数据的可选参数,根据输入参数 进行不同处理case $# in 1) createTpl $1 $suffix $(pwd) ;; 2) localdir=$(checkDir $2) if [ -z "$localdir" ]; then echo ‘The directory does not exist‘ exit fi createTpl $1 $suffix $localdir ;; 3) localdir=$(checkDir $2) if [ -z "$localdir" ]; then echo ‘The directory does not exist‘ exitfi if [ -z "$(checkSuffix $3)" ]; then echo ‘suffix format is error‘ exit else suffix=$(checkSuffix $3) fi createTpl $1 $suffix $localdir ;; 4) localdir=$(checkDir $2) if [ -z "$localdir" ]; then echo ‘The directory does not exist‘ exit fi if [ -z "$(checkSuffix $3)" ]; then echo ‘suffix format is error‘ exit else suffix=$(checkSuffix $3) fi if [[ "$4" =~ ^[a-zA-Z]+$ ]]; then author=$4 else author=$(whoami) ficreateTpl $1 $suffix $localdir $author ;; *) echo "options nums is error" exit ;;esac |
建立tpl模板文件:
html.tpl:
|
1
2
3
4
5
6
7
8
9
10
|
<!DOCTYPE html PUBLIC "-//W3C//DTD HTML 4.01 Transitional//EN" "http://www.w3.org/TR/html4/loose.dtd"><html><head><meta http-equiv="Content-Type" content="text/html; charset=UTF-8"><title>Insert title here</title></head><body></body></html> |
php.tpl
|
1
2
3
4
5
6
7
|
<?php /* * filename: @filename * author : @author * create : @cdate * update : @update */ |
sh.tpl
|
1
2
3
4
5
6
7
8
|
#!/bin/bash#+++++++++++++++++++++++++++++++++++++++++++++++++# filename : @filename# author : @author# create : @cdate# update : @update#+++++++++++++++++++++++++++++++++++++++++++++++++ |
设置系统加载和alias 建立别名
+++++++++++++++++++++++++++++++++++++++++++++++++++++++++++++++++++++++++++++++++++++++++++++++++++++
根据我们开篇的知识我们复制我们的new.sh文件到 /etc/profile.d文件夹下:

设置执行权限

复制过来发现,我们文件的权限和其他文件一致,所以我们就不做修改了
+++++++++++++++++++++++++++++++++++++++++++++++++++++++++++++++++++++++++++++++++++++++++++++++++++++
复制复制我们的new.sh文件到 /usr/local/bin文件夹下,并更名为 new,修改权限可执行

测试:

OK 命令存在
复制我们的模板文件到 /var/tpl 目录下
cp -r /root/mylinux/myCommand/newtpl/tpl /var/
修改new.sh文件中的TPL_DIR变量

alias设置别名 修改 /etc/bashrc 文件,在文件末尾追加
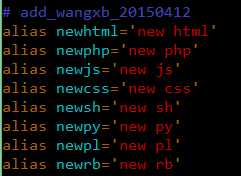
完工
激动的时候来了,我们试试执行我们的命令
新建html


新建php

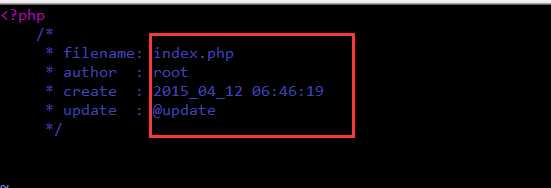
看到么,初始化文件信息已经完成
新建 shell文件

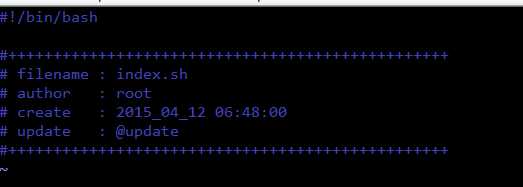
再来看看,html和shell文件已经在当前目录下生成,php文件则在我们的相对目录下生成


结语
至此,一套属于我们自己的命令就已经完成,万事开头难,昨天突然有了这个小想法,硬着头皮开始做,现在弄完了觉得非常开心。嘿嘿 洗洗睡觉了
标签:
原文地址:http://www.cnblogs.com/wxb0328/p/mycommand.html