标签:
有关使用Android如何设计出有个性的界面,按照本人估计,除了遵循google的设计规范,就只能使用自定义View这个最灵活的方式了,这几天找了些资料学习自定义View,但是学习android developer文档中自定义的View比较麻烦,又找了些比较简单的材料,结合自己对CustomView这个实例的理解,开始学习自定义View。
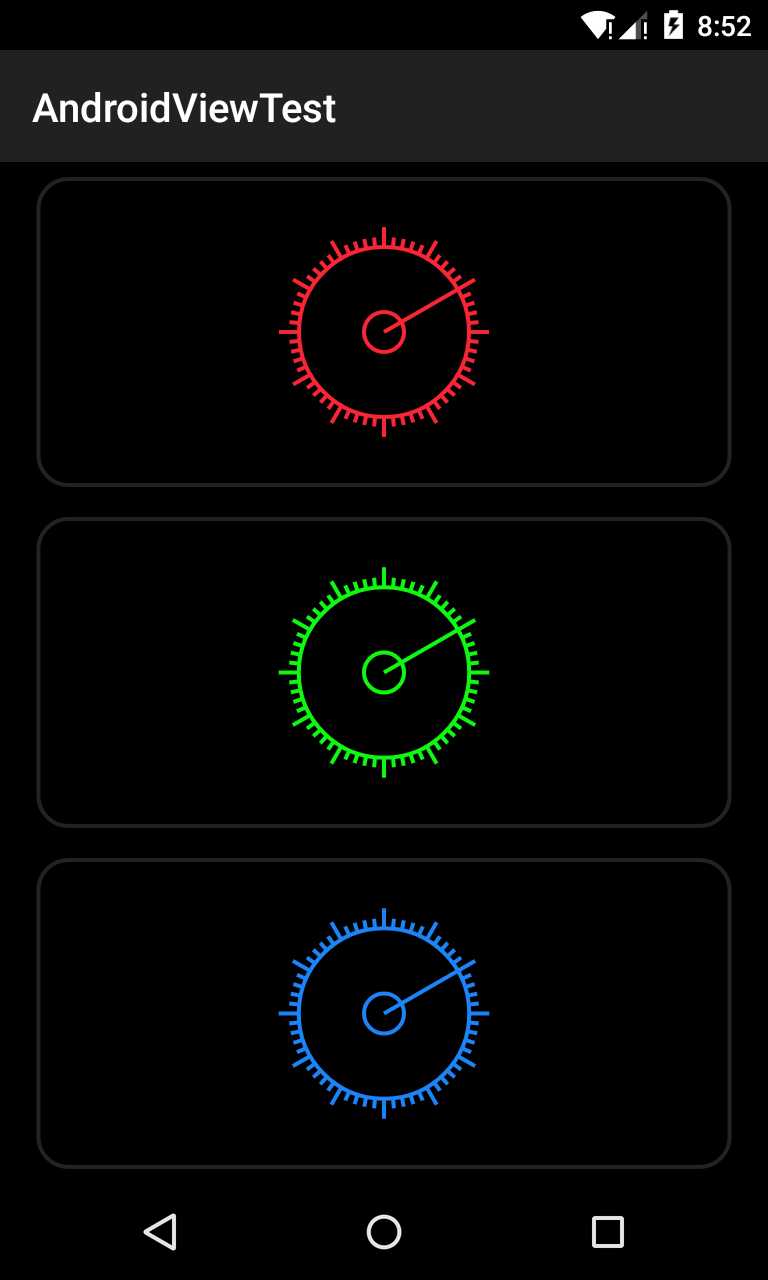
下面实现一个类似时钟/仪表盘的简单界面,通过绘制一个圆来实现,这个圆周围有标的刻度,同时在每五个位置上绘制一个比其他刻度线长的刻度,然后再绘制一个类似的表针。我来一步一步实现这个界面,同时我会介绍如何让View自适应界面,在LinearLayout中添加多个此View的方法(暂时不了解ViewGroup原理,所以解决方式可能比较麻烦)。
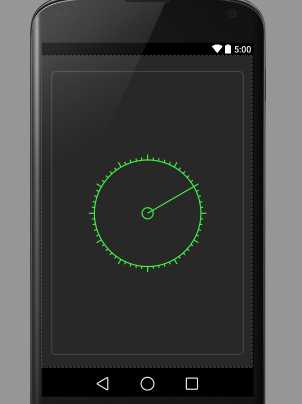
首先上图,分别显示在横屏和宽屏下的效果:
对于这个自定义View,由于暂时不打算加入监听事件,所以只是使用XML进行静态定义,没有监听事件。
我按照步骤来:
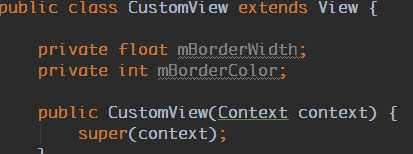
1.定义一个自定义View类,继承自View类,同时注意必须使用构造方法,在构造方法中首先调用超类的构造方法:
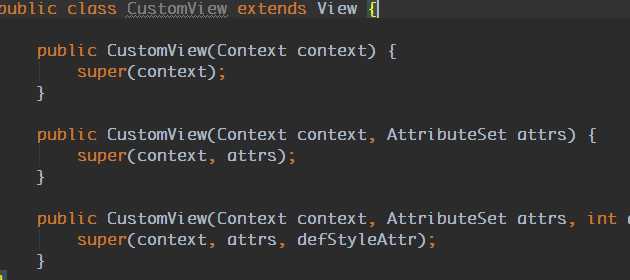
同时注意,我无法添加IDE提示的第四种被重载的方法,就是四个参数的那个构造方法,是因为四个参数版本支持的API是21+。
2.下面实现的就是如何定义一些通过XML定义的参数,比如我们在XML布局下使用的id,layout_width,layout_height等等参数是如何定义的?我们就实现这种类型参数的定义。
为此,我定义一个专门用来保存这个名为attr资源的文件,按照标准,命名为attrs.xml
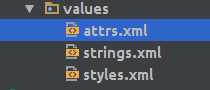
,然后在这个文件中定义一个针对我们自定义View的可用参数名的表,我为了这个View定义的是笔触的颜色border_color,还有笔触的宽度border_width。(为什么取这个名字呢,因为这是参考一个名为CircleImageView的时候定义的参数,但是暂时没实现出来,而是只学习了一部分,所以我没再改过)
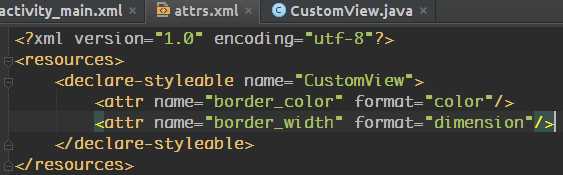
因为这个参数要求整体唯一,所以如果你定义的一些attr在你引入的某些库中已经存在,会出现错误。
3.定义好了可选参数之后,不着急如何在XML布局中使用,先要知道如何在类中使用他们,我们在构造方法中获取并赋给一些自定义View中变量。按照官方文档的做法,需要在两个参数的构造方法中获取他们:
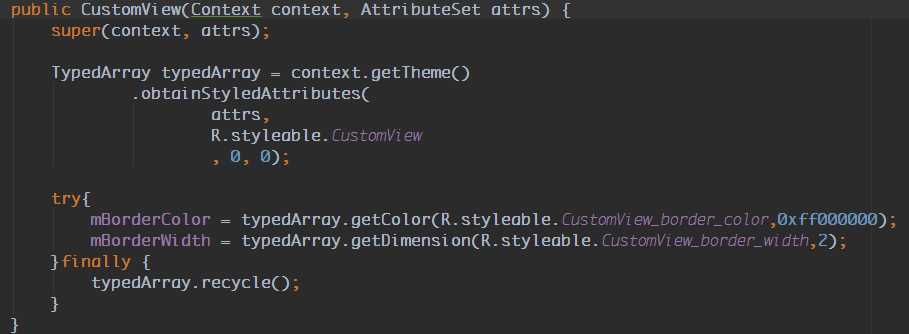
这样,我们就可以在XML布局中设置参数值,然后在此处会被获取。
4.我这个自定义View做重要的工作,我觉得应当是在onDraw和onSizeChanged方法中,下面介绍这两个重写的方法作用:
onDraw(Canvas canvas)方法
这个方法是用来绘制View这个Canvas用的重要方法,所有canvas绘图的方法都适用于此,在此介绍一个介绍这个的文章,
地址在此:http://www.jcodecraeer.com/a/anzhuokaifa/androidkaifa/2012/1212/703.html
onSizeChanged()
这个方法在界面的尺寸更改的时候会被调用,一般是在屏幕旋转的时候会被调用,有两个新w/h和旧w/h会被传入,这里我用来实现初始化绘图的时候边框(RecF类型,具体见Canvas绘图中的Oval和矩形绘制类)等。
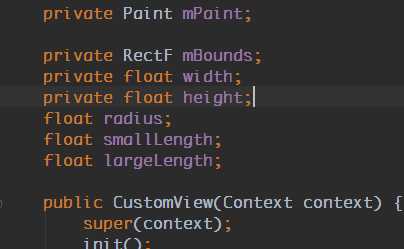
5.说完了两个方法的重要性,开始界面绘制的重要工作,因为我们绘制的都是比较简单的线条,我们只需要一个画笔,同时为了方便使用整个View的界面中的一部分,我使用了一个RecF来定义一块矩形区域。绘制圆形使用的radius,每个标度使用Line来绘制,同时表针使用的也是Line。。。这个部分可以自行决定何种算法绘制,这里介绍直接计算的方法,另一种方式在上面介绍的Canvas的文章中介绍过,就是使用旋转进行绘制,下面是我的主要实现
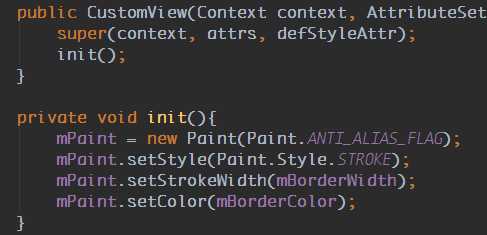
1)首先初始化画笔
自定义一个init方法用来在三个构造方法中都初始化画笔:
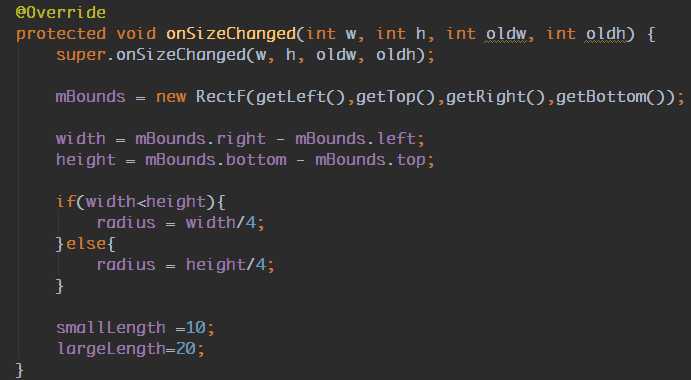
2)初始化全局参数,主要是在onSizeChanged()中,这是为了自适应界面,每次界面变化的时候都会被调用来重新计算一些参数:
3)在onDraw中绘制:
 1 @Override
 2     protected void onDraw(Canvas canvas) {
 3         super.onDraw(canvas);
 4         canvas.drawColor(0xff000000);
 5         mPaint.setColor(0x66555555);
 6         canvas.drawRoundRect(new RectF(mBounds.centerX()-(float)0.9*width/2, mBounds.centerY() - (float)0.9*height/2, mBounds.centerX() + (float)0.9*width/2, mBounds.centerY() + (float)0.9*height/2), 30, 30, mPaint);
 7         mPaint.setColor(mBorderColor);
 8         canvas.drawCircle(mBounds.centerX(),mBounds.centerY(),radius,mPaint);
 9         float start_x,start_y;
10         float end_x,end_y;
11         for(int i=0;i<60;++i){
12             start_x= radius *(float)Math.cos(Math.PI/180 * i * 6);
13             start_y= radius *(float)Math.sin(Math.PI/180 * i * 6);
14             if(i%5==0){
15                 end_x = start_x+largeLength*(float)Math.cos(Math.PI / 180 * i * 6);
16                 end_y = start_y+largeLength*(float)Math.sin(Math.PI/180 * i * 6);
17             }else{
18                 end_x = start_x+smallLength*(float)Math.cos(Math.PI/180 * i * 6);
19                 end_y = start_y+smallLength*(float)Math.sin(Math.PI/180 * i * 6);
20             }
21             start_x+=mBounds.centerX();
22             end_x+=mBounds.centerX();
23             start_y+=mBounds.centerY();
24             end_y+=mBounds.centerY();
25             canvas.drawLine(start_x, start_y, end_x, end_y, mPaint);
26         }
27         canvas.drawCircle(mBounds.centerX(),mBounds.centerY(),20,mPaint);
28         canvas.rotate(60,mBounds.centerX(),mBounds.centerY());
29         canvas.drawLine(mBounds.centerX(),mBounds.centerY(),mBounds.centerX(),mBounds.centerY()-radius,mPaint);
30     }
这样我们就可以在XML布局中使用了,比如这样
 1 <LinearLayout
 2     android:layout_height="match_parent"
 3     android:layout_width="match_parent"
 4     android:orientation="vertical"
 5     xmlns:android="http://schemas.android.com/apk/res/android"
 6     xmlns:app="http://schemas.android.com/apk/res-auto">
 7
 8     <com.example.androidviewtest.view.CustomView
 9         android:id="@+id/view1"
10         android:layout_width="match_parent"
11         android:layout_height="match_parent"
12         app:border_color="#ff1ff41f"
13         app:border_width="2dp"/>
14
15 </LinearLayout>
显示的是:
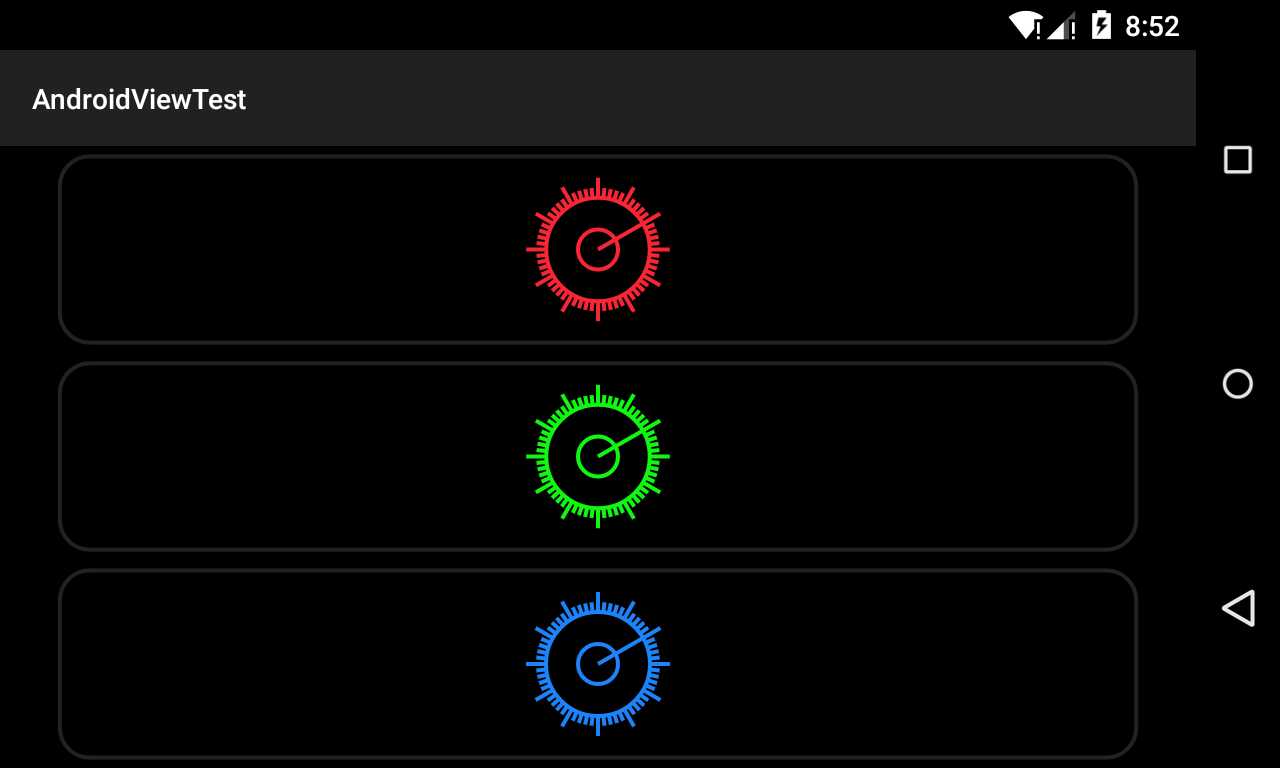
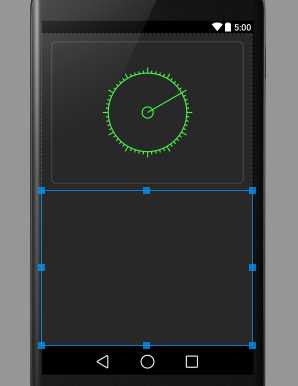
6.解决多个LinearLayout下使用这个自定义View的方法。
在上面例子中,我们使用的虽然也是使用LinearLayout,但是在其中插入多个这样的自定义View的时候会出现问题:
我的解决方法是将自定义View用FrameLayout包装起来,代码如下:
结果是:
 1 <LinearLayout
 2     android:layout_height="match_parent"
 3     android:layout_width="match_parent"
 4     android:orientation="vertical"
 5     xmlns:android="http://schemas.android.com/apk/res/android"
 6     xmlns:app="http://schemas.android.com/apk/res-auto">
 7
 8     <FrameLayout
 9         android:layout_width="match_parent"
10         android:layout_height="0dp"
11         android:layout_weight="1">
12         <com.example.androidviewtest.view.CustomView
13             android:id="@+id/view1"
14             android:layout_width="match_parent"
15             android:layout_height="match_parent"
16             app:border_color="#ff1ff41f"
17             app:border_width="2dp"/>
18     </FrameLayout>
19     <FrameLayout
20         android:layout_width="match_parent"
21         android:layout_height="0dp"
22         android:layout_weight="1">
23         <com.example.androidviewtest.view.CustomView
24             android:id="@+id/view2"
25             android:layout_width="match_parent"
26             android:layout_height="match_parent"
27             app:border_color="#ff2523f4"
28             app:border_width="2dp"/>
29     </FrameLayout>
30 </LinearLayout>
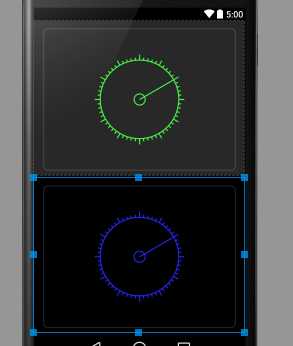
这样我们就解决了这个不显示的问题,据了解我觉得可能是因为LinearLayout的实现中,结合我这个自定义View会有问题,这个问题跟我View中的某些应当定义的重写方法(大胆猜测是onMeasure)有关
上述代码运行在模拟器上,横屏和竖屏的结果类似开头的图。
整个View的所有代码如下:
  1 package com.example.androidviewtest.view;
  2
  3 import android.content.Context;
  4 import android.content.res.TypedArray;
  5 import android.graphics.Canvas;
  6 import android.graphics.Paint;
  7 import android.graphics.RectF;
  8 import android.util.AttributeSet;
  9 import android.view.View;
 10
 11 import com.example.androidviewtest.R;
 12
 13 public class CustomView extends View {
 14
 15     private float mBorderWidth;
 16     private int mBorderColor;
 17
 18     private Paint mPaint;
 19
 20     private RectF mBounds;
 21     private float width;
 22     private float height;
 23     float radius;
 24     float smallLength;
 25     float largeLength;
 26
 27     public CustomView(Context context) {
 28         super(context);
 29         init();
 30     }
 31
 32     public CustomView(Context context, AttributeSet attrs) {
 33         super(context, attrs);
 34
 35         TypedArray typedArray = context.getTheme()
 36                 .obtainStyledAttributes(
 37                         attrs,
 38                         R.styleable.CustomView
 39                         , 0, 0);
 40
 41         try{
 42             mBorderColor = typedArray.getColor(R.styleable.CustomView_border_color,0xff000000);
 43             mBorderWidth = typedArray.getDimension(R.styleable.CustomView_border_width,2);
 44         }finally {
 45             typedArray.recycle();
 46         }
 47
 48         init();
 49     }
 50
 51     public CustomView(Context context, AttributeSet attrs, int defStyleAttr) {
 52         super(context, attrs, defStyleAttr);
 53         init();
 54     }
 55
 56     private void init(){
 57         mPaint = new Paint(Paint.ANTI_ALIAS_FLAG);
 58         mPaint.setStyle(Paint.Style.STROKE);
 59         mPaint.setStrokeWidth(mBorderWidth);
 60         mPaint.setColor(mBorderColor);
 61     }
 62
 63     @Override
 64     protected void onSizeChanged(int w, int h, int oldw, int oldh) {
 65         super.onSizeChanged(w, h, oldw, oldh);
 66
 67         mBounds = new RectF(getLeft(),getTop(),getRight(),getBottom());
 68
 69         width = mBounds.right - mBounds.left;
 70         height = mBounds.bottom - mBounds.top;
 71
 72         if(width<height){
 73             radius = width/4;
 74         }else{
 75             radius = height/4;
 76         }
 77
 78         smallLength =10;
 79         largeLength=20;
 80     }
 81
 82     @Override
 83     protected void onDraw(Canvas canvas) {
 84         super.onDraw(canvas);
 85         canvas.drawColor(0xff000000);
 86         mPaint.setColor(0x66555555);
 87         canvas.drawRoundRect(new RectF(mBounds.centerX()-(float)0.9*width/2, mBounds.centerY() - (float)0.9*height/2, mBounds.centerX() + (float)0.9*width/2, mBounds.centerY() + (float)0.9*height/2), 30, 30, mPaint);
 88         mPaint.setColor(mBorderColor);
 89         canvas.drawCircle(mBounds.centerX(),mBounds.centerY(),radius,mPaint);
 90         float start_x,start_y;
 91         float end_x,end_y;
 92         for(int i=0;i<60;++i){
 93             start_x= radius *(float)Math.cos(Math.PI/180 * i * 6);
 94             start_y= radius *(float)Math.sin(Math.PI/180 * i * 6);
 95             if(i%5==0){
 96                 end_x = start_x+largeLength*(float)Math.cos(Math.PI / 180 * i * 6);
 97                 end_y = start_y+largeLength*(float)Math.sin(Math.PI/180 * i * 6);
 98             }else{
 99                 end_x = start_x+smallLength*(float)Math.cos(Math.PI/180 * i * 6);
100                 end_y = start_y+smallLength*(float)Math.sin(Math.PI/180 * i * 6);
101             }
102             start_x+=mBounds.centerX();
103             end_x+=mBounds.centerX();
104             start_y+=mBounds.centerY();
105             end_y+=mBounds.centerY();
106             canvas.drawLine(start_x, start_y, end_x, end_y, mPaint);
107         }
108         canvas.drawCircle(mBounds.centerX(),mBounds.centerY(),20,mPaint);
109         canvas.rotate(60,mBounds.centerX(),mBounds.centerY());
110         canvas.drawLine(mBounds.centerX(),mBounds.centerY(),mBounds.centerX(),mBounds.centerY()-radius,mPaint);
111     }
112 }
下一步我准备学习给这个View加入事件监听,我的目标是制作一个指南针式的应用。
标签:
原文地址:http://www.cnblogs.com/lhyz/p/4430409.html