标签:
《Windows Azure Platform 系列文章目录》
注意:本文介绍的是国内由世纪互联运维的Windows Azure服务。
项目文件请在这里下载。
我们在使用Azure平台的时候,经常会遇到本地应用和云端应用进行互通互连的情况。
在这种混合云的场景下,我们可以通过以下方式解决:
一.Point-To-Site VPN
将本地的一台设备(Point),与云端的网络(Site)进行互通互联。
- 这里的Point指的就是企业内网的一台主机(VPN客户端)
- 这里的Site是指Azure Virtual Network的网络
- 这样可以实现将企业内网的一台主机与云端网络互通互联,同时通过VPN保证网络的安全性
企业内网的主机需要安装VPN客户端
支持以下客户端操作系统:
Windows 7 (32位和64位)
Windows Server 2008 R2(仅支持64位)
Windows 8(32位和64位)
Windows Server 2012(仅支持64位)
Point-to-Site VPN是使用SSTP VPN协议
有兴趣的读者可以参考笔者之前的文章:
Windows Azure Virtual Network (8) 创建Azure Point-to-Site点到站点 VPN
二.Site-To-Site VPN
将本地的网络(Site)与云端的Azure虚拟网络(Site)进行互通互联。
Site-To-Site VPN的前提要求:
- 企业本地网络需要固定的公网IPV4地址
- 需要微软认证的VPN设备 or Windows Server 2012 RRAS
设备列表请参考:https://msdn.microsoft.com/en-us/library/azure/jj156075.aspx
- VPN设备必须在NAT设备的前面
Site-to-Site VPN是使用IPSec VPN协议
这篇文章我回头再写 :)
以上的方法都可以看出,Azure Virtual Network VPN的方式,都是基于TCP/IP网络协议的。
在很多场景下,实现Point-To-Site和Site-To-Site并不是非常容易。例如以下场景:
- 企业没有固定的公网IPV4地址
- 企业的IT策略,不允许设置Azure Site-To-Site VPN
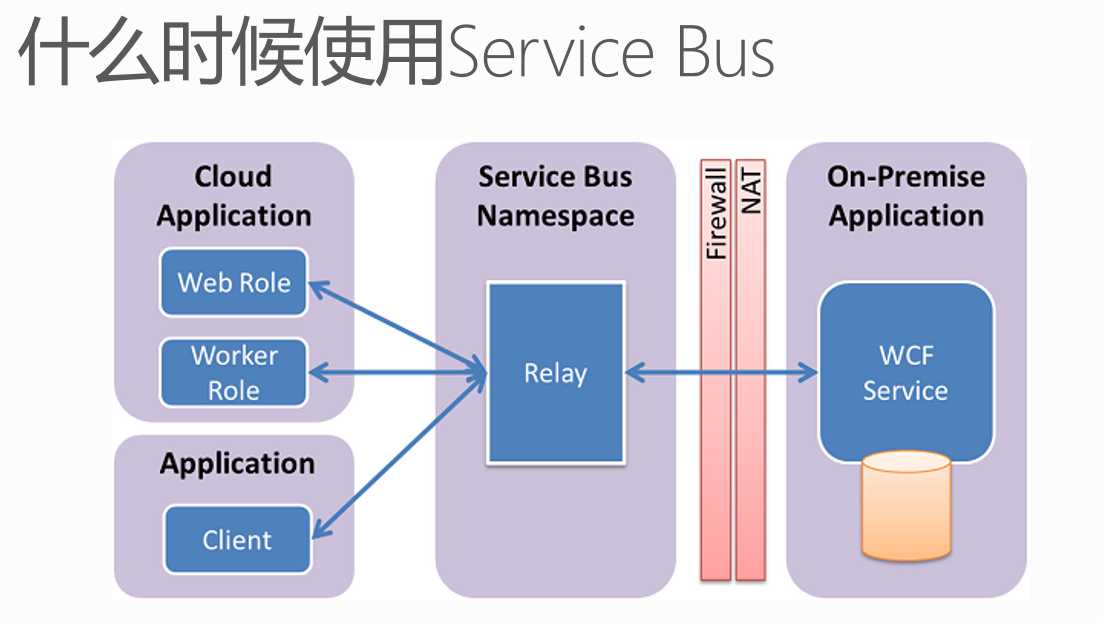
在这种情况下,就可以使用Azure Service Bus Relay On实现应用层的混合云了。
Azure Service Bus Relay On
- 不依赖于固定公网IPV4或者VPN设备
- 可以穿透NAT设备
如下图:

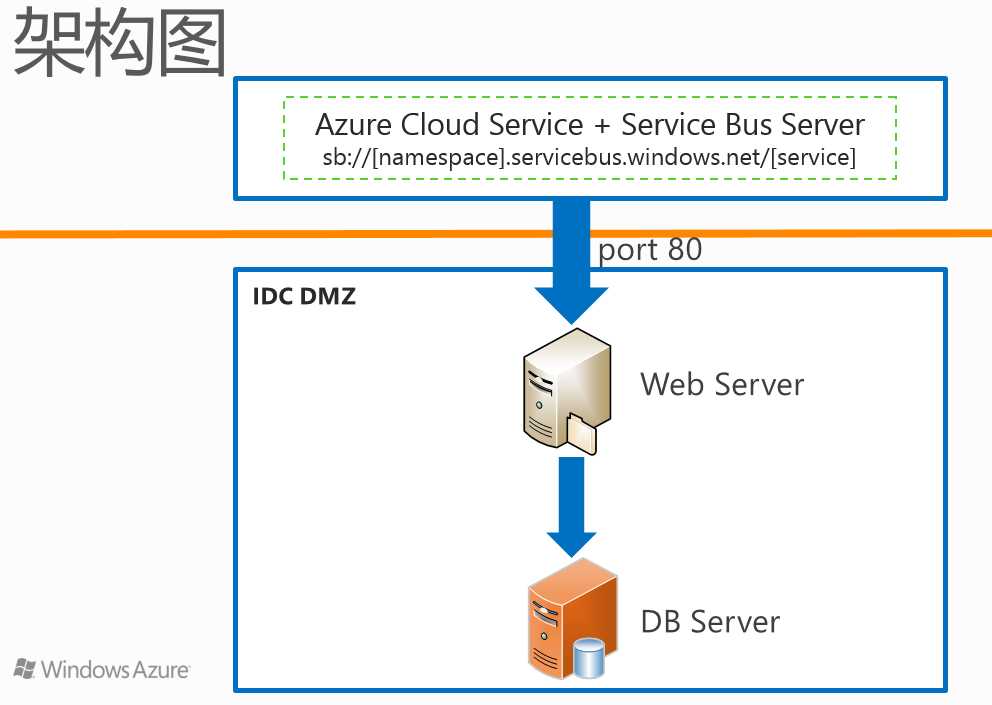
Azure Service Bus Relay On是通过HTTP, HTTPS实现应用的混合云。假设当需要把企业内网WCF应用服务发布到公网,被其他客户端进行调用的时候,只需要在企业内网允许HTTP需要80端口,或者HTTPS需要的443端口即可。
另外,企业内网的WCF应用服务,和客户端(外网)应用服务之间,不是直接调用的。而是首先需要将WCF服务,在Azure Service Bus Relay On进行注册,客户端(外网)应用才能调用被注册的Azure Service Bus Relay On。Azure Service Relay On概念上类似于代理服务器。

注意:Azure Service Bus在企业内网的应用目前只能支持WCF服务。
前面的介绍完了,现在进入Demo演示阶段。笔者模拟以下场景:
1.在企业内网中,有一台Web Service,上面部署了WCF服务
2.通过Azure Service Bus Relay On,将WCF注册到Service Bus上。
3.从Internet上的另外一台客户端机器,通过验证Service Bus的SAS验证方式,来调用Azure Service Bus Relay On上的服务。
以下项目分为三类:
- 使用PowerShell,创建Azure Service Bus Relay On
- 服务器端,将WCF服务注册到Azure Service Bus。因为WCF项目执行的时候,需要宿主,本项目以Windows Console为宿主。
- 客户端,Internet上的机器,调用Azure Service Bus注册的WCF服务
一.使用PowerShell,创建Azure Service Bus Relay On
请读者注意,Azure Service Bus Relay On只能通过PowerShell来创建。如何读者已经通过Management Portal,创建了Azure Service的话,是不能正常使用Relay On功能的。需要删除,然后通过PowerShell重建。
1.我们使用管理员身份,运行Azure PowerShell
2.假设读者有多个Azure订阅的情况下,切换当前订阅
Select-AzureSubscription ‘[YourSubscriptionName]‘ -current
3.执行以下代码:
New-AzureSBNamespace -Name ‘[YourServiceBusName]‘ -NamespaceType ‘Messaging‘ -Location ‘[YourLocation]‘
例如笔者想创建的Service Bus名称为leiservicebus,位于China East数据中心
New-AzureSBNamespace -Name ‘leizhangservicebus‘ -NamespaceType ‘Messaging‘ -Location ‘China East‘
以下为执行结果截图:
4.可以在Azure Management Portal查看到创建结果。我们还可以查看Service Bus的连接字符串,如下图:

注意:客户端是否可以连接Azure Service Bus Relay是通过上面的连接字符串来验证的。
以上,创建Azure Service Bus Relay On的工作就完成了。
二.服务器端,将WCF服务注册到Azure Service Bus
接下来,我们使用管理员身份,运行Visual Studio 2013。创建一个新的项目,重名为SBRelay。
1.增加Windows Console Library,命名为SBRelayServer
2.在Program.cs增加以下代码:
using System;
using System.Collections.Generic;
using System.Linq;
using System.Text;
using System.Threading.Tasks;
using System.ServiceModel;
using Foundation;
using Microsoft.ServiceBus;
using System.ServiceModel.Description;

namespace SBRelayServer
{
    class Program
    {
        static void Main(string[] args)
        {
            var tokenProvider = TokenProvider.CreateSharedAccessSignatureTokenProvider("RootManageSharedAccessKey", "+LSd5njWikUZEi+RY/NpkkR/GL3PlpVRGCv23gwKrM0=");

            var serviceHost = new ServiceHost(typeof(EchoService));

            var serviceEndpoint = serviceHost.AddServiceEndpoint(
                typeof(IEcho),
                new NetTcpRelayBinding(),
                "sb://leizhangservicebus.servicebus.chinacloudapi.cn/echo");

            serviceEndpoint.Behaviors.Add(new TransportClientEndpointBehavior(tokenProvider));

            serviceHost.Open();
            Console.WriteLine("Press ENTER to close");
            Console.ReadLine();
            serviceHost.Close();
        }
    }
}
注意:上图的TokenProvider为我们的SAS密钥。
上面的应用程序中,会将本地的WCF注册到云端的Azure Service Bus,地址为sb://leizhangservicebus.servicebus.chinacloudapi.cn/echo
3.在SBRelayServer项目中,增加EchoService.cs,输入以下代码:
using Foundation;
using System;
using System.Collections.Generic;
using System.Linq;
using System.Text;
using System.Threading.Tasks;

namespace SBRelayServer
{
    class EchoService : IEcho
    {
        public string GetValue()
        {
            return "Hello World!";
        }
    }
}
服务器端会返回给客户端字符串,内容为Hello World!
三.客户端,从客户端调用
1.增加Windows Console Library,命名为SBRelayClient
2.在Program.cs中,增加如下代码:
using Microsoft.ServiceBus;
using System;
using System.Collections.Generic;
using System.Linq;
using System.ServiceModel;
using System.Text;
using System.Threading.Tasks;
using Foundation;
using System.Diagnostics;


namespace SBRelayClient
{
    class Program
    {
        static void Main(string[] args)
        {
            var binding = new NetTcpRelayBinding();

            var channelFactory = new ChannelFactory<IEchoChannel>
            (
               binding,
               new EndpointAddress("sb://leizhangservicebus.servicebus.chinacloudapi.cn/echo")
           );

            channelFactory.Endpoint.EndpointBehaviors.Add(new TransportClientEndpointBehavior { TokenProvider = TokenProvider.CreateSharedAccessSignatureTokenProvider("RootManageSharedAccessKey", "+LSd5njWikUZEi+RY/NpkkR/GL3PlpVRGCv23gwKrM0=") });

            using (var ch = channelFactory.CreateChannel())
            {
                Stopwatch sw = new Stopwatch();
                sw.Start();
                string returnValue = ch.GetValue();
                sw.Stop();
                Console.WriteLine("Get {0} From WCF Server", returnValue);
            }
            Console.ReadLine();
        }
    }
}
上面的代码中,会从服务器读取GetValue方法,返回给客户端字符串。
如何执行该代码?
1.编译项目文件
2.执行服务器端项目,SBRelayServer项目下的SBRelayServer.exe。
3.等到服务器端项目,SBRelayServer.exe命令行显示Press ENTER to close,请不要关闭SBRelayServer.exe
4.执行客户端项目,SBRelayClient项目下的SBRelayClient.exe
5.下图中,左侧为服务器端命令行界面,右侧为客户端命令行结果,其中的Hello World即为服务器的返回值。

本博-三石Blog(下文简称本博),在本博客文章结尾处右下脚未注明转载、来源、出处的作品(内容)均为本博原创,本站对于原创作品内容对其保留版权,请勿随意转载,如若真有需要的朋友可以发Mail联系我;转载本博原创作品(内容)也必须遵循“署名-非商业用途-保持一致”的创作共用协议,请务必以文字链接的形式标明或保留文章原始出处和博客作者(Lei Zhang)的信息,关于本博摄影作品请务必注意保留(www.cnblog.com/threestone)等相关水印版权信息,否则视为侵犯原创版权行为;本博谢绝商业网站转载。版权所有,禁止一切有违中华人民共和国著作权保护法及相关法律和本博(法律)声明的非法及恶意抄袭。
Windows Azure Service Bus (6) 中继(Relay On) 使用VS2013开发Service Bus Relay On
标签:
原文地址:http://www.cnblogs.com/threestone/p/4429804.html