标签:
前言,還是那句話,按照濤叔下面畫黃色的步驟順序執行就好了
使用CocoaPods兩種方式:使用之前安裝的插件&命令行。
一、利用插件
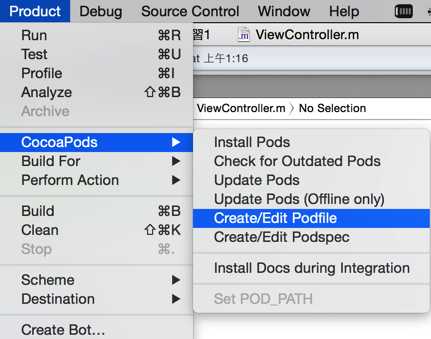
1、創建項目后添加CocoaPods

2、在文本框中輸入如下插件名稱。
pod ‘SDWebImage‘
說明:添加多個插件,只需要換行添加 pod ‘xxx‘

//適配版本
platform :<#ios#>, "<#6.0#>"

//插件名稱
pod "<#PodName#>"

//單元測試
target :<#TargetName#>Tests, :exclusive => true do
  # pod ‘Kiwi‘
end
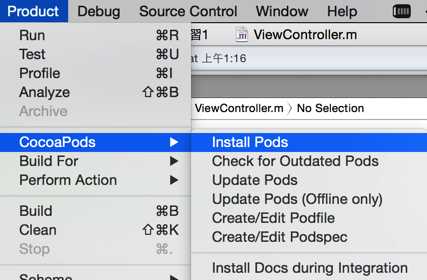
3、安裝pods

在XCode下可以看到輸出:分析依賴,下載以來,安裝插件。。。。 等待安裝結束后回提示重啟打開,完畢!
(好吧,這裡沒有截圖,濤叔下載了最新版XCode 然後 插件沒有支持。之前版本的XCodey一直分析,就是沒有結果。再試試吧)
4、如果需要更新,就執行步驟3中的Update Pods
二、使用命令行操作
例如要使用"SDWebImage"
1、首先要找到項目路徑
$ cd 項目路徑
2、查找要用的插件
$ pod search sdwebimage

libotaodeMacBook-Pro:CocoaPod練習1 libotao$ pod search sdwebimage


-> ComponentKit+SDWebImage (0.0.1)
   CKNetworkImageDownloading implementation for SDWebImage.
   pod ‘ComponentKit+SDWebImage‘, ‘~> 0.0.1‘
   - Homepage: https://github.com/eyeem/ComponentKit-SDWebImage
   - Source:   https://github.com/eyeem/ComponentKit-SDWebImage.git
   - Versions: 0.0.1 [master repo]


-> DSActivityIndicatorSDWebImage (1.0)
   The easiest way to add a UIActivityView to your SDWebImage view.
   pod ‘DSActivityIndicatorSDWebImage‘, ‘~> 1.0‘
   - Homepage: https://github.com/diejmon/UIActivityIndicator-for-SDWebImage
   - Source:   https://github.com/diejmon/UIActivityIndicator-for-SDWebImage.git
   - Versions: 1.0 [master repo]


-> SDWebImage (3.7.2)
   Asynchronous image downloader with cache support with an UIImageView
   category.
   pod ‘SDWebImage‘, ‘~> 3.7.2‘
   - Homepage: https://github.com/rs/SDWebImage
   - Source:   https://github.com/rs/SDWebImage.git
   - Versions: 3.7.2, 3.7.1, 3.7.0, 3.6, 3.5.4, 3.5.2, 3.5.1, 3.5, 3.4, 3.3,
   3.2, 3.1, 3.0, 2.7.4, 2.7, 2.6, 2.5, 2.4 [master repo]
   - Subspecs:
     - SDWebImage/Core (3.7.2)
     - SDWebImage/MapKit (3.7.2)
     - SDWebImage/WebP (3.7.2)


-> SDWebImage+ExtensionSupport (3.7.1.2)
   Asynchronous image downloader with cache support with an UIImageView
   category. Added SD_APP_EXTENSION macro for ios8 extensions
   pod ‘SDWebImage+ExtensionSupport‘, ‘~> 3.7.1.2‘
   - Homepage: https://github.com/rs/SDWebImage
   - Source:   https://github.com/glassoff/SDWebImage.git
   - Versions: 3.7.1.2, 3.7.1.1 [master repo]
   - Subspecs:
     - SDWebImage+ExtensionSupport/Core (3.7.1.2)
     - SDWebImage+ExtensionSupport/MapKit (3.7.1.2)


-> SDWebImage-Category (1.4)
   方便快捷的为UIImageView加上下载进度条,支持:下载失败显示裂图,显示 点击下载图片
   pod ‘SDWebImage-Category‘, ‘~> 1.4‘
   - Homepage: https://github.com/li6185377/SDWebImage-Category
   - Source:   https://github.com/li6185377/SDWebImage-Category.git
   - Versions: 1.4, 1.3, 1.2, 1.1.1, 1.1 [master repo]


-> SDWebImage-ProgressView (0.4.0)
   Category on UIImageView, adding a progress view while images are downloaded
   using SDWebImage.
   pod ‘SDWebImage-ProgressView‘, ‘~> 0.4.0‘
   - Homepage: https://github.com/kevinrenskers/SDWebImage-ProgressView
   - Source:   https://github.com/kevinrenskers/SDWebImage-ProgressView.git
   - Versions: 0.4.0, 0.3.1, 0.3.0, 0.2.0, 0.1.0 [master repo]


-> UIActivityIndicator-for-SDWebImage (1.2)
   The easiest way to add a UIActivityView to your SDWebImage view.
   pod ‘UIActivityIndicator-for-SDWebImage‘, ‘~> 1.2‘
   - Homepage: https://github.com/JJSaccolo/UIActivityIndicator-for-SDWebImage
   - Source:
   https://github.com/JJSaccolo/UIActivityIndicator-for-SDWebImage.git
   - Versions: 1.2, 1.1, 1.0.5, 1.0.4, 1.0.3, 1.0.2, 1.0.0 [master repo]


-> UIImageView+SDWebImage_M13ProgressSuite (0.1.1)
   Category of UIImageView, downloaded with SDWebImage, progressed with
   M13ProgressSuite.
   pod ‘UIImageView+SDWebImage_M13ProgressSuite‘, ‘~> 0.1.1‘
   - Homepage: https://github.com/Jowyer/UIImageView-SDWebImage_M13ProgressSuite
   - Source:
   https://github.com/Jowyer/UIImageView-SDWebImage_M13ProgressSuite.git
   - Versions: 0.1.1, 0.1.0 [master repo]
3、找到需要的插件創建Podfile文件(與使用touch Podfile 創建,open -e Podfile 修改相同)
$ echo "pod ‘SDWebImage‘" > Podfile
4、安裝pod
$ pod install
等待,分析依賴,下載以來,安裝插件。。。。

libotaodeMacBook-Pro:CocoaPod練習1 libotao$ pod install
Analyzing dependencies
Downloading dependencies
Installing SDWebImage (3.7.2)
Generating Pods project
Integrating client project
5、需要添加新的第三方庫
用記事本打開
open -e Podfile
然後添加新的庫 (換行添加下面代碼即可)
pod ‘xxx‘
=================================================================================
# 搜索
$ pod search AFNetworking
# 安装
$ pod install
# 升级
$ pod update
命令: touch Podfile 创建
命令: open -e Podfile 打开
# 查看gem源
$ gem sources –l
# gem自身升级
$ sudo gem update –system
# 查看版本
$ gem --version
# 清除过期的gem
$ sudo gem cleanup
# 安装包
$ sudo gem install cocoapods
# 删除包
$ gem uninstall cocoapods
# 更新包
$ sudo gem update
# 列出本地安装的包
$ gem list 标签:
原文地址:http://www.cnblogs.com/surge/p/4436389.html