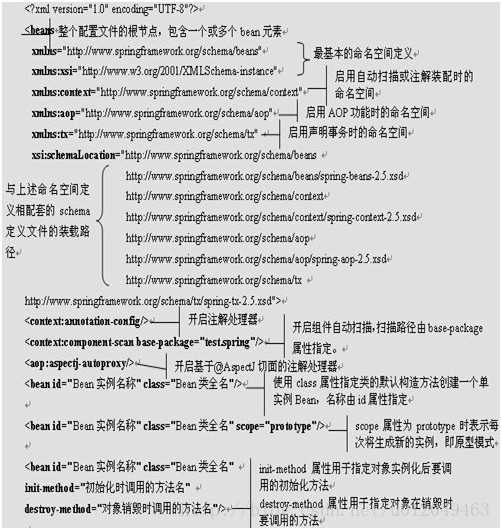
标签:
Spring配置文件是用于指导Spring工厂进行Bean生产、依赖关系注入(装配)及Bean实例分发的"图纸"。
Spring配置文件是一个或多个标准的XML文档,applicationContext.xml是Spring的默认配置文件,当容器启动时找不到指定的配置文档时,将会尝试加载这个默认的配置文件。
示例:
<?xml version="1.0" encoding="UTF-8"?>
<beans xmlns="http://www.springframework.org/schema/beans"
    xmlns:xsi="http://www.w3.org/2001/XMLSchema-instance"
    xsi:schemaLocation="http://www.springframework.org/schema/beans
http://www.springframework.org/schema/beans/spring-beans-2.5.xsd">
    <!-- 定义使用C3P0连接池的数据源 -->
    <bean id="dataSource" class="com.mchange.v2.c3p0.ComboPooledDataSource">
        <!-- 指定连接数据库的JDBC驱动 -->
        <property name="driverClass">
            <value>com.mysql.jdbc.Driver</value>
        </property>
        <!-- 连接数据库所用的URL -->
        <property name="jdbcUrl">
            <value>jdbc:mysql://localhost:3306/eportal?useUnicode=
                true&characterEncoding=gbk</value>
        </property>
        <!-- 连接数据库的用户名 -->
        <property name="user">
            <value>root</value>
        </property>
        <!-- 连接数据库的密码 -->
        <property name="password">
            <value>root</value>
        </property>
        <!-- 设置数据库连接池的最大连接数 -->
        <property name="maxPoolSize">
            <value>20</value>
        </property>
        <!-- 设置数据库连接池的最小连接数 -->
        <property name="minPoolSize">
            <value>2</value>
        </property>
        <!-- 设置数据库连接池的初始化连接数 -->
        <property name="initialPoolSize">
            <value>2</value>
        </property>
        <!-- 设置数据库连接池的连接的最大空闲时间,单位为秒 -->
        <property name="maxIdleTime">
            <value>20</value>
        </property>
    </bean>
    <!-- 定义Hibernate的SessionFactory -->
    <bean id="sessionFactory"
        class="org.springframework.orm.
hibernate3.LocalSessionFactoryBean">
        <!-- 依赖注入上面定义的数据源dataSource -->
        <property name="dataSource" ref="dataSource" />
        <!-- 注册Hibernate的ORM映射文件 -->
        <property name="mappingResources">
            <list>
                <value>com/eportal/ORM/News.hbm.xml</value>
                <value>com/eportal/ORM/Category.hbm.xml</value>
                <value>com/eportal/ORM/Memberlevel.hbm.xml</value>
                <value>com/eportal/ORM/Cart.hbm.xml</value>
                <value>com/eportal/ORM/Traffic.hbm.xml</value>
                <value>com/eportal/ORM/Newsrule.hbm.xml</value>
                <value>com/eportal/ORM/Merchandise.hbm.xml</value>
                <value>com/eportal/ORM/Admin.hbm.xml</value>
                <value>com/eportal/ORM/Orders.hbm.xml</value>
                <value>com/eportal/ORM/Cartselectedmer.hbm.xml</value>
                <value>com/eportal/ORM/Newscolumns.hbm.xml</value>
                <value>com/eportal/ORM/Member.hbm.xml</value>
            </list>
        </property>
        <!-- 设置Hibernate的相关属性 -->
        <property name="hibernateProperties">
            <props>
                <!-- 设置Hibernate的数据库方言 -->
                <prop key="hibernate.dialect">org.hibernate.dialect.MySQLDialect</prop>
                <!-- 设置Hibernate是否在控制台输出SQL语句,开发调试阶段通常设为true -->
                <prop key="show_sql">true</prop>
                <!-- 设置Hibernate一个提交批次中的最大SQL语句数 -->
                <prop key="hibernate.jdbc.batch_size">50</prop>
                <prop key="show_sql">50</prop>
            </props>
        </property>
    </bean>
    <!--定义Hibernate的事务管理器HibernateTransactionManager -->
    <bean id="transactionManager"
        class="org.springframework.orm.hibernate3.HibernateTransactionManager">
        <!-- 依赖注入上面定义的sessionFactory -->
        <property name="sessionFactory" ref="sessionFactory" />
    </bean>
    <!--定义Spring的事务拦截器TransactionInterceptor -->
    <bean id="transactionInterceptor"
        class="org.springframework.transaction.interceptor.TransactionInterceptor">
        <!-- 依赖注入上面定义的事务管理器transactionManager -->
        <property name="transactionManager" ref="transactionManager" />
        <!-- 定义需要进行事务拦截的方法及所采用的事务控制类型 -->
        <property name="transactionAttributes">
            <props>
                <!-- 以browse、list、load、get及is开头的所有方法采用只读型事务控制类型 -->
                <prop key="browse*">PROPAGATION_REQUIRED,readOnly</prop>
                <prop key="list*">PROPAGATION_REQUIRED,readOnly</prop>
                <prop key="load*">PROPAGATION_REQUIRED,readOnly</prop>
                <prop key="get*">PROPAGATION_REQUIRED,readOnly</prop>
                <prop key="is*">PROPAGATION_REQUIRED,readOnly</prop>
                <!-- 所有方法均进行事务控制,如果当前没有事务,则新建一个事务 -->
                <prop key="*">PROPAGATION_REQUIRED</prop>
            </props>
        </property>
    </bean>
    <!-- 定义BeanNameAutoProxyCreatorf进行Spring的事务处理 -->
    <bean
        class="org.springframework.aop.framework.autoproxy.
BeanNameAutoProxyCreator">
        <!-- 针对指定的bean自动生成业务代理 -->
        <property name="beanNames">
            <list>
                <value>adminService</value>
                <value>columnsService</value>
                <value>newsService</value>
                <value>crawlService</value>
                <value>memberLevelService</value>
                <value>memberService</value>
                <value>categoryService</value>
                <value>merService</value>
                <value>cartService</value>
                <value>ordersService</value>
                <value>trafficService</value>
            </list>
        </property>
        <!-- 这个属性为true时,表示被代理的是目标类本身而不是目标类的接口 -->
        <property name="proxyTargetClass">
            <value>true</value>
        </property>
        <!-- 依赖注入上面定义的事务拦截器transactionInterceptor -->
        <property name="interceptorNames">
            <list>
                <value>transactionInterceptor</value>
            </list>
        </property>
    </bean>
    <!-- 装配通用数据库访问类BaseDAOImpl -->
    <bean id="dao" class="com.eportal.DAO.BaseDAOImpl">
        <property name="sessionFactory" ref="sessionFactory" />
    </bean>
    <!-- 部署系统用户管理业务逻辑组件AdminServiceImpl -->
    <bean id="adminService" class="com.eportal.service.AdminServiceImpl">
        <property name="dao" ref="dao" />
    </bean>
    <!-- 部署新闻栏目管理业务逻辑组件ColumnsServiceImpl -->
    <bean id="columnsService" class="com.eportal.service.ColumnsServiceImpl">
        <property name="dao" ref="dao" />
    </bean>

    <!-- 部署订单管理业务逻辑组件OrderServiceImpl -->
    <bean id="ordersService" class="com.eportal.service.OrderServiceImpl">
        <property name="dao" ref="dao" />
    </bean>
    <!-- 部署流量统计业务逻辑组件TrafficServiceImpl -->
    <bean id="trafficService" class="com.eportal.service.TrafficServiceImpl">
        <property name="dao" ref="dao" />
    </bean>
    <!-- 部署Struts 2负责系统用户管理的控制器AdminAction -->
    <bean id="adminAction" class="com.eportal.struts.action.
AdminAction"
        scope="prototype">
        <property name="service" ref="adminService" />
    </bean>
    <!-- 部署Struts 2负责新闻栏目管理的控制器ColumnsAction -->
    <bean id="columnsAction" class="com.eportal.struts.action.
ColumnsAction"
        scope="prototype">
        <property name="service" ref="columnsService" />
    </bean>
    <!-- 部署Struts 2负责新闻管理的控制器NewsAction -->
    <bean id="newsAction" class="com.eportal.struts.action.
NewsAction"
        scope="prototype">
        <property name="service" ref="newsService" />
        <property name="columnsService" ref="columnsService" />
    </bean>
    <!-- 部署Struts 2负责新闻采集规则管理的控制器CrawlAction -->
    <bean id="crawlAction" class="com.eportal.struts.action.
CrawlAction"
        scope="prototype">
        <property name="service" ref="crawlService" />
        <property name="columnsService" ref="columnsService" />
    </bean>

</beans>
其他各种相关配置实例
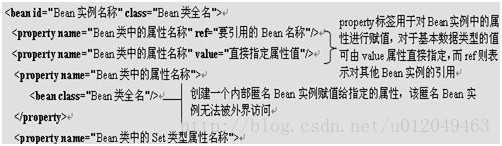
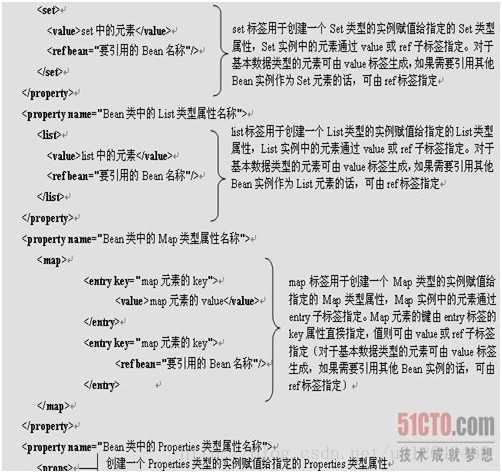
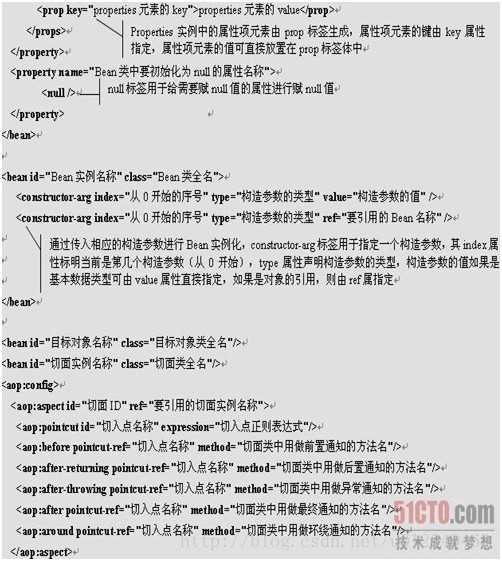
<?xml version="1.0" encoding="UTF-8"?>
<beans
    xmlns="http://www.springframework.org/schema/beans"
    xmlns:xsi="http://www.w3.org/2001/XMLSchema-instance"
    xmlns:context="http://www.springframework.org/schema/context"
    xsi:schemaLocation="http://www.springframework.org/schema/beans
                       http://www.springframework.org/schema/beans/spring-beans-2.5.xsd
                       http://www.springframework.org/schema/context
                       http://www.springframework.org/schema/context/spring-context-2.5.xsd
                       ">


<context:component-scan base-package="com.persia">
<!-- 开启组件扫描 -->
</context:component-scan>

<context:annotation-config>
<!--开启注解处理器-->
</context:annotation-config>

<!-- 使用注解,省去了propertity的xml配置,减少xml文件大小 -->
<bean id="personServiceAnno" class="com.persia.PersonServiceAnnotation"></bean>
<bean id="personDaoBeanAnno" class="com.persia.PersonDaoBean"></bean>
<bean id="personDaoBeanAnno2" class="com.persia.PersonDaoBean"></bean>

<!-- 自动注解 -->
<bean id="personServiceAutoInject" class="com.persia.PersonServiceAutoInject" autowire="byName"></bean>


<bean id="personService" class="com.persia.PersonServiceBean">
<!-- 由spring容器去创建和维护,我们只要获取就可以了 -->
</bean>

<bean id="personService2" class="com.persia.PersonServiceBeanFactory" factory-method="createInstance" lazy-init="true"
      init-method="init"  destroy-method="destory">
<!-- 静态工厂获取bean -->
</bean>

<bean id="fac" class="com.persia.PersonServiceBeanInsFactory"></bean>
<bean id="personService3" factory-bean="fac" factory-method="createInstance" scope="prototype">
<!-- 实例工厂获取bean,先实例化工厂再实例化bean-->
</bean>


<!-- ref方式注入属性 -->
<bean id="personDao" class="com.persia.PersonDaoBean"></bean>
<bean id="personService4" class="com.persia.PersonServiceBean">
  <property name="personDao" ref="personDao"></property>
</bean>

<!-- 内部bean方式注入 -->
<bean id="personService5" class="com.persia.PersonServiceBean">
  <property name="personDao">
     <bean class="com.persia.PersonDaoBean"></bean>
  </property>
  <property name="name" value="persia"></property>
  <property name="age" value="21"></property>

  <property name="sets">
    <!-- 集合的注入 -->
     <set>
       <value>第一个</value>
       <value>第二个</value>
       <value>第三个</value>
     </set>
  </property>

  <property name="lists">
    <!-- 集合的注入 -->
    <list>
        <value>第一个l</value>
       <value>第二个l</value>
       <value>第三个l</value>
    </list>

  </property>

  <property name="properties">
    <props>
      <prop key="key1">value1</prop>
      <prop key="key2">value2</prop>
      <prop key="key3">value3</prop>
    </props>
  </property>

  <property name="map">
   <map>
      <entry key="key1" value="value-1"></entry>
      <entry key="key2" value="value-2"></entry>
      <entry key="key3" value="value-3"></entry>
   </map>
  </property>
</bean>

<bean id="personService6" class="com.persia.PersonServiceBean">
   <constructor-arg index="0" value="构造注入的name" ></constructor-arg>
   <!-- 基本类型可以不写type -->
   <constructor-arg index="1" type="com.persia.IDaoBean" ref="personDao">
   </constructor-arg>
</bean>

</beans>
<?xml version="1.0" encoding="UTF-8"?>
<beans
    xmlns="http://www.springframework.org/schema/beans"
    xmlns:xsi="http://www.w3.org/2001/XMLSchema-instance"
    xmlns:context="http://www.springframework.org/schema/context"
    xmlns:aop="http://www.springframework.org/schema/aop"
    xsi:schemaLocation="http://www.springframework.org/schema/beans
                       http://www.springframework.org/schema/beans/spring-beans-2.5.xsd
                        http://www.springframework.org/schema/aop
                       http://www.springframework.org/schema/aop/spring-aop-2.5.xsd
                       http://www.springframework.org/schema/context
                       http://www.springframework.org/schema/context/spring-context-2.5.xsd
                      ">

<aop:aspectj-autoproxy></aop:aspectj-autoproxy>
<bean id="myInterceptor" class="com.persia.service.MyInterceptor"></bean>
<bean id="personServiceImpl" class="com.persia.service.impl.PersonServiceImpl"></bean>
</beans>
AOP的xml版本
<?xml version="1.0" encoding="UTF-8"?>
<beans
    xmlns="http://www.springframework.org/schema/beans"
    xmlns:xsi="http://www.w3.org/2001/XMLSchema-instance"
    xmlns:context="http://www.springframework.org/schema/context"
    xmlns:aop="http://www.springframework.org/schema/aop"
    xsi:schemaLocation="http://www.springframework.org/schema/beans
                       http://www.springframework.org/schema/beans/spring-beans-2.5.xsd
                        http://www.springframework.org/schema/aop
                       http://www.springframework.org/schema/aop/spring-aop-2.5.xsd
                       http://www.springframework.org/schema/context
                       http://www.springframework.org/schema/context/spring-context-2.5.xsd
                      ">

<aop:aspectj-autoproxy></aop:aspectj-autoproxy>

<bean id="personService" class="com.persia.service.impl.PersonServiceImpl"></bean>
<bean id="aspectBean" class="com.persia.service.MyInterceptor"></bean>

<aop:config>
 <aop:aspect id="myaop" ref="aspectBean">
 <aop:pointcut id="mycut" expression="execution(* com.persia.service.impl.PersonServiceImpl.*(..))"/>
 <aop:pointcut id="argcut" expression="execution(* com.persia.service.impl.PersonServiceImpl.*(..)) and args(name)"/>
 <aop:before pointcut-ref="mycut" method="doAccessCheck"  />
 <aop:after-returning pointcut-ref="mycut" method="doAfterReturning"/>
   <aop:after-throwing pointcut-ref="mycut" method="doThrowing"/>
   <aop:after pointcut-ref="argcut" method="doAfter" arg-names="name"/>
 <aop:around pointcut-ref="mycut" method="arround"/>
 </aop:aspect>

</aop:config>

</beans>
<?xml version="1.0" encoding="UTF-8"?> <beans xmlns="http://www.springframework.org/schema/beans" xmlns:xsi="http://www.w3.org/2001/XMLSchema-instance" xmlns:context="http://www.springframework.org/schema/context" xmlns:aop="http://www.springframework.org/schema/aop" xmlns:tx="http://www.springframework.org/schema/tx" xsi:schemaLocation="http://www.springframework.org/schema/beans http://www.springframework.org/schema/beans/spring-beans-2.5.xsd http://www.springframework.org/schema/context http://www.springframework.org/schema/context/spring-context-2.5.xsd http://www.springframework.org/schema/aop http://www.springframework.org/schema/aop/spring-aop-2.5.xsd http://www.springframework.org/schema/tx http://www.springframework.org/schema/tx/spring-tx-2.5.xsd "> <aop:aspectj-autoproxy></aop:aspectj-autoproxy> <!-- 配置数据源 --> <bean id="dataSource" class="org.apache.commons.dbcp.BasicDataSource" destroy-method="close"> <property name="driverClassName" value="com.mysql.jdbc.Driver"/> <property name="url" value="jdbc:mysql://localhost:3306/test?useUnicode=true&characterEncoding=utf-8"/> <property name="username" value="root"/> <property name="password" value=""/> <!-- 连接池启动时的初始值 --> <property name="initialSize" value="1"/> <!-- 连接池的最大值 --> <property name="maxActive" value="500"/> <!-- 最大空闲值.当经过一个高峰时间后,连接池可以慢慢将已经用不到的连接慢慢释放一部分,一直减少到maxIdle为止 --> <property name="maxIdle" value="2"/> <!-- 最小空闲值.当空闲的连接数少于阀值时,连接池就会预申请去一些连接,以免洪峰来时来不及申请 --> <property name="minIdle" value="1"/> </bean> <!-- 配置事务管理器--> <bean id="txManager" class="org.springframework.jdbc.datasource.DataSourceTransactionManager"> <property name="dataSource" ref="dataSource"/> </bean> <!-- 配置业务bean --> <bean id="personService" class="com.persia.service.impl.PersonServiceImpl"> <property name="ds" ref="dataSource"></property> </bean> <!-- 采用@Transactional注解方式来使用事务 --> <tx:annotation-driven transaction-manager="txManager"/> </beans>
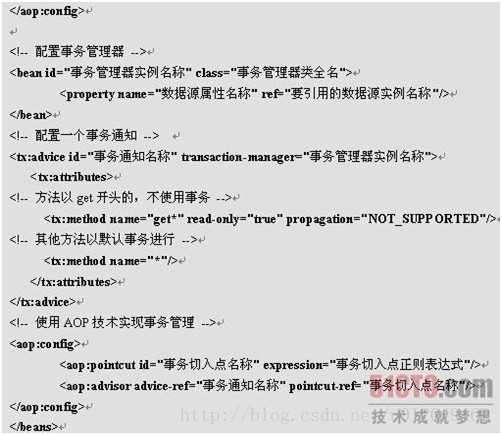
XML版本:
<?xml version="1.0" encoding="UTF-8"?> <beans xmlns="http://www.springframework.org/schema/beans" xmlns:xsi="http://www.w3.org/2001/XMLSchema-instance" xmlns:context="http://www.springframework.org/schema/context" xmlns:aop="http://www.springframework.org/schema/aop" xmlns:tx="http://www.springframework.org/schema/tx" xsi:schemaLocation="http://www.springframework.org/schema/beans http://www.springframework.org/schema/beans/spring-beans-2.5.xsd http://www.springframework.org/schema/context http://www.springframework.org/schema/context/spring-context-2.5.xsd http://www.springframework.org/schema/aop http://www.springframework.org/schema/aop/spring-aop-2.5.xsd http://www.springframework.org/schema/tx http://www.springframework.org/schema/tx/spring-tx-2.5.xsd "> <aop:aspectj-autoproxy></aop:aspectj-autoproxy> <!-- 配置数据源 --> <bean id="dataSource" class="org.apache.commons.dbcp.BasicDataSource" destroy-method="close"> <property name="driverClassName" value="com.mysql.jdbc.Driver"/> <property name="url" value="jdbc:mysql://localhost:3306/test?useUnicode=true&characterEncoding=utf-8"/> <property name="username" value="root"/> <property name="password" value=""/> <!-- 连接池启动时的初始值 --> <property name="initialSize" value="1"/> <!-- 连接池的最大值 --> <property name="maxActive" value="500"/> <!-- 最大空闲值.当经过一个高峰时间后,连接池可以慢慢将已经用不到的连接慢慢释放一部分,一直减少到maxIdle为止 --> <property name="maxIdle" value="2"/> <!-- 最小空闲值.当空闲的连接数少于阀值时,连接池就会预申请去一些连接,以免洪峰来时来不及申请 --> <property name="minIdle" value="1"/> </bean> <!-- 配置事务管理器 --> <bean id="txManager" class="org.springframework.jdbc.datasource.DataSourceTransactionManager"> <property name="dataSource" ref="dataSource"/> </bean> <!-- 配置业务bean --> <bean id="personService" class="com.persia.service.impl.PersonServiceImpl"> <property name="ds" ref="dataSource"></property> </bean> <!-- 使用XML来使用事务管理--> <aop:config> <!-- 配置一个切面,和需要拦截的类和方法 --> <aop:pointcut id="transactionPointcut" expression="execution(* com.persia.service..*.*(..))"/> <aop:advisor advice-ref="txAdvice" pointcut-ref="transactionPointcut"/> </aop:config> <!-- 配置一个事务通知 --> <tx:advice id="txAdvice" transaction-manager="txManager"> <tx:attributes> <!-- 方法以get开头的,不使用事务 --> <tx:method name="get*" read-only="true" propagation="NOT_SUPPORTED"/> <!-- 其他方法以默认事务进行 --> <tx:method name="*"/> </tx:attributes> </tx:advice> </beans>
<?xml version="1.0" encoding="UTF-8"?> <beans xmlns="http://www.springframework.org/schema/beans" xmlns:xsi="http://www.w3.org/2001/XMLSchema-instance" xmlns:context="http://www.springframework.org/schema/context" xmlns:aop="http://www.springframework.org/schema/aop" xmlns:tx="http://www.springframework.org/schema/tx" xsi:schemaLocation="http://www.springframework.org/schema/beans http://www.springframework.org/schema/beans/spring-beans-2.5.xsd http://www.springframework.org/schema/context http://www.springframework.org/schema/context/spring-context-2.5.xsd http://www.springframework.org/schema/aop http://www.springframework.org/schema/aop/spring-aop-2.5.xsd http://www.springframework.org/schema/tx http://www.springframework.org/schema/tx/spring-tx-2.5.xsd "> <!-- 配置数据源 --> <bean id="dataSource" class="org.apache.commons.dbcp.BasicDataSource" destroy-method="close"> <property name="driverClassName" value="com.mysql.jdbc.Driver"/> <property name="url" value="jdbc:mysql://localhost:3306/test?useUnicode=true&characterEncoding=utf-8"/> <property name="username" value="root"/> <property name="password" value=""/> <!-- 连接池启动时的初始值 --> <property name="initialSize" value="1"/> <!-- 连接池的最大值 --> <property name="maxActive" value="500"/> <!-- 最大空闲值.当经过一个高峰时间后,连接池可以慢慢将已经用不到的连接慢慢释放一部分,一直减少到maxIdle为止 --> <property name="maxIdle" value="2"/> <!-- 最小空闲值.当空闲的连接数少于阀值时,连接池就会预申请去一些连接,以免洪峰来时来不及申请 --> <property name="minIdle" value="1"/> </bean> <!-- 配置hibernate的sessionFactory --> <bean id="sessionFactory" class="org.springframework.orm.hibernate3.LocalSessionFactoryBean"> <property name="dataSource"><ref bean="dataSource" /></property> <property name="mappingResources"> <list> <value>com/persia/model/Person.hbm.xml</value> </list> </property> <!-- 1.首先在sessionFactory里面配置以上3条设置 --> <!-- 2.然后得在类路径下面添加一个ehcache.xml的缓存配置文件 --> <!-- 3.最后在要使用缓存的实体bean的映射文件里面配置缓存设置 --> <!--使用二级缓存--> <!-- 不使用查询缓存,因为命中率不是很高 --> <!-- 使用Ehcache缓存产品 --> <property name="hibernateProperties"> <value> hibernate.dialect=org.hibernate.dialect.MySQL5Dialect hibernate.hbm2ddl.auto=update hibernate.show_sql=false hibernate.format_sql=false hibernate.cache.use_second_level_cache=true hibernate.cache.use_query_cache=false hibernate.cache.provider_class=org.hibernate.cache.EhCacheProvider </value> </property> </bean> <!-- 配置Spring针对hibernate的事务管理器 --> <bean id="txManager" class="org.springframework.orm.hibernate3.HibernateTransactionManager"> <property name="sessionFactory" ref="sessionFactory"/> </bean> <!-- 配置使用注解的方式来使用事务 --> <tx:annotation-driven transaction-manager="txManager"/> <!-- 使用手工配置的注解方式来注入bean --> <context:annotation-config></context:annotation-config> <!--定义要注入的业务bean --> <bean id="personService" class="com.persia.service.impl.PersonServiceImpl"></bean> <!--将Struts的action交给Spring容器来管理 --> <bean name="/person/list" class="com.persia.struts.PersonListAction"> <!--1.这里要求name和struts-config里面的action的path名称一致,因为id不允许有特殊字符--> <!--2.还得在Struts-config文件里面添加Spring的请求处理器,该处理器会根据action的path属性到Spring容器里面寻找这个bean,若找到了则用这个bean来处理用户的请求--> <!--3.然后去掉action的type标签和值(可选),当Spring处理器找不到该bean时,才会使用Struts的action--> <!--4.最后在action里面使用Spring的注入方式来注入业务bean--> </bean> <bean name="/person/manage" class="com.persia.struts.PersonManageAction"></bean> </beans>
<?xml version="1.0" encoding="UTF-8"?> <beans xmlns="http://www.springframework.org/schema/beans" xmlns:xsi="http://www.w3.org/2001/XMLSchema-instance" xmlns:context="http://www.springframework.org/schema/context" xmlns:aop="http://www.springframework.org/schema/aop" xmlns:tx="http://www.springframework.org/schema/tx" xsi:schemaLocation="http://www.springframework.org/schema/beans http://www.springframework.org/schema/beans/spring-beans-2.5.xsd http://www.springframework.org/schema/context http://www.springframework.org/schema/context/spring-context-2.5.xsd http://www.springframework.org/schema/aop http://www.springframework.org/schema/aop/spring-aop-2.5.xsd http://www.springframework.org/schema/tx http://www.springframework.org/schema/tx/spring-tx-2.5.xsd "> <!-- 配置数据源 --> <bean id="dataSource" class="org.apache.commons.dbcp.BasicDataSource" destroy-method="close"> <property name="driverClassName" value="com.mysql.jdbc.Driver"/> <property name="url" value="jdbc:mysql://localhost:3306/test?useUnicode=true&characterEncoding=utf-8"/> <property name="username" value="root"/> <property name="password" value=""/> <!-- 连接池启动时的初始值 --> <property name="initialSize" value="1"/> <!-- 连接池的最大值 --> <property name="maxActive" value="500"/> <!-- 最大空闲值.当经过一个高峰时间后,连接池可以慢慢将已经用不到的连接慢慢释放一部分,一直减少到maxIdle为止 --> <property name="maxIdle" value="2"/> <!-- 最小空闲值.当空闲的连接数少于阀值时,连接池就会预申请去一些连接,以免洪峰来时来不及申请 --> <property name="minIdle" value="1"/> </bean> <!-- 配置hibernate的sessionFactory --> <bean id="sessionFactory" class="org.springframework.orm.hibernate3.LocalSessionFactoryBean"> <property name="dataSource"><ref bean="dataSource" /></property> <property name="mappingResources"> <list> <value>com/persia/model/Person.hbm.xml</value> </list> </property> <!-- 1.首先在sessionFactory里面配置以上3条设置 --> <!-- 2.然后得在类路径下面添加一个ehcache.xml的缓存配置文件 --> <!-- 3.最后在要使用缓存的实体bean的映射文件里面配置缓存设置 --> <!--使用二级缓存--> <!-- 不使用查询缓存,因为命中率不是很高 --> <!-- 使用Ehcache缓存产品 --> <property name="hibernateProperties"> <value> hibernate.dialect=org.hibernate.dialect.MySQL5Dialect hibernate.hbm2ddl.auto=update hibernate.show_sql=false hibernate.format_sql=false hibernate.cache.use_second_level_cache=true hibernate.cache.use_query_cache=false hibernate.cache.provider_class=org.hibernate.cache.EhCacheProvider </value> </property> </bean> <!-- 配置Spring针对hibernate的事务管理器 --> <bean id="txManager" class="org.springframework.orm.hibernate3.HibernateTransactionManager"> <property name="sessionFactory" ref="sessionFactory"/> </bean> <!-- 配置使用注解的方式来使用事务 --> <tx:annotation-driven transaction-manager="txManager"/> <!-- 使用手工配置的注解方式来注入bean --> <context:annotation-config></context:annotation-config> <!--定义要注入的业务bean --> <bean id="personService" class="com.persia.service.impl.PersonServiceImpl"></bean> <!--注入Struts 2的action --> <bean id="personList" class="com.persia.struts2.action.PersonListAction"></bean> </beans>
<?xml version="1.0" encoding="UTF-8"?>
<beans
    xmlns="http://www.springframework.org/schema/beans"
    xmlns:xsi="http://www.w3.org/2001/XMLSchema-instance"
    xmlns:context="http://www.springframework.org/schema/context"
    xmlns:aop="http://www.springframework.org/schema/aop"
    xmlns:tx="http://www.springframework.org/schema/tx"
    xsi:schemaLocation="http://www.springframework.org/schema/beans
                       http://www.springframework.org/schema/beans/spring-beans-2.5.xsd
                       http://www.springframework.org/schema/context
                       http://www.springframework.org/schema/context/spring-context-2.5.xsd
                       http://www.springframework.org/schema/aop
                       http://www.springframework.org/schema/aop/spring-aop-2.5.xsd
                       http://www.springframework.org/schema/tx http://www.springframework.org/schema/tx/spring-tx-2.5.xsd
                      ">


<!-- 使用手工配置的注解方式来注入bean -->
<context:annotation-config></context:annotation-config>

<!-- 1.配置Spring集成JPA -->
<bean id="entityManagerFactory" class="org.springframework.orm.jpa.LocalEntityManagerFactoryBean">
      <property name="persistenceUnitName" value="SpringJPAPU"/>
</bean>

<!--2.配置Spring针对JPA的事务 -->
    <bean id="txManager" class="org.springframework.orm.jpa.JpaTransactionManager">
        <property name="entityManagerFactory" ref="entityManagerFactory"/>
</bean>

<!--3.开启事务注解 -->
<tx:annotation-driven transaction-manager="txManager"/>

<!--以上3个Spring集成JPA的配置,在web项目先添加Spring支持,后添加JPA支持时会自动生成 -->

<!-- 配置业务bean -->
<bean id="personService" class="com.persia.service.impl.PersonServiceImpl"></bean>

<!-- 配置Struts的action -->
<bean name="/person/list" class="com.persia.struts.PersonListAction"/>
<bean name="/person/manage" class="com.persia.struts.PersonManageAction"/>
</beans>
Spring 配置文件applicationContext.xml
标签:
原文地址:http://www.cnblogs.com/hwaggLee/p/4461736.html