标签:
复习一下:
1、在控制器上添加一个UITableView, 暂时该UITableView控件变量名命名为为tableView, 设置控件代理,实现控制器的UITableViewDataSource, UITableViewDelegate协议;
2、tableView控件的editing属性默认是NO, 并且UITableViewCell默认情况下没有删除和增加功能。
实现代理方法
- (void)tableView:(UITableView *)tableView commitEditingStyle:(UITableViewCellEditingStyle)editingStyle forRowAtIndexPath:(NSIndexPath *)indexPath;
后,然后UITableViewCell向左拖拽时会出现删除按钮:
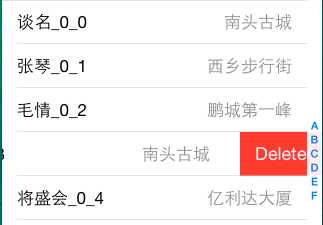
在代理方法里面做相应处理,就可以实现删除功能,代码如下:
//代理方法,实现后可以进行增加单元行或者删除单元行
- (void)tableView:(UITableView *)tableView commitEditingStyle:(UITableViewCellEditingStyle)editingStyle forRowAtIndexPath:(NSIndexPath *)indexPath{
//    typedef NS_ENUM(NSInteger, UITableViewCellEditingStyle) {
//        UITableViewCellEditingStyleNone,
//        UITableViewCellEditingStyleDelete,  //表示删除
//        UITableViewCellEditingStyleInsert   //表示增加
//    };
   // NSLog(@"%d", editingStyle);
    //当样式是删除操作,进行删除
    if (editingStyle == UITableViewCellEditingStyleDelete){

        //删除数组中一行
        [self.arrays[indexPath.section] removeObjectAtIndex:indexPath.row];

//        [tableView reloadData]; //删除后全部重新加载
        [tableView deleteRowsAtIndexPaths:@[indexPath] withRowAnimation:UITableViewRowAnimationRight];//只刷新删除行部分(性能更好一些)
    }

}
这里还有一个代理方法:
- (UITableViewCellEditingStyle)tableView:(UITableView *)tableView editingStyleForRowAtIndexPath:(NSIndexPath *)indexPath;当没有实现此方法时,默认是返回
UITableViewCellEditingStyleDelete枚举,要想实现单元格增加,就要实现此方法,并且返回UITableViewCellEditingStyleInsert枚举
然后还要设置tableView控件属性 editing 为YES, 完整代码如下:
- (void)viewDidLoad {
    [super viewDidLoad];

    //...... //实现代码

    //设置tableView控件editing属性
    tableView.editing = YES;  //设置可编辑
}


//delegate代理方法,实现此方法,可以设置UITableViewCell增加或删除功能,如果不实现此方法,默认都是删除样式
- (UITableViewCellEditingStyle)tableView:(UITableView *)tableView editingStyleForRowAtIndexPath:(NSIndexPath *)indexPath{

    if (indexPath.row % 2 == 0){
        return UITableViewCellEditingStyleInsert;
    }
    else{
        return UITableViewCellEditingStyleDelete;
    }
}

//处理UITableViewCell的增加和删除功能
- (void)tableView:(UITableView *)tableView commitEditingStyle:(UITableViewCellEditingStyle)editingStyle forRowAtIndexPath:(NSIndexPath *)indexPath{
//    typedef NS_ENUM(NSInteger, UITableViewCellEditingStyle) {
//        UITableViewCellEditingStyleNone,
//        UITableViewCellEditingStyleDelete,
//        UITableViewCellEditingStyleInsert
//    };

    //删除操作
    if (editingStyle == UITableViewCellEditingStyleDelete){

        [self.arrays[indexPath.section] removeObjectAtIndex:indexPath.row];

//        [tableView reloadData]; //全部重新加载
        [tableView deleteRowsAtIndexPaths:@[indexPath] withRowAnimation:UITableViewRowAnimationRight];//删除行
    }//插入操作
    else if (editingStyle == UITableViewCellEditingStyleInsert){
        TanPerson *per = [[TanPerson alloc] init];
        per.name = @"哈哈哈哈";
        per.address = @"小楼昨夜又东风";
        [self.arrays[indexPath.section] insertObject:per atIndex:indexPath.row];
        [tableView insertRowsAtIndexPaths:@[indexPath] withRowAnimation:UITableViewRowAnimationLeft];
    }
}
运行后一加载截图为:
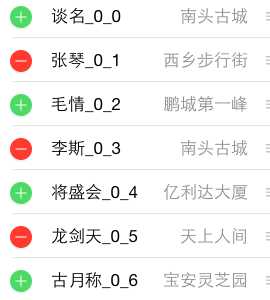 可以进行增加或删除操作:
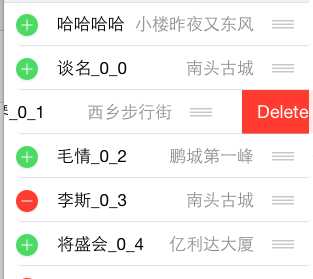
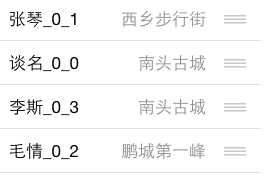
3、UITableViewCell的移动:实现一个代理方法,就可以进行单元格的移动:
//实现此方法,就可以移动单元格, 方法里面是让数据和样式移动保持一致
- (void)tableView:(UITableView *)tableView moveRowAtIndexPath:(NSIndexPath *)sourceIndexPath toIndexPath:(NSIndexPath *)destinationIndexPath{
   // NSLog(@"移动了”");
    TanPerson *sourcePerson = self.arrays[sourceIndexPath.section][sourceIndexPath.row];
    TanPerson *destPerson = self.arrays[destinationIndexPath.section][destinationIndexPath.row];

    self.arrays[destinationIndexPath.section][destinationIndexPath.row] = sourcePerson;
    self.arrays[sourceIndexPath.section][sourceIndexPath.section] = destPerson;
}
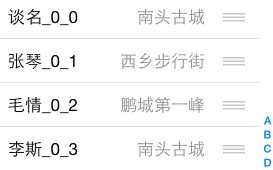 按住想要移动的UITableViewCell的哪个三横图标,可以进行移动
标签:
原文地址:http://www.cnblogs.com/tandaxia/p/4461906.html