标签:
简单介绍:
两种样式
UITableViewStylePlain
UITableViewStyleGrouped
数据显示需要设置数据源,数据源是符合遵守协议 <UITableViewDataSource>的类
数据源
dataSource
一些UITableViewDataSource协议里写好的类,这些类有系统自动调用,调用顺序是先设置组再设置行最后设置行内容
设置组section,直接将组返回
- (NSInteger)numberOfSectionsInTableView:(UITableView *)tableView
设置行,直接返回行
- (NSInteger)tableView:(UITableView *)tableView numberOfRowsInSection:(NSInteger)section
设置行内容,直接返回UITableViewCell对象
- (UITableViewCell *)tableView:(UITableView *)tableView cellForRowAtIndexPath:(NSIndexPath *)indexPath
设置组标题(头部),返回头部标题
- (NSString *)tableView:(UITableView *)tableView titleForHeaderInSection:(NSInteger)section
设置组描述(尾部),返回尾部描述
- (NSString *)tableView:(UITableView *)tableView titleForFooterInSection:(NSInteger)section
其中indexPath包含两个数据一个是section一个是row,也就是每一行数据的位置,表示第几组第几行
具体用法看下面的代码
1、创建一个UITableView对象,并设置数据源
1     // 创建一个UITableView
2     UITableView *tableView = [[UITableView alloc] initWithFrame:self.view.bounds style:UITableViewStyleGrouped];
3     tableView.dataSource = self; // 设置数据源
4     [self.view addSubview:tableView]; // 添加到视图
既然数据源是self,那么这个类必须遵守协议:UITableViewDataSource,在这个类扩展上遵守协议即可
1 @interface SLQViewController () <UITableViewDataSource> // 遵守协议
2
3 @end
将待添加数据到数组中
1 @interface SLQViewController () <UITableViewDataSource> // 遵守协议
2 {
3     NSArray *_property; // 属性
4     NSArray *_location;  // 位置
5 }
在viewDidLoad方法中初始化数组
1     _property = @[@"红",@"蓝",@"黑"];
2     _location = @[@"上",@"下",@"左",@"右"];
设置有多少组
1 // 设置组section
2 - (NSInteger)numberOfSectionsInTableView:(UITableView *)tableView
3 {
4     return 2; // 返回组数
5 }
 1 // 设置每组多少行 row
 2 - (NSInteger)tableView:(UITableView *)tableView numberOfRowsInSection:(NSInteger)section
 3 {
 4     if(section == 0)
 5         return _property.count;
 6     if (section == 1) {
 7         return _location.count;
 8     }
 9
10     return 0;
11 }
 1 // 设置行内容
 2 - (UITableViewCell *)tableView:(UITableView *)tableView cellForRowAtIndexPath:(NSIndexPath *)indexPath
 3 {
     // 创建UITableViewCell对象
 4     UITableViewCell *cell = [[UITableViewCell alloc] initWithStyle:UITableViewCellStyleDefault reuseIdentifier:nil];
 5     if (indexPath.section == 0)
 6     {
 7         cell.textLabel.text = _property[indexPath.row];
 8     }
 9     if (indexPath.section == 1)
10     {
11         cell.textLabel.text = _location[indexPath.row];
12    }
13
14     return cell; // 返回
15 }
 1 // 设置每组头部显示文字
 2 - (NSString *)tableView:(UITableView *)tableView titleForHeaderInSection:(NSInteger)section
 3 {
 4     if(section == 0)
 5     {
 6         return @"颜色";
 7     }
 8     if (section == 1)
 9     {
10         return @"位置";
11     }
12     return nil;
13 }
 1 // 设置每组尾部显示文字
 2 - (NSString *)tableView:(UITableView *)tableView titleForFooterInSection:(NSInteger)section
 3 {
 4     if(section == 0)
 5     {
 6         return @"设置一些颜色属性啦啦啦啦";
 7     }
 8     if (section == 1)
 9     {
10         return @"位置属性的设置哈哈哈哈";
11     }
12     return nil;
13 }
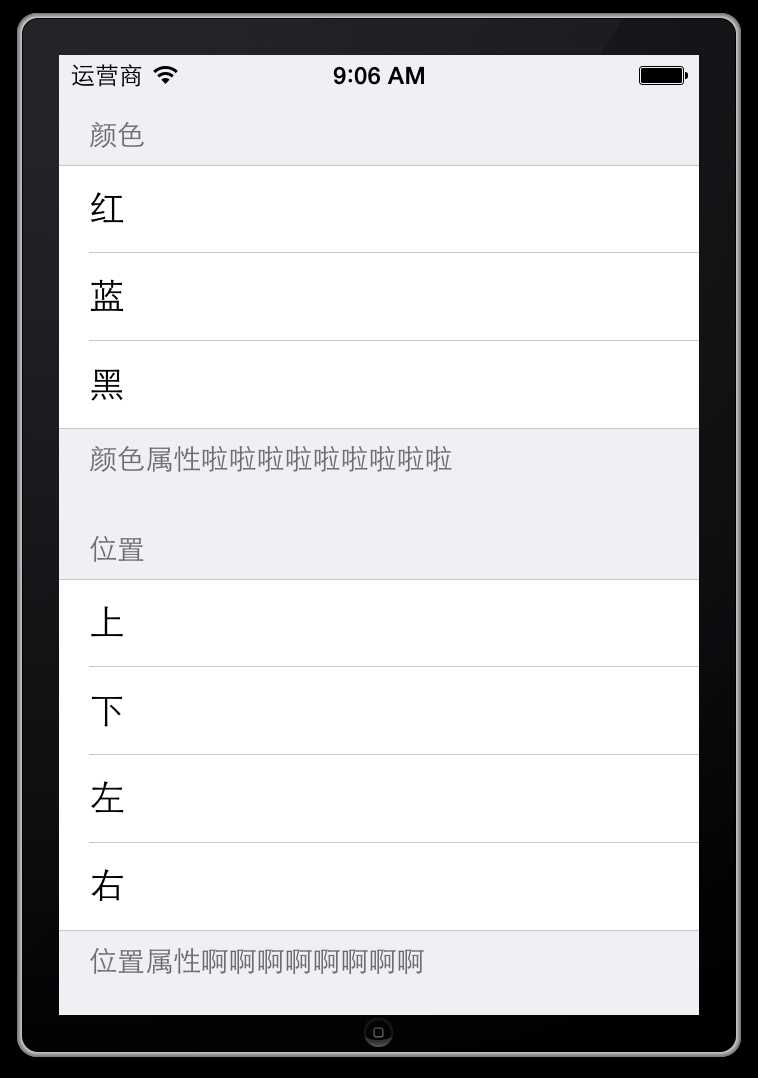
运行可以看到结果:

上面的代码看着可扩展性太差,下面来几个优化版本,直接看代码吧
  1 //
  2 //  SLQViewController.m
  3 //  UITableView的练习
  4 //
  5 //  Created by Christian on 15/5/16.
  6 //  Copyright (c) 2015年 slq. All rights reserved.
  7 //
  8
  9 #import "SLQViewController.h"
 10
 11
 12 //
 13 #define kHeader @"header"
 14 #define kFooter @"footer"
 15 #define kSetting @"setting"
 16
 17
 18 @interface SLQViewController () <UITableViewDataSource> // 遵守协议
 19
 20 {
 21 //    NSArray *_property;
 22 //    NSArray *_location;
 23
 24     // 优化1
 25 //    NSArray *_allSetting;
 26 //    NSArray *_noramlSet;
 27 //    NSArray *_moveSet;
 28
 29     // 优化2
 30     NSArray *_allInfo; // 内部保存字典
 31 }
 32 @end
 33
 34 @implementation SLQViewController
 35
 36 - (void)viewDidLoad
 37 {
 38     [super viewDidLoad];
 39     // Do any additional setup after loading the view, typically from a nib.
 40     // 创建一个UITableView
 41     UITableView *tableView = [[UITableView alloc] initWithFrame:self.view.bounds style:UITableViewStyleGrouped];
 42     tableView.dataSource = self; // 设置数据源
 43     [self.view addSubview:tableView]; // 添加到视图
 44 //
 45 //    _property = @[@"颜色",@"大小",@"透明度"];
 46 //    _location = @[@"上",@"下",@"左",@"右"];
 47     // 优化1
 48 //    _allSetting = @[
 49 //                    @[@"颜色",@"大小",@"透明度"],
 50 //                    @[@"上",@"下",@"左",@"右"],
 51 //                    ];
 52 //    _noramlSet =  @[@"设置",@"位置"];
 53 //    _moveSet =  @[@"常见属性设置啦啦啦啦啦了",@"位移属性设置啊啊啊啊啊啊啊啊"];
 54     // 优化2,保存字典
 55     _allInfo = @[
 56                     @{
 57                         kHeader : @"颜色",
 58                         kFooter : @"颜色属性啦啦啦啦啦啦啦啦啦",
 59                         kSetting : @[@"红",@"蓝",@"黑"]
 60                         },
 61                     @{
 62                         kHeader : @"位置",
 63                         kFooter : @"位置属性啊啊啊啊啊啊啊啊",
 64                         kSetting : @[@"上",@"下",@"左",@"右"]
 65                         },
 66                     @{
 67                         kHeader : @"透明属性",
 68                         kFooter : @"透明属性啊啊啊啊啊啊啊啊",
 69                         kSetting : @[@"透明",@"半透明",@"不透明"]
 70                         }
 71                     ];
 72
 73 }
 74 // 设置组section
 75 - (NSInteger)numberOfSectionsInTableView:(UITableView *)tableView
 76 {
 77     //return 2;
 78     // 优化1
 79     //return _allSetting.count;
 80     // 优化2
 81     return _allInfo.count;
 82 }
 83 // 设置每组多少行 row
 84 - (NSInteger)tableView:(UITableView *)tableView numberOfRowsInSection:(NSInteger)section
 85 {
 86 //    if(section == 0)
 87 //        return _property.count;
 88 //    if (section == 1) {
 89 //        return _location.count;
 90 //    }
 91     // 优化1
 92     // return [_allSetting[section] count];
 93     // 优化2
 94     return [_allInfo[section][kSetting] count];
 95     //return 0;
 96 }
 97 // 设置行内容
 98 - (UITableViewCell *)tableView:(UITableView *)tableView cellForRowAtIndexPath:(NSIndexPath *)indexPath
 99 {
100     UITableViewCell *cell = [[UITableViewCell alloc] initWithStyle:UITableViewCellStyleDefault reuseIdentifier:nil];
101 //    if (indexPath.section == 0)
102 //    {
103 //        cell.textLabel.text = _property[indexPath.row];
104 //    }
105 //    if (indexPath.section == 1)
106 //    {
107 //        cell.textLabel.text = _location[indexPath.row];
108 //    }
109     // 优化1
110     //cell.textLabel.text = _allSetting[indexPath.section][indexPath.row];
111     // 优化2
112     cell.textLabel.text = _allInfo[indexPath.section][kSetting][indexPath.row];
113     return cell;
114 }
115 // 设置每组头部显示文字
116 - (NSString *)tableView:(UITableView *)tableView titleForHeaderInSection:(NSInteger)section
117 {
118 //    if(section == 0)
119 //    {
120 //        return @"设置";
121 //    }
122 //    if (section == 1)
123 //    {
124 //        return @"位置";
125 //    }
126     // 优化1
127     // return _noramlSet[section];
128     // 优化2
129     return _allInfo[section][kHeader];
130 }
131 // 设置每组尾部显示文字
132 - (NSString *)tableView:(UITableView *)tableView titleForFooterInSection:(NSInteger)section
133 {
134 //    if(section == 0)
135 //    {
136 //        return @"设置一些常见属性";
137 //    }
138 //    if (section == 1)
139 //    {
140 //        return @"位置属性的设置";
141 //    }
142      // 优化1
143     // return _moveSet[section];
144      // 优化2
145     return _allInfo[section][kFooter];
146 }
147 @end
源代码:
http://pan.baidu.com/s/1hqCLqra
其实还有优化的空间,继续学习。。。。
标签:
原文地址:http://www.cnblogs.com/songliquan/p/4507454.html