标签:
简易NewsDemo代码分析
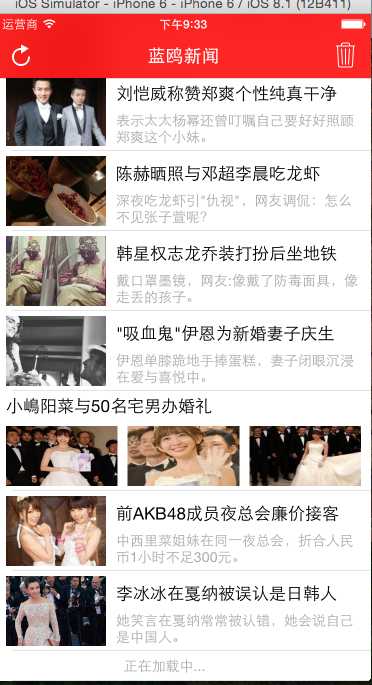
界面布局就不多说了.效果图:(自定义了三套Cell,最后一套Cell是页面最下方的"正在加载中..."Cell,图三.)


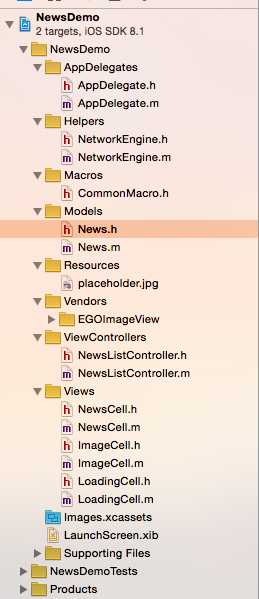
主要分析工程目录和流程.
第一:Helper中的负责请求数据的网络引擎类.
网络请求类NetworkEngine主要完成数据请求的任务.用来简化控制器中的代码.将数据单独存放.
实现步骤分析:
.h文件中:
1.分析完成网络请求需要:①请求的网址 ②请求的参数 ③请求的方式(GET或者POST).
那么将这三个定义为属性.请求参数只有两种,所以定义为枚举类型.然后将请求数据和结束请求数据写成两个方法.
//
//  NetworkEngine.h
//  NewsDemo

#import <Foundation/Foundation.h>
/**
 *  NetworkEngine 是网络引擎类,完成数据的网络请求操作.
 */

@class NetworkEngine;
@protocol NetworkEngineDelegate <NSObject>
//协议中添加两个方法,一个对应请求数据成功的方法,一个对应请求数据失败的方法
- (void)networkEngine:(NetworkEngine *)networkEngine requestSuccessWithData:(NSData *)data;
- (void)networkEngine:(NetworkEngine *)networkEngine requestFailWithData:(NSError *)error;
@end


//请求方式(枚举类型)
typedef enum RequsetMethod {
    RequsetMethodGET,
    RequsetmethodPOST
}RequestMethod;

@interface NetworkEngine : NSObject
@property (nonatomic, copy) NSString *linkName; //请求服务器地址
@property (nonatomic, retain) NSDictionary *parmDic; //参数字典,存储所有的请求参数.
@property (nonatomic, assign) RequestMethod requestMethod;  //请求方式

@property (nonatomic, assign) id<NetworkEngineDelegate> delegate; //指定代理

//开始请求数据
- (void)startDownloadData;
//结束请求数据
- (void)stopDownloadData;

@end
.m文件中:
2.有了服务器址,参数和请求方式,下面开始请求数据.但是前提是要把服务器地址装化为NSURL格式.这里就要根据请求方式来判断是否需要将参数拼接到服务器地址后面了.
GET方式的请求需要在服务器地址后,用?隔开,然后加上请求的参数.例如服务器地址为:
//API 网络接口
#define kNewsAPI @"http://m2.qiushibaike.com/article/list/text"
那么GET请求就需要加上参数变为
http://m2.qiushibaike.com/article/list/text?count=30&page=%25d&AdID=14314020462881C8509990
参数为一个字典, @{count:30,page:25,ADID:14314020462881C8509990}
下面就是判断请求方式和实现参数拼接的代码实现了,这里不详述了.
3.将服务器地址转为NSURL对象之后,下一步创建请求.由于不确定是GET还是POST,这里就用通用的创建请求方式,也是POST的请求方式
//GET创建请求方式(不可变URLRequest)
NSURLRequest *request = [NSURLRequset requestWithURL:];

//POST创建请求方式(可变MutableURLRequest)
NSMutableURLRequest *request = [NSMutableURLRequest requestWithURL:];
4.如果是POST方式,还要设置请求体(就是GET方式的URL中?后面的参数)和请求方式.
[request setHTTPBody:[[self appendStringByParDic] dataUsingEncoding:NSUTF8StringEncoding]];
[request setHTTPMethod:@"POST"];
5.下一步创建连接对象(使用代理方式),将连接对象定义成属性,便于在结束方法中访问.
连接对象创建完毕,就可以连接服务器请求数据,(这里定义一个属性NSMutableData *mData,存储从服务器放回的所有数据.) 这里还要实现代理中的四个方法.
①:didReceiveResponse:收到服务器响应,这时候为mData开辟空间.
②:didReceiveData:开始从服务器接收数据.(一点一点传送),这时候需要进行数据拼接.
③:connectionDidFinishLoading:接收数据完毕. 关键点:这时候NetworkEngine的获取数据的工作已经完成了,它需要能够将数据发送给控制器.怎么发送呢?自然要使用代理了.
在.h文件中定义协议,并且添加方法.然后指定代理.
//协议中添加两个方法,一个对应请求数据成功的方法,一个对应请求数据失败的方法
- (void)networkEngine:(NetworkEngine *)networkEngine requestSuccessWithData:(NSData *)data;
- (void)networkEngine:(NetworkEngine *)networkEngine requestFailWithData:(NSError *)error;
并且在.m文件中的connectionDidFinishLoading方法中,给代理指定执行时机.(这本来是使用代理的最后一步,这里提前说.).
    //通知代理执行协议中请求数据成功的方法
    if ([self.delegate respondsToSelector:@selector(networkEngine:requestSuccessWithData:)]) {
        [self.delegate networkEngine:self requestSuccessWithData:self.mData];
    }
到此,网络请求完成.
//  NetworkEngine.m
//  NewsDemo

#import "NetworkEngine.h"

@interface NetworkEngine ()<NSURLConnectionDataDelegate>
@property (nonatomic, retain) NSURLConnection *connection; //存储连接对象
@property (nonatomic, retain) NSMutableData *mData; //存储服务器返回的所有数据
@end

@implementation NetworkEngine

//开始请求数据
- (void)startDownloadData {
    //1.创建NSURL对象
    NSURL *url = [NSURL URLWithString:[self urlString]];
    //2.创建请求
    NSMutableURLRequest *request = [NSMutableURLRequest requestWithURL:url];
    if (self.requestMethod == RequsetmethodPOST) {
        //如果是POST请求,就需要设置请求体,以及请求方式.
        [request setHTTPBody:[[self appendStringByParDic] dataUsingEncoding:NSUTF8StringEncoding]];
        [request setHTTPMethod:@"POST"];
    }
    //3.创建连接对象(Delegate方式)
    self.connection = [NSURLConnection connectionWithRequest:request delegate:self];
}

//结束请求数据
- (void)stopDownloadData {
    [self.connection cancel]; //中断连接
}

#pragma mark - handle
/**
 *  获取网址字符串对象
 */
- (NSString *)urlString {
    //保存服务器地址
    NSString *newLinkName = nil;
    //判断请求方式
    switch (self.requestMethod) {
        case RequsetMethodGET: //GET请求,需要拼接上参数
            newLinkName = [self urlStringByGET];
            break;
        case RequsetmethodPOST: //POST请求,无需拼接
            newLinkName = self.linkName;
            break;
        default:
            break;
    }
    return newLinkName;
}

//GET请求获取请求的网址字符串对象
- (NSString *)urlStringByGET {
    //判断参数字段中是否有参数
    if (!self.parmDic) {
        //如果没有参数,则不需要拼接,直接返回服务器地址即可.
        return self.linkName;
    }
    //如果有参数,则需要拼接
    return [[self.linkName stringByAppendingFormat:@"?%@", [self appendStringByParDic]] stringByAddingPercentEscapesUsingEncoding:NSUTF8StringEncoding];
}

//将字典中的所有参数拼接成字符串
- (NSString *)appendStringByParDic {
    //1.创建可变数组,存储字典中的key:Value元素
    NSMutableArray *tempArr = [NSMutableArray arrayWithCapacity:1];
    //2.遍历字典,将key:value两部分合成一个字符串对象
    for (NSString *key in self.parmDic) {
        NSString *newStr = [NSString stringWithFormat:@"%@=%@", key, self.parmDic[key]];
        [tempArr addObject:newStr];
    }
    //3.将数组中的所有元素拼接成一个字符串,中间通过&间隔.
    return [tempArr componentsJoinedByString:@"&"];
}


#pragma mark - NSURLConnectionDataDelegate

//收到服务器响应
- (void)connection:(NSURLConnection *)connection didReceiveResponse:(NSURLResponse *)response {
    //开辟空间
    self.mData = [NSMutableData data];
}

//收到服务器数据
- (void)connection:(NSURLConnection *)connection didReceiveData:(NSData *)data {
    //拼接数据
    [self.mData appendData:data];
}
//数据传输完毕
- (void)connectionDidFinishLoading:(NSURLConnection *)connection {
    //通知代理执行协议中请求数据成功的方法
    if ([self.delegate respondsToSelector:@selector(networkEngine:requestSuccessWithData:)]) {
        [self.delegate networkEngine:self requestSuccessWithData:self.mData];
    }

}
//连接失败
- (void)connection:(NSURLConnection *)connection didFailWithError:(NSError *)error {
    //通知代理执行协议中请求数据失败的方法
    if ([self.delegate respondsToSelector:@selector(networkEngine:requestFailWithData:)]) {
        [self.delegate networkEngine:self requestFailWithData:error];
    }
}

- (void)dealloc {
    [_linkName release];
    [_parmDic release];
    [_connection release];
    [_mData release];
    [super dealloc];
}

@end
接下来呢?我们需要回到视图控制器中,在这里,我们会给NetworkEngine指定服务器地址和参数,让它去真正的请求数据,我们在视图控制器中接收数据并且进行解析,将解析的数据封装成一个一个Model对象存储起来,供tableView显示.
所以首先我们还是先建立Model对象吧,非常简单,我们需要让Cell显示什么数据,就在这个Model中定义什么属性,当然,也有一些东西需要注意.
1.在Models工程文件夹中建立News类
.h文件如下:
//  News.h
//  NewsDemo

#import <Foundation/Foundation.h>
/*
{
    "template": "manual",
    "hasCover": false,
    "hasHead": 1,
    "skipID": "54GK0096|65860",
    "replyCount": 2785,
    "alias": "Entertainment",
    "hasImg": 1,
    "digest": "",
    "hasIcon": true,
    "skipType": "photoset",
    "cid": "C1348648351901",
    "docid": "9IG74V5H00963VRO_AQ01DJ36zongssupdateDoc",
    "title": "[广角镜]何炅的“老师”生涯全回顾",
    "hasAD": 1,
    "order": 1,
    "imgextra": [
                 {
                     "imgsrc": "http://img2.cache.netease.com/3g/2015/5/19/201505191431056e75c.jpg"
                 },
                 {
                     "imgsrc": "http://img4.cache.netease.com/3g/2015/5/19/201505191431082bd04.jpg"
                 }
                 ],
    "priority": 200,
    "lmodify": "2015-05-19 14:16:05",
    "ename": "yule",
    "tname": "娱乐",
    "imgsrc": "http://img6.cache.netease.com/ent/2015/5/19/2015051914225773b5e.jpg",
    "photosetID": "54GK0096|65860",
    "ptime": "2015-05-19 14:16:05"
},
*/

@interface News : NSObject
@property (nonatomic, copy) NSString *title; //标题
@property (nonatomic, copy) NSString *digest; //简介
@property (nonatomic, copy) NSString *imgsrc; //图片链接
@property (nonatomic, retain) NSArray *imgextra; //另外两个图片的链接,可能有,可能没有
@property (nonatomic, assign) NSInteger flag; //用来标识当前数据需要那一套Cell来展示,如果为0,对应NewsCell,为1,对应imageCell.

- (instancetype)initWithDictionary:(NSDictionary *)dic;

@end
上面注释中的内容是我们从网易服务器获取到的网易新闻的新闻源数据,我们做的Demo就是基于此,由于这里我们只需要显示标题,简介,和图片,别的暂时不需要.
所以我们定义属性:标题, 简介, 左侧的图片(第一套NewsCell显示), 多图显示时候的图片(第二套ImageCell显示), 以及用来标示当前数据需要哪一套Cell显示的flag.
因为News中存储的是一条新闻的信息,所以我们还需要添加一个初始化方法,这样在视图控制器中,才能将解析出来的一个新闻数据通过初始化赋值给一个News对象.供Cell来使用,取出需要的数据.
.m文件如下:
- (instancetype)initWithDictionary:(NSDictionary *)dic {
    self = [super init];
    if (self) {
        //KVC赋值
        [self setValuesForKeysWithDictionary:dic];
        //需要判断属性imgextra有没有赋值,如果赋值了,说明此时含有三张图片链接,则使用ImageCell展示.否则使用NewsCell
        if (self.imgextra) {
            self.flag = 1; //使用ImageCell
        } else {
            self.flag = 0; //使用NewsCell
        }
    }
    return self;
}
//为没有对应的属性的Key实现此方法,防止程序crash
- (void)setValue:(id)value forUndefinedKey:(NSString *)key {

}

+ (id)newsWithDictionary:(NSDictionary *)dic {
    return[[[self alloc] initWithDictionary:dic] autorelease];
}
使用KVC赋值,安全起见,一定要调用一下方法,为没有对应属性的key实现此方法.
News创建完毕,回到控制器中.接上第一步,给NetworkEngine指定服务器地址和参数,让它去真正的请求数据,我们在视图控制器中接收数据并且进行解析,将解析的数据封装成一个一个Model对象存储起来,供tableView显示.
部分实现代码如下.
@interface NewsListController ()<NetworkEngineDelegate>
@property (nonatomic, retain) NSMutableArray *dataSource; //存储所有的News对象

@end

@implementation NewsListController

//懒加载数组
- (NSMutableArray *)dataSource {
    if (!_dataSource) {
        self.dataSource = [NSMutableArray arrayWithCapacity:0];
    }
    return [[_dataSource retain] autorelease];
}


//请求新闻数据
- (void)requsetData {
    NetworkEngine *engine = [[NetworkEngine alloc] init];
   //设置请求网址
    engine.linkName = [NSString stringWithFormat:kNewsAPI, 0];//0 - 20条数据
    //设置请求方式
    engine.requestMethod = RequsetMethodGET; //GET请求方式
    //设置代理
    engine.delegate = self;
    //开始网络请求
    [engine startDownloadData];
    [engine release];
}

#pragma mark - NetworkEngineDelegate
- (void)networkEngine:(NetworkEngine *)networkEngine requestSuccessWithData:(NSData *)data {
    //解析数据
    NSDictionary *dic = [NSJSONSerialization JSONObjectWithData:data options:NSJSONReadingMutableContainers error:nil];
    //根据Key获取存储新闻的数组
    NSArray *results = dic[@"T1348648517839"];
    //将数组中的每个小字典封装成NewsModel对象
    for (NSDictionary *dic in results) {
        News *news = [[News alloc] initWithDictionary:dic];
        //添加到数组中
        [self.dataSource addObject:news];
    }
    //让tableView刷新数据
    [self.tableView reloadData];

}
- (void)networkEngine:(NetworkEngine *)networkEngine requestFailWithData:(NSError *)error {

}


- (NSInteger)numberOfSectionsInTableView:(UITableView *)tableView {

    return 1;
}

- (NSInteger)tableView:(UITableView *)tableView numberOfRowsInSection:(NSInteger)section {
    NSUInteger count = self.dataSource.count;
    return count ? count + 1 : 0; //因为有最后一个"上拉加载更多的Label",如果没有请求数据成功,那就不展示Cell.
}

- (UITableViewCell *)tableView:(UITableView *)tableView cellForRowAtIndexPath:(NSIndexPath *)indexPath {

    //如果是最后一行,则显示加载Cell
    if (indexPath.row == self.dataSource.count) {
        LoadingCell *cell = [tableView dequeueReusableCellWithIdentifier:kLoadingCellReuseIdentifier forIndexPath:indexPath];
        return cell;
    }

    News *news = self.dataSource[indexPath.row];
    if (news.flag == 0) {
        //为0使用NewsCell
        NewsCell *cell = [tableView dequeueReusableCellWithIdentifier:kNewsCellReuseIdentifier forIndexPath:indexPath];
        [cell configureCellWithNews:news];
        return cell;
    } else {
        //为1,使用imageCell
        ImageCell *cell = [tableView dequeueReusableCellWithIdentifier:kImageCellReuseIdentifier forIndexPath:indexPath];
        [cell configureCellWithNews:news];
        return cell;
    }

}

//动态设置每一行Cell的高度
- (CGFloat) tableView:(UITableView *)tableView heightForRowAtIndexPath:(NSIndexPath *)indexPath {
    //对于NewsCell,高度为80,ImageCell为100, loadingCell为30

    //如果索引和元素个数相同,说明是最后一行
    if (indexPath.row == self.dataSource.count) {
        return 30;
    }

    News *news = self.dataSource[indexPath.row];
    if (news.flag == 0) {
        return 80;
    } else {
        return 100;
    }
}
分析:
第一步,肯定是请求新闻数据.给NetworkEngine设定服务器地址,参数,请求方式等.这里写成一个方法,不要忘了在viewDidLoad中调用.
既然请求了数据,我们就要接收,怎么接收呢?我们已经在NetworkEngine中定义了代理属性,就是用来传数据的,所以这里设置控制器为代理对象,并且实现协议中的方法,将接收到的数据进行解析.
//请求新闻数据
- (void)requsetData {
    NetworkEngine *engine = [[NetworkEngine alloc] init];
   //设置请求网址
    engine.linkName = [NSString stringWithFormat:kNewsAPI, 0];//0 - 20条数据
    //设置请求方式
    engine.requestMethod = RequsetMethodGET; //GET请求方式
    //设置代理
    engine.delegate = self;
    //开始网络请求
    [engine startDownloadData];
    [engine release];
}
在协议方法中进行数据解析:(因为协议方法中传过来的是接收完毕后的数据,所以这里进行解析.)(已知为JSON数据,并且最外层为一个字典).
我们需要先定义一个属性dataSource,用来存储解析之后并封装成News对象的数据.
#pragma mark - NetworkEngineDelegate
- (void)networkEngine:(NetworkEngine *)networkEngine requestSuccessWithData:(NSData *)data {
    //解析数据
    NSDictionary *dic = [NSJSONSerialization JSONObjectWithData:data options:NSJSONReadingMutableContainers error:nil];
    //根据Key获取存储新闻的数组
    NSArray *results = dic[@"T1348648517839"];
    //将数组中的每个小字典封装成NewsModel对象
    for (NSDictionary *dic in results) {
        News *news = [[News alloc] initWithDictionary:dic];
        //添加到数组中
        [self.dataSource addObject:news];
    }
    //让tableView刷新数据
    [self.tableView reloadData];

}
到这里,数据解析也已经完成,存储在dataSource中,剩下的工作就是让每一套Cell显示它应该显示的数据.
这里可以很方便的利用我们之前在News中定义的flag属性来进行判断.
- (NSInteger)tableView:(UITableView *)tableView numberOfRowsInSection:(NSInteger)section {
    NSUInteger count = self.dataSource.count;
    return count ? count + 1 : 0; //因为有最后一个"上拉加载更多的Label",如果没有请求数据成功,那就不展示Cell.
}

- (UITableViewCell *)tableView:(UITableView *)tableView cellForRowAtIndexPath:(NSIndexPath *)indexPath {

    //如果是最后一行,则显示加载Cell
    if (indexPath.row == self.dataSource.count) {
        LoadingCell *cell = [tableView dequeueReusableCellWithIdentifier:kLoadingCellReuseIdentifier forIndexPath:indexPath];
        return cell;
    }

    News *news = self.dataSource[indexPath.row];
    if (news.flag == 0) {
        //为0使用NewsCell
        NewsCell *cell = [tableView dequeueReusableCellWithIdentifier:kNewsCellReuseIdentifier forIndexPath:indexPath];
        [cell configureCellWithNews:news];
        return cell;
    } else {
        //为1,使用imageCell
        ImageCell *cell = [tableView dequeueReusableCellWithIdentifier:kImageCellReuseIdentifier forIndexPath:indexPath];
        [cell configureCellWithNews:news];
        return cell;
    }
}
最后,需要说明的时是,在自定义Cell的时候,我们使用了第三方的显示图片工具EGOImageView.它为我们提供了方便的显示图片方法,直接将解析出来的NSData数据中存储的图片的NSURL显示成图片.
实例:
.h文件

#import <UIKit/UIKit.h>
#import "EGOImageView.h"
#import "News.h"

@interface ImageCell : UITableViewCell
@property (nonatomic, retain) UILabel *titleLabel; //标题
@property (nonatomic, retain) EGOImageView *leftImageView;
@property (nonatomic, retain) EGOImageView *centerImageView;
@property (nonatomic, retain) EGOImageView *rightImageView;

//赋值
- (void)configureCellWithNews:(News *)news;
@end


.m文件
//赋值
- (void)configureCellWithNews:(News *)news {
    //左边的图片
    self.leftImageView.imageURL = [NSURL URLWithString:news.imgsrc];
    //中间的图片
    self.centerImageView.imageURL = [NSURL URLWithString:news.imgextra[0][@"imgsrc"]];
    //右边的图片
    self.rightImageView.imageURL = [NSURL URLWithString:news.imgextra[1][@"imgsrc"]];
    //Title标题
    self.titleLabel.text = news.title;
}
OVER.
自己还是不够熟练,不能够非常熟练的使用MVC,界面之间的数据传输是弱项,以后还要多加练习啊!
标签:
原文地址:http://www.cnblogs.com/ErosLii/p/4514445.html