标签:
Python C++扩展
前段时间看了一篇文章,http://blog.jobbole.com/78859/, 颇有感触,于是就结合自己工作中的知识作了一个简单的Python移动侦测:移动侦测的算法使用C++实现,封装成Python可以调用的格式,具体流程如图1。
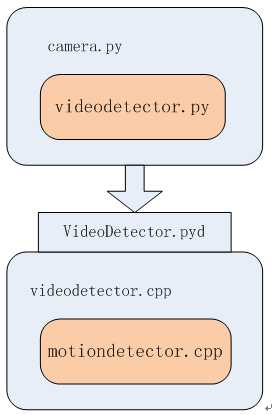
图1
首先看一下C++的工程配置,如图2
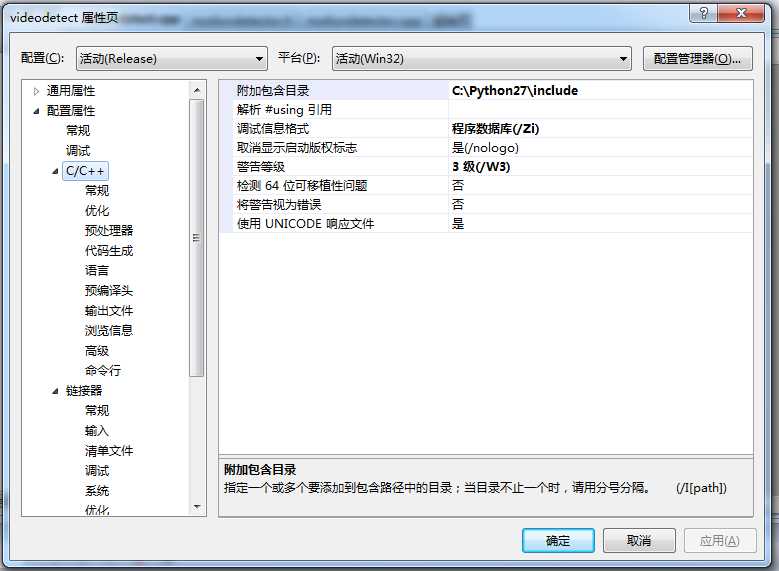
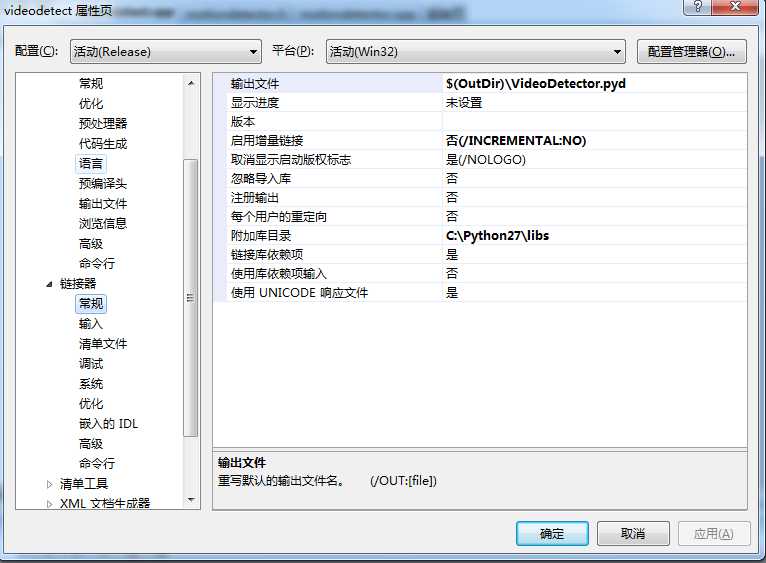
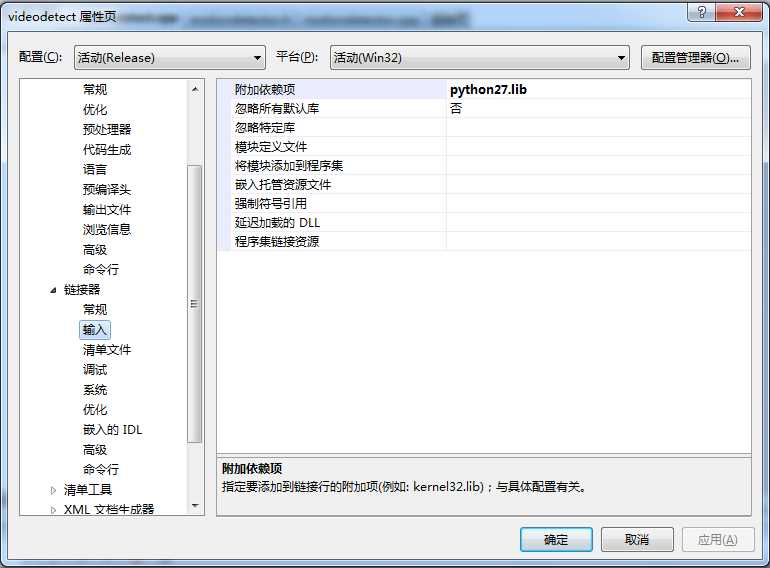
图2
C++部分代码:
#include "stdafx.h"
#include "Python.h"
#include "C:\Python27\Lib\site-packages\numpy\core\include\numpy\arrayobject.h"
#include "motiondetector.h"
static int MD_GRID_W = 32;
static int MD_GRID_H = 32;
static int MD_NOISE_LEVEL = 150;
static int MD_SENSITIVITY = 150;
class VideoDetector
{
public:
~VideoDetector()
{
if (m_motionDetector != NULL)
{
delete m_motionDetector;
m_motionDetector = NULL;
printf("~VideoDetector\r\n");
}
}
VideoDetector(int width, int height):m_width(width), m_height(height)
{
m_motionDetector = new simple_md::MotionDetector();
if (m_motionDetector != NULL)
{
m_motionDetector->init(MD_GRID_W, MD_GRID_H, m_width, height);
m_motionDetector->set_noise_level(MD_NOISE_LEVEL);
m_motionDetector->set_sensitivity(MD_SENSITIVITY);
// Setup default zone
std::vector<simple_md::Zone> zones;
simple_md::Zone z;
z.sensitivity = 100;
for (int i = 0; i < MD_GRID_W * MD_GRID_H; ++i)
{
z.mask.push_back(100);
}
zones.push_back(z);
m_motionDetector->set_zones(zones);
m_motionDetector->set_md_enbale();
printf("VideoDetector\r\n");
}
}
int process_frame(uint8_t *frame)
{
if (m_motionDetector != NULL && frame != NULL)
{
m_motionDetector->feed_frame(frame, m_width, m_height, m_width - 1, GetTickCount(), NULL, 0, NULL, 0, NULL, 0);
return m_motionDetector->get_state();
}
return 0;
}
int test(void)
{
return m_width * m_height;
}
private:
VideoDetector();
simple_md::MotionDetector *m_motionDetector;
int m_width;
int m_height;
};
static void PyDelVideoDetector(void *ptr)
{
printf("VideoDetector_UnInit\n");
VideoDetector *tmp = static_cast<VideoDetector *>(ptr);
delete tmp;
return;
}
PyObject *VideoDetector_Init(PyObject *self, PyObject *args)
{
printf("VideoDetector_Init\n");
int arg1 = 0;
int arg2 = 0;
int ret = PyArg_ParseTuple(args, "ii", &arg1, &arg2);
if (ret == 0)
{
printf("VideoDetector_Init fail\n");
return NULL;
}
VideoDetector *vd = new VideoDetector(arg1, arg2);
return PyCObject_FromVoidPtr(vd, PyDelVideoDetector);
}
#define f(x0) (*((uint8_t*)PyArray_DATA(py_pix) + (x0) * PyArray_STRIDES(py_pix)[0]))
#define shape(i) (py_pix->dimensions[(i)])
PyObject *VideoDetector_Process(PyObject *self, PyObject *args)
{
printf("VideoDetector_Process\n");
PyObject *py_obj = 0;
PyArrayObject *py_pix = 0;
npy_int64 idx = 0;
int ret = PyArg_ParseTuple(args, "OO", &py_obj, &py_pix);
if (ret == 0)
{
printf("VideoDetector_Process fail\n");
return NULL;
}
uint8_t *frame = (uint8_t *)malloc(sizeof(uint8_t) * shape(0));
if (frame == NULL)
{
return NULL;
}
for (idx = 0; idx < shape(0); idx++)
{
*(frame + idx) = (uint8_t)f(idx);
}
printf("-------process_frame start-------\n");
void * tmp = PyCObject_AsVoidPtr(py_obj);
VideoDetector *vd = static_cast<VideoDetector *>(tmp);
int result = vd->process_frame(frame);
free(frame);
frame = NULL;
printf("-------process_frame end(%d)-------\n", result);
return Py_BuildValue("i", result);
}
PyObject *VideoDetector_Test(PyObject *self, PyObject *args)
{
printf("VideoDetector_Test\n");
PyObject *pynum = 0;
int ret = PyArg_ParseTuple(args, "O", &pynum);
if (ret == 0)
{
printf("VideoDetector_Test fail\n");
return NULL;
}
void * tmp = PyCObject_AsVoidPtr(pynum);
VideoDetector *vd = static_cast<VideoDetector *>(tmp);
int result = vd->test();
return Py_BuildValue("i", result);
}
static PyMethodDef VideoDetector_methods[] = {
{"VideoDetector", VideoDetector_Init , METH_VARARGS},
{"test" , VideoDetector_Test , METH_VARARGS},
{"process" , VideoDetector_Process , METH_VARARGS},
{NULL, NULL, 0}
};
PyMODINIT_FUNC initVideoDetector(void)
{
Py_InitModule("VideoDetector", VideoDetector_methods);
}
videodetector.py代码:
from VideoDetector import *
class videodetector(object):
def __init__(self, arg1, arg2):
self._base = VideoDetector(arg1, arg2)
def test(self):
return test(self._base)
def process(self, frame):
return process(self._base, frame)
camera.py代码:
import cv2
import time
import datetime
import numpy as np
from videodetector import *
frame_num = 0
def motion_detect(obj, frame):
global frame_num
if frame_num % 5 == 0:
print frame_num
pixels = []
for ch in frame.tostring():
pixels.append(ord(ch))
#rgb2yuv = np.array([[0.299, 0.587, 0.114],
# [-0.14713, -0.28886, 0.436],
# [0.615, -0.51499, -0.10001]])
#rgb = np.array(pixels).reshape(len(pixels) / 3, 3)
#yuv = np.dot(rgb, rgb2yuv.T)
#y = np.array(yuv[ :, 0]).reshape(len(yuv), 1)
#print yuv.shape
#print y.shape
#print obj.process(y)
rgb = np.array(pixels).reshape(len(pixels) / 3, 3)
r = rgb[ : , 0];
g = rgb[ : , 1];
b = rgb[ : , 2];
raw = r + g + b;
#print datetime.datetime.now().second
#print datetime.datetime.now().microsecond
print raw.shape;
print obj.process(raw)
frame_num += 1
camera = cv2.VideoCapture(0)
fps = camera.get(cv2.cv.CV_CAP_PROP_FPS)
(width, height) = (int(camera.get(cv2.cv.CV_CAP_PROP_FRAME_WIDTH)), int(camera.get(cv2.cv.CV_CAP_PROP_FRAME_HEIGHT)))
print width
print height
obj = videodetector(width, height)
#print obj.test()
print("program begin")
while True:
(grabbed, frame) = camera.read()
if not grabbed:
continue
cv2.imshow("Frame", frame)
motion_detect(obj, frame)
key = cv2.waitKey(1) & 0xFF
if key == ord("q"):
break
print("program end")
camera.release()
cv2.destroyAllWindows()
print("program release")
效果如图3:
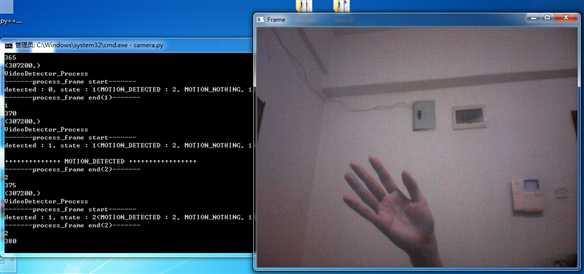
图3
标签:
原文地址:http://www.cnblogs.com/dongguadan/p/4541955.html