标签:
用户权限问题是绝大部分应用都要考虑的问题,在这些应用中想必都会定义role,user等来控制资源的访问。今天这里要说的并不是如何去设计权限的管理系统,而是来说明一下Web应用的安全域等。
在与Java web相关的JSR中,对于Java Web的安全访问有也相关规定,具体内容就不再这里阐述。与些相关的配置有:security-constraint,security-role,login-config。
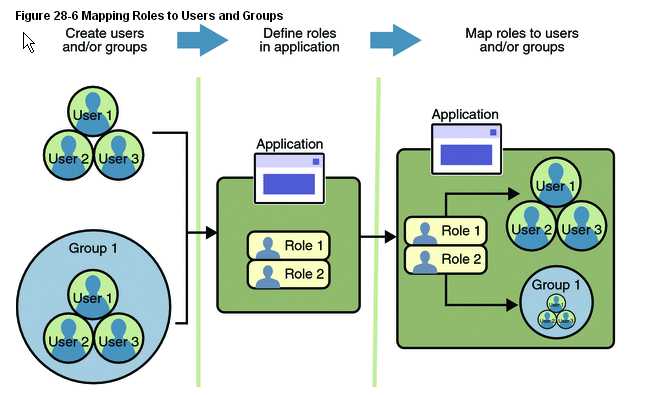
Web安全访问的机制其实就是一套权限处理系统。它包括了:role、user、resources、group等概念。接下来就心Tomcat的manager应用为例来了解一下web安全相关内容。

1、在Web.xml中使用security-role定义角色
在Manager应用在web.xml中定义了下列角色:
<security-role>
    <description>
      The role that is required to access the HTML Manager pages
    </description>
    <role-name>manager-gui</role-name>
  </security-role>
  <security-role>
    <description>
      The role that is required to access the text Manager pages
    </description>
    <role-name>manager-script</role-name>
  </security-role>
  <security-role>
    <description>
      The role that is required to access the HTML JMX Proxy
    </description>
    <role-name>manager-jmx</role-name>
  </security-role>
  <security-role>
    <description>
      The role that is required to access to the Manager Status pages
    </description>
    <role-name>manager-status</role-name>
  </security-role>
  <security-role>
    <description>
      Deprecated role that can access all Manager functionality
    </description>
    <role-name>manager</role-name>
  </security-role>
从上面的例子中,就直接可以看出角色定义是很简单的,只需要设置role-name就可以了。
2、在web.xml中使用security-constraint配置资源访问
Manager应用中定义了一些安全访问的限制如下:
<security-constraint>
    <web-resource-collection>
      <web-resource-name>Manager commands</web-resource-name>
      <url-pattern>/list</url-pattern>
      <url-pattern>/expire</url-pattern>
      <url-pattern>/sessions</url-pattern>
      <url-pattern>/start</url-pattern>
      <url-pattern>/stop</url-pattern>
      <url-pattern>/install</url-pattern>
      <url-pattern>/remove</url-pattern>
      <url-pattern>/deploy</url-pattern>
      <url-pattern>/undeploy</url-pattern>
      <url-pattern>/reload</url-pattern>
      <url-pattern>/save</url-pattern>
      <url-pattern>/serverinfo</url-pattern>
      <url-pattern>/roles</url-pattern>
      <url-pattern>/resources</url-pattern>
      <url-pattern>/findleaks</url-pattern>
    </web-resource-collection>
    <auth-constraint>
       <!-- NOTE: 1. These roles are not present in the default users file
                  2. The manager role is deprecated, it will be removed in
                     Tomcat 7.
                  3. Use the manager-script role to take advantage of the new
                     CSRF protection. Using the manager role or assigning both
                     the manager-script and manager-gui roles to the same user
                     will bypass the CSRF protection. -->
       <role-name>manager-script</role-name>
       <role-name>manager</role-name>
    </auth-constraint>
  </security-constraint>

  <security-constraint>
    <web-resource-collection>
      <web-resource-name>HTML Manager commands</web-resource-name>
      <url-pattern>/html/*</url-pattern>
    </web-resource-collection>
    <auth-constraint>
       <!-- NOTE: 1. These roles are not present in the default users file
                  2. The manager role is deprecated, it will be removed in
                     Tomcat 7.
                  3. Use just the manager-gui role to take advantage of the new
                     CSRF protection. Assigning the manager role or manager-gui
                     role along with either the manager-script or manager-jmx
                     roles to the same user will bypass the CSRF protection. -->
       <role-name>manager-gui</role-name>
       <role-name>manager</role-name>
    </auth-constraint>
  </security-constraint>

  <security-constraint>
    <web-resource-collection>
      <web-resource-name>JMX proxy</web-resource-name>
      <url-pattern>/jmxproxy/*</url-pattern>
    </web-resource-collection>
    <auth-constraint>
       <!-- NOTE: 1. These roles are not present in the default users file
                  2. The manager role is deprecated, it will be removed in
                     Tomcat 7.
                  3. Use the manager-jmx role to take advantage of the new
                     CSRF protection. Using the manager role or assigning both
                     the manager-jmx and manager-gui roles to the same user
                     will bypass the CSRF protection. -->
       <role-name>manager-jmx</role-name>
       <role-name>manager</role-name>
    </auth-constraint>
  </security-constraint>

  <security-constraint>
    <web-resource-collection>
      <web-resource-name>Status</web-resource-name>
      <url-pattern>/status/*</url-pattern>
    </web-resource-collection>
    <auth-constraint>
       <!-- NOTE: 1. These roles are not present in the default users file
                  2. The manager role is deprecated, it will be removed in
                     Tomcat 7. -->
       <role-name>manager-status</role-name>
       <role-name>manager-gui</role-name>
       <role-name>manager-script</role-name>
       <role-name>manager-jmx</role-name>
       <role-name>manager</role-name>
    </auth-constraint>
  </security-constraint>
从上面的例子中很容易可以理解:security-constraint是用于对指定的角色进行url资源访问上的限制。
3、使用Realm来配置user
到目前为止,resources、role已经配置完毕,那么怎么去指定访问资源的用户呢?以及这些用户是拥有哪些role呢?
Realm安全域,简单的理解就是一个数据存储介质(例如xml-文件、数据库、JNDI数据源等),或者说是数据来源。它配置了username、password、所属roles的这样一个简单的数据库。
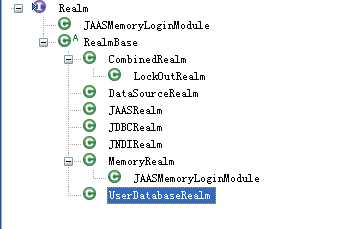
第一种服务器中间件都会支持多种Realm的配置方式。这里只说一下在使用Tomcat时,可以基于哪些数据存储介质来配置:

相信看了这个类的继承关系图,就可以知道Tomcat中支持哪些配置Realm的方式了。
MemoryRealm 是使用tomcat/conf/tomcat-users.xml来配置的。
JNDIRealm 是基于JNDI资源的方式配置的,
JDBCRealm 是将用户存储在数据库里。
3.1 JDBCRealm
在一个数据库里创建下面两张表:
create table users (
  user_name         varchar(15) not null primary key,
  user_pass         varchar(15) not null
);

create table user_roles (
  user_name         varchar(15) not null,
  role_name         varchar(15) not null,
  primary key (user_name, role_name)
);
然后在tomcat/conf/server.xml中配置插入数据.
<Realm className="org.apache.catalina.realm.JDBCRealm"
      driverName="org.gjt.mm.mysql.Driver"
   connectionURL="jdbc:mysql://localhost/authority?user=dbuser;password=dbpass"
       userTable="users" userNameCol="user_name" userCredCol="user_pass"
   userRoleTable="user_roles" roleNameCol="role_name"/>
3.2 DataSourceRealm
在tomcat中定义数据源的方式就是使用JNDI Resources。
1、创建相关表
create table users (
  user_name         varchar(15) not null primary key,
  user_pass         varchar(15) not null
);

create table user_roles (
  user_name         varchar(15) not null,
  role_name         varchar(15) not null,
  primary key (user_name, role_name)
);
2、server.xml配置一个Global Resources or Context Resources
<Resource name="jdbc/authority" auth="Container"
            type="javax.sql.DataSource"
username="dbuser" password="dbpass" url= "jdbc:mysql://localhost/authority?useEncoding=UTF-8"
/>
如果不会配置datasource可以参考Tomcat:定义JNDI资源,访问数据库
3、在server.xml中配置Realm
<Realm className="org.apache.catalina.realm.DataSourceRealm"
   dataSourceName="jdbc/authority"
   userTable="users" userNameCol="user_name" userCredCol="user_pass"
   userRoleTable="user_roles" roleNameCol="role_name"/>
3.3 JNDIRealm
虽然tomcat中使用resource定义的资源都是通过jndi方式来访问的,但是这里说的JNDIRealm是特指使用了LDAP 目录服务的数据源。
3.4 UserDatabaseRealm
UserDatabaseRealm是Realm的一个子类,它是通过JNDI资源的方式来获取数据的。所以需要采用Resource的定义方式来定义。例如Tomcat中默认的配置
<Resource auth="Container" description="User database that can be updated and saved" factory="org.apache.catalina.users.MemoryUserDatabaseFactory" name="UserDatabase" pathname="conf/tomcat-users.xml" type="org.apache.catalina.UserDatabase"/>
它定义了名为UserDatabase的资源,然后在Engine范围内使用这个Realm:
<Engine defaultHost="localhost" name="Catalina">
<Realm
className="org.apache.catalina.realm.UserDatabaseRealm"
resourceName="UserDatabase" />
只不过数据来源于tomcat-users.xml。
3.5 MemoryRealm
如果要使用MemoryRealm,需要在server.xml中配置相关Realm,MemoryRealm默认是使用tomcat/conf/tomcat-users.xml文件。其实也可以是其它的xml文件,只要格式与tomcat-user.xml 文件格式一样即可。也就是说,满足在tomcat-users元素下定义user(和role)即可。
<tomcat-users>
<!--
  NOTE:  By default, no user is included in the "manager-gui" role required
  to operate the "/manager/html" web application.  If you wish to use this app,
  you must define such a user - the username and password are arbitrary.
-->
<!--
  NOTE:  The sample user and role entries below are wrapped in a comment
  and thus are ignored when reading this file. Do not forget to remove
  <!.. ..> that surrounds them.
-->

  <role rolename="tomcat"/>
  <role rolename="role1"/>

  <user username="both" password="tomcat" roles="tomcat,role1"/>
  <user username="role1" password="tomcat" roles="role1"/>

    <user username="tomcat" password="tomcat" roles="manager-gui,manager" />
    <user username="tomcat2" password="tomcat" roles="manager-gui,manager" />
    <user username="tomcat3" password="tomcat" roles="manager-gui,manager" />
    <user username="tomcat4" password="tomcat" roles="manager-gui,manager" />
</tomcat-users>
3.6 JAASRealm
如果你了解JAAS的话,JAASRealm的方式你就很容易学会的。JAAS 是Java Authentication & Authorization Service (JAAS) framework ,是J2SE API的一部分。这个就不再详细说明。
3.7 CombinedRealm
顾名思义,就是结合了多种Realm方式。例如:
<Realm className="org.apache.catalina.realm.CombinedRealm" >
    <Realm className="org.apache.catalina.realm.UserDatabaseRealm"
             resourceName="UserDatabase"/>
    <Realm className="org.apache.catalina.realm.DataSourceRealm"
             dataSourceName="jdbc/authority"
             userTable="users" userNameCol="user_name" userCredCol="user_pass"
             userRoleTable="user_roles" roleNameCol="role_name"/>

</Realm>
3.8 LockOutRealm
LockOutRealm 是 CombinedRealm的子类,它额外的提供了锁出机制。这里就不再详细说明了。
4 认证方式
到目前为此,user( & group) 、role、resouces都配置完毕了,那么要让服务器采用哪种认证方式呢?
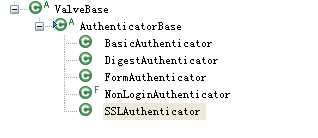
目前的服务器中间件都支持下列几种方式: BASIC、DIGEST、CLIENT_CERT、FORM。这几种方式是标准的。
对于tomcat来说,它同样也支持这几种。

要配置采用哪种认证方式很简单,只需要在web.xml的login-config中配置认证方式为上面几种即可。下面来简单的分别说一下这几种认证方式。
4.1 BASIC
Basic方式是最简单的方式,用户若访问受限的资源时,浏览器就会弹出一个对话框,让输入用户名和密码。浏览器在发送请求时,会使用Base64进行编码。
<login-config>
        <auth-method>BASIC</auth-method>
    </login-config>
查看认证过程的部分源码:
if (authorization != null) {
            authorization.toBytes();
            ByteChunk authorizationBC = authorization.getByteChunk();
            if (authorizationBC.startsWithIgnoreCase("basic ", 0)) {
                authorizationBC.setOffset(authorizationBC.getOffset() + 6);
                // FIXME: Add trimming
                // authorizationBC.trim();

                CharChunk authorizationCC = authorization.getCharChunk();
                Base64.decode(authorizationBC, authorizationCC);

                // Get username and password
                int colon = authorizationCC.indexOf(‘:‘);
                if (colon < 0) {
                    username = authorizationCC.toString();
                } else {
                    char[] buf = authorizationCC.getBuffer();
                    username = new String(buf, 0, colon);
                    password = new String(buf, colon + 1,
                            authorizationCC.getEnd() - colon - 1);
                }

                authorizationBC.setOffset(authorizationBC.getOffset() - 6);
            }

            principal = context.getRealm().authenticate(username, password);
            if (principal != null) {
                register(request, response, principal, Constants.BASIC_METHOD,
                         username, password);
                return (true);
            }
        }
认证前,使用Base64解码取得用户名和密码,然后进行认证。
4.2 FORM
使用FORM方式时,就需要在自己定制登录页面:
<login-config>
        <auth-method>FORM</auth-method>
        <form-login-config>
            <form-login-page>/login.html</form-login-page>
            <form-error-page>/error.jsp</form-error-page>
        </form-login-config>
    </login-config>
login页面如下:
<form name="loginform" method="post" action="j_security_check">
<INPUT name="j_username" type="text">
<INPUT name="j_password" TYPE="password">
<input type="submit" value="登 录" >
</form>
其中表单的action值,以及代表用户名、密码的input的name值是固定的。
下面是部分源码:
String username = request.getParameter(Constants.FORM_USERNAME);
        String password = request.getParameter(Constants.FORM_PASSWORD);
        if (log.isDebugEnabled())
            log.debug("Authenticating username ‘" + username + "‘");
        principal = realm.authenticate(username, password);
        if (principal == null) {
            forwardToErrorPage(request, response, config);
            return (false);
        }
认证失败就会转到error-page了。
4.3 DIGEST
<login-config>
        <auth-method>DIGEST</auth-method>
    </login-config>
Digest,采用的是MD5摘要算法。可以参考源码:
            // Second MD5 digest used to calculate the digest :
            // MD5(Method + ":" + uri)
            String a2 = method + ":" + uri;

            byte[] buffer;
            synchronized (md5Helper) {
                buffer = md5Helper.digest(a2.getBytes());
            }
            String md5a2 = md5Encoder.encode(buffer);

            return realm.authenticate(userName, response, nonce, nc, cnonce,
                    qop, realmName, md5a2);
4.4 CLIENT_CERT
<login-config>
        <auth-method>CLIENT-CERT</auth-method>
    </login-config>
采用的是X509证书认证。
5、安全认证流程
当用户访问的是一个受限的资源(也就是security-contistans中配置的url)时,应付触发安全认证。安全认证的过程:Server通过不同形式(基于认证方式的不同)取得用户的username和password,与Realm中存储的值匹配,匹配成功后就得知访问用户所拥有的roles,再根据roles判断是否能够访问的资源。如果这些流程都通过,会将用户信息存储在session中,这样就不需要每次访问受限资源都输入用户名和密码,之后就能够访问到资源了。中间过程有一步出错,就会访问失败。
标签:
原文地址:http://www.cnblogs.com/f1194361820/p/4555354.html