标签:style class blog code http tar
iOS开发UI篇—实现一个简单的手势解锁应用(基本)
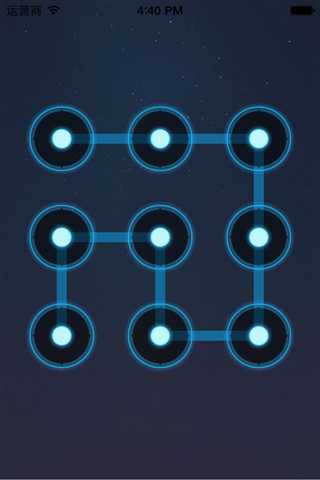
一、实现效果
实现效果图:

二、手势解锁应用分析
 1 //界面搭建
 2 - (id)initWithFrame:(CGRect)frame
 3 {
 4     self = [super initWithFrame:frame];
 5     if (self) {
 6         [self setup];
 7     }
 8     return self;
 9 }
10
11 -(id)initWithCoder:(NSCoder *)aDecoder
12 {
13     if (self=[super initWithCoder:aDecoder]) {
14         [self setup];
15     }
16     return self;
17 }
18 //在界面上创建9个按钮
19 -(void)setup
20 {
21     //1.创建9个按钮
22     for (int i=0; i<9; i++) {
23         UIButton *btn=[UIButton buttonWithType:UIButtonTypeCustom];
24         //2.设置按钮的状态背景
25         [btn setBackgroundImage:[UIImage imageNamed:@"gesture_node_normal"] forState:UIControlStateNormal];
26         [btn setBackgroundImage:[UIImage imageNamed:@"gesture_node_highlighted"] forState:UIControlStateSelected];
27         //3.把按钮添加到视图中
28         [self  addSubview:btn];
29         //4.禁止按钮的点击事件
30         btn.userInteractionEnabled=NO;
31     }
32 }
 1 //对功能点进行封装
 2 -(CGPoint)getCurrentPoint:(NSSet *)touches
 3 {
 4     UITouch *touch=[touches anyObject];
 5     CGPoint point=[touch locationInView:touch.view];
 6     return point;
 7 }
 8
 9 -(UIButton *)getCurrentBtnWithPoint:(CGPoint)point
10 {
11     for (UIButton *btn in self.subviews) {
12         if (CGRectContainsPoint(btn.frame, point)) {
13             return btn;
14         }
15     }
16     return Nil;
17 }
1   if (btn && btn.selected != YES) {
2         //设置按钮的选中状态
3         btn.selected=YES;
4         //把按钮添加到数组中
5         [self.buttons addObject:btn];
6     }
 1 //重写drawrect:方法
 2 -(void)drawRect:(CGRect)rect
 3 {
 4     //获取上下文
 5     CGContextRef ctx=UIGraphicsGetCurrentContext();
 6     //绘图(线段)
 7     for (int i=0; i<self.buttons.count; i++) {
 8         UIButton *btn=self.buttons[i];
 9         if (0==i) {
10             //设置起点(注意连接的是中点)
11 //            CGContextMoveToPoint(ctx, btn.frame.origin.x, btn.frame.origin.y);
12             CGContextMoveToPoint(ctx, btn.center.x, btn.center.y);
13         }else
14         {
15 //            CGContextAddLineToPoint(ctx, btn.frame.origin.x, btn.frame.origin.y);
16             CGContextAddLineToPoint(ctx, btn.center.x, btn.center.y);
17         }
18     }
19     //渲染
20     //设置线条的属性
21     CGContextSetLineWidth(ctx, 10);
22     CGContextSetRGBStrokeColor(ctx, 20/255.0, 107/255.0, 153/255.0, 1);
23     CGContextStrokePath(ctx);
24 }
  1 //
  2 //  YYLockView.m
  3 //  01-手势解锁(基本)
  4 //
  5 //  Created by apple on 14-6-18.
  6 //  Copyright (c) 2014年 itcase. All rights reserved.
  7 //
  8
  9 #import "YYLockView.h"
 10
 11 @interface YYLockView ()
 12 @property(nonatomic,strong)NSMutableArray *buttons;
 13 @end
 14 @implementation YYLockView
 15
 16 #pragma mark-懒加载
 17 -(NSMutableArray *)buttons
 18 {
 19     if (_buttons==nil) {
 20         _buttons=[NSMutableArray array];
 21     }
 22     return _buttons;
 23 }
 24
 25 //界面搭建
 26 - (id)initWithFrame:(CGRect)frame
 27 {
 28     self = [super initWithFrame:frame];
 29     if (self) {
 30         [self setup];
 31     }
 32     return self;
 33 }
 34
 35 -(id)initWithCoder:(NSCoder *)aDecoder
 36 {
 37     if (self=[super initWithCoder:aDecoder]) {
 38         [self setup];
 39     }
 40     return self;
 41 }
 42 //在界面上创建9个按钮
 43 -(void)setup
 44 {
 45     //1.创建9个按钮
 46     for (int i=0; i<9; i++) {
 47         UIButton *btn=[UIButton buttonWithType:UIButtonTypeCustom];
 48         //2.设置按钮的状态背景
 49         [btn setBackgroundImage:[UIImage imageNamed:@"gesture_node_normal"] forState:UIControlStateNormal];
 50         [btn setBackgroundImage:[UIImage imageNamed:@"gesture_node_highlighted"] forState:UIControlStateSelected];
 51         //3.把按钮添加到视图中
 52         [self  addSubview:btn];
 53         //4.禁止按钮的点击事件
 54         btn.userInteractionEnabled=NO;
 55     }
 56 }
 57
 58 //4.设置按钮的frame
 59 -(void)layoutSubviews
 60 {
 61     //4.1需要先调用父类的方法
 62     [super layoutSubviews];
 63     for (int i=0; i<self.subviews.count; i++) {
 64         //4.2取出按钮
 65         UIButton *btn=self.subviews[i];
 66
 67     //4.3九宫格法计算每个按钮的frame
 68         CGFloat row = i/3;
 69         CGFloat loc   = i%3;
 70         CGFloat btnW=74;
 71         CGFloat btnH=74;
 72         CGFloat padding=(self.frame.size.width-3*btnW)/4;
 73         CGFloat btnX=padding+(btnW+padding)*loc;
 74         CGFloat btnY=padding+(btnW+padding)*row;
 75         btn.frame=CGRectMake(btnX, btnY, btnW, btnH);
 76     }
 77 }
 78
 79 //5.监听手指的移动
 80 -(void)touchesBegan:(NSSet *)touches withEvent:(UIEvent *)event
 81 {
 82     CGPoint starPoint=[self getCurrentPoint:touches];
 83     UIButton *btn=[self getCurrentBtnWithPoint:starPoint];
 84
 85     if (btn && btn.selected != YES) {
 86         btn.selected=YES;
 87         [self.buttons addObject:btn];
 88     }
 89 }
 90 -(void)touchesMoved:(NSSet *)touches withEvent:(UIEvent *)event
 91 {
 92     CGPoint movePoint=[self getCurrentPoint:touches];
 93     UIButton *btn=[self getCurrentBtnWithPoint:movePoint];
 94     //存储按钮
 95     //已经连过的按钮,不可再连
 96     if (btn && btn.selected != YES) {
 97         //设置按钮的选中状态
 98         btn.selected=YES;
 99         //把按钮添加到数组中
100         [self.buttons addObject:btn];
101     }
102     //通知view重新绘制
103     [self setNeedsDisplay];
104 }
105 //对功能点进行封装
106 -(CGPoint)getCurrentPoint:(NSSet *)touches
107 {
108     UITouch *touch=[touches anyObject];
109     CGPoint point=[touch locationInView:touch.view];
110     return point;
111 }
112
113 -(UIButton *)getCurrentBtnWithPoint:(CGPoint)point
114 {
115     for (UIButton *btn in self.subviews) {
116         if (CGRectContainsPoint(btn.frame, point)) {
117             return btn;
118         }
119     }
120     return Nil;
121 }
122
123 //重写drawrect:方法
124 -(void)drawRect:(CGRect)rect
125 {
126     //获取上下文
127     CGContextRef ctx=UIGraphicsGetCurrentContext();
128     //绘图(线段)
129     for (int i=0; i<self.buttons.count; i++) {
130         UIButton *btn=self.buttons[i];
131         if (0==i) {
132             //设置起点(注意连接的是中点)
133 //            CGContextMoveToPoint(ctx, btn.frame.origin.x, btn.frame.origin.y);
134             CGContextMoveToPoint(ctx, btn.center.x, btn.center.y);
135         }else
136         {
137 //            CGContextAddLineToPoint(ctx, btn.frame.origin.x, btn.frame.origin.y);
138             CGContextAddLineToPoint(ctx, btn.center.x, btn.center.y);
139         }
140     }
141     //渲染
142     //设置线条的属性
143     CGContextSetLineWidth(ctx, 10);
144     CGContextSetRGBStrokeColor(ctx, 20/255.0, 107/255.0, 153/255.0, 1);
145     CGContextStrokePath(ctx);
146 }
147 @end
iOS开发UI篇—实现一个简单的手势解锁应用(基本),布布扣,bubuko.com
标签:style class blog code http tar
原文地址:http://www.cnblogs.com/wendingding/p/3795139.html