标签:des android style class blog code
之前由于做一个小项目需要用swing,结果swing把我折腾的够呛。后来得知有javaFX这个类似于C#中WPF形式的利用XML来写界面的框架之后,马上就转到javaFX上了。找过一些资料但是帮助都不大,最后还是选择直接看官方demo。(我之前是做过android app,有些东西其实都是差不多的。)
下面选取官方demo中的一个 UnlockCustom 。
这个demo中涉及到 继承原始控件(自定义),FXML 布局嵌套,以及一些控件动画等。
整个javaFX demo 的入口函数 是 unlock.class 中的main函数。
在这个demo中 main函数中只有一条语句。Application.launch 的作用与swing 中 EventQueue.invokeLater的作用相似,其结果是 启动一个UI线程 并在线程中回调 被加载的类中的start方法。

 1 package unlock;
 2
 3 import java.util.logging.Level;
 4 import java.util.logging.Logger;
 5 import javafx.application.Application;
 6 import javafx.fxml.FXMLLoader;
 7 import javafx.scene.Scene;
 8 import javafx.scene.layout.Pane;
 9 import javafx.stage.Stage;
10
11 /**
12  * Main class for the Unlock Custom sample.
13  * This is boilerplate code:
14  * Loads ‘Unlock.fxml‘, adds the root node to a Scene, and set the scene
15  * to the application primary stage.
16  * <br>In the Unlock Custom demo the key pad is defined as a custom type named Keypad.
17  * From within Unlock.fxml we refer to the key pad by its Java class name, Keypad.
18  */
19 public class Unlock extends Application {
20
21     /**
22      * @param args the command line arguments
23      */
24     public static void main(String[] args) {
25         Application.launch(Unlock.class);
26     }
27
28     @Override
29     public void start(Stage primaryStage) {
30         try {
31             String filename = "Unlock.fxml";
32             Pane page = (Pane) FXMLLoader.load(Unlock.class.getResource(filename));
33             Scene scene = new Scene(page);
34             primaryStage.setScene(scene);
35             primaryStage.setTitle("Unlock Custom Sample");
36             primaryStage.show();
37         } catch (Exception ex) {
38             Logger.getLogger(Unlock.class.getName()).log(Level.SEVERE, null, ex);
39         }
40     }
41 }
在上面的代码中,start方法 加载了一个fxml文件并对其进行处理。被加载的fxml文件经过一系列处理 成为了Pane的引用,随后创建了Scene对象并将pane设置到Scene中,接着将Scene设置到Stage对象中。pane、Scene、Stage是3个窗口容器 与 Swing 中的 Jpanel和JFrame的关系相似。
pane、Scene与Stage具体关系如下图
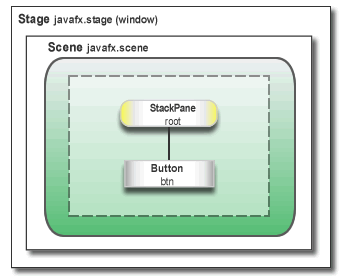
Stage 与 Swing 中JFrame 一样是顶层容器,构建了整个程序的主题窗口。
Scene 与Swing 中JPanel 一样是中层容器,用于摆放基本控件或其他中下层容器
Pane 与Swing中 Pane 是一样的,都是控件的载体
FXML文件其实就是一个布局文件,保存控件相关信息,文件结构基本与XML类似。我们可以通过使用Oralce提供的 JavaFX Scene Builder 工具来进行可视化操作,大大的提高了界面设计的效率。
下面是 unlock.class 中加载的FXML 文件
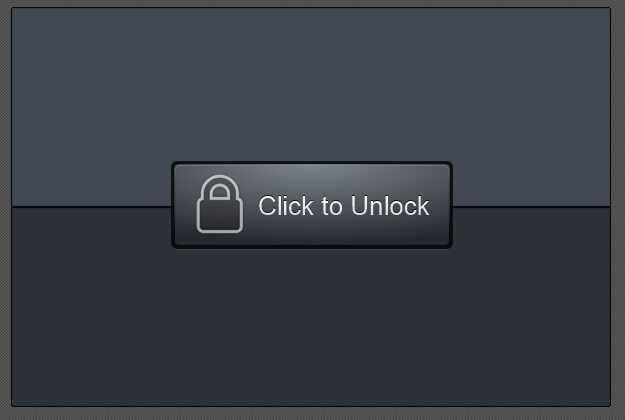
 1 <?xml version="1.0" encoding="UTF-8"?>
 2
 3 <?import java.lang.*?>
 4 <?import java.net.*?>
 5 <?import javafx.scene.control.*?>
 6 <?import javafx.scene.image.*?>
 7 <?import javafx.scene.layout.*?>
 8 <?import javafx.scene.shape.*?>
 9 <?import javafx.scene.text.*?>
10 <?import unlock.*?>
11 <?scenebuilder-classpath-element ../../dist/UnlockCustom.jar?>
12
13
14 <AnchorPane id="AnchorPane" fx:id="root" focusTraversable="false" maxHeight="-Infinity" maxWidth="-Infinity" minHeight="-Infinity" minWidth="-Infinity" prefHeight="400.0" prefWidth="600.0" xmlns="http://javafx.com/javafx/8" xmlns:fx="http://javafx.com/fxml/1" fx:controller="unlock.UnlockController">
15   <children>
16     <Text layoutX="76.0" layoutY="230.0" strokeType="OUTSIDE" strokeWidth="0.0" text="Hello World">
17       <font>
18         <Font size="80.0" />
19       </font>
20     </Text>
21     <Rectangle fx:id="okleft" arcHeight="5.0" arcWidth="5.0" fill="DODGERBLUE" height="400.0" stroke="BLACK" strokeType="INSIDE" styleClass="unlock-leftright" width="300.0" AnchorPane.leftAnchor="0.0" AnchorPane.topAnchor="0.0" />
22     <Rectangle fx:id="okright" arcHeight="5.0" arcWidth="5.0" fill="DODGERBLUE" height="400.0" layoutX="300.0" stroke="BLACK" strokeType="INSIDE" styleClass="unlock-leftright" width="300.0" AnchorPane.topAnchor="0.0" />
23     <Rectangle fx:id="error" arcHeight="5.0" arcWidth="5.0" fill="#992500" height="400.0" opacity="0.0" stroke="BLACK" strokeType="INSIDE" width="600.0" AnchorPane.leftAnchor="0.0" AnchorPane.topAnchor="0.0" />
24     <Keypad fx:id="pad" layoutX="187.0" layoutY="68.0" styleClass="keypad" />
25     <Rectangle fx:id="unlocktop" arcHeight="5.0" arcWidth="5.0" fill="DODGERBLUE" height="200.0" stroke="BLACK" strokeType="INSIDE" styleClass="unlock-top" visible="true" width="600.0" AnchorPane.leftAnchor="0.0" AnchorPane.topAnchor="0.0" />
26     <Rectangle fx:id="unlockbottom" arcHeight="5.0" arcWidth="5.0" fill="DODGERBLUE" height="200.0" layoutY="200.0" stroke="BLACK" strokeType="INSIDE" styleClass="unlock-bottom" visible="true" width="600.0" AnchorPane.leftAnchor="0.0" />
27     <Button fx:id="lock" layoutX="163.0" layoutY="157.0" mnemonicParsing="false" onAction="#unlockPressed" styleClass="unlock-button" text="Click to Unlock" visible="true">
28       <graphic>
29         <ImageView id="lock" pickOnBounds="true">
30           <image>
31             <Image preserveRatio="true" smooth="true" url="@lock.png" />
32           </image>
33         </ImageView>
34       </graphic>
35     </Button>
36   </children>
37   <stylesheets>
38     <URL value="@Unlock.css" />
39   </stylesheets>
40 </AnchorPane>
除开xml文件声明的语句,文件前几行是导入控件相应的包,这个操作基本与java的格式相匹配。后面的都是在定义控件并设置相应属性。完成的效果如下:
值得注意的是 几乎很多地方都有 fx:xxxxxx的属性标记,这些是javaFX中已经规定的特殊标记属性。具体内容请查看官方文档。
就几个比较重要的 简单的说一下,例如在 控件定义的 第一行中有如下的代码:
<AnchorPane id="AnchorPane" fx:id="root" focusTraversable="false" maxHeight="-Infinity" maxWidth="-Infinity" minHeight="-Infinity" minWidth="-Infinity" prefHeight="400.0" prefWidth="600.0" xmlns="http://javafx.com/javafx/8" xmlns:fx="http://javafx.com/fxml/1" fx:controller="unlock.UnlockController">
其中 id="AnchorPane" id 是定义文档中节点的id号,需要与 fx:id区分开。节点id在一个scene中是唯一的,它类似于html中的id属性。
fx:id="root" fx:id 是定义控件的id号,与android开发中 布局文件里的控件id 一样。可以在.java文件中声明并引用 这个 id 对应的控件,具体方法后面会讲到。
fx:controller="unlock.UnlockController" fx:controller 是定义该FXML所对应的控制器类,在这个控制器类中可以处理在fxml中定义的事件响应方法 ,例如 button 点击事件。
下面是个 button控件的定义,除了 fx:id 和其他基本属性的定义以外 还有一个 onAction="#keyPressed" 属性的定义。它就是定了一个事件响应方法名称,值得注意的是方法名前面必须加上# 标识符。
<Button fx:id="del" mnemonicParsing="false" onAction="#keyPressed" text="Del" GridPane.columnIndex="0" GridPane.rowIndex="3" />
下面再让我们看到前面说的控制器类 UnlockController.class
 1 package unlock;
 2
 3 import java.net.URL;
 4 import java.util.ResourceBundle;
 5 import javafx.event.ActionEvent;
 6 import javafx.fxml.FXML;
 7 import javafx.fxml.Initializable;
 8 import javafx.scene.control.Button;
 9 import javafx.scene.control.PasswordField;
10 import javafx.util.Callback;
11
12 /**
13  * The controller for the custom Keypad component - see ‘Keypad.fxml‘
14  * and ‘Keypad.java‘.
15  */
16 public final class KeypadController implements Initializable {
17
18     @FXML //  fx:id="del"
19     private Button del; // Value injected by FXMLLoader
20
21     @FXML //  fx:id="ok"
22     private Button ok; // Value injected by FXMLLoader
23
24     @FXML //  fx:id="display"
25     private PasswordField display; // Value injected by FXMLLoader
26
27     private Callback<String, Boolean> validateCallback = null;
28
29     // Handler for Button[Button[id=null, styleClass=button]] onAction
30     // Handler for Button[fx:id="del"] onAction
31     // Handler for Button[fx:id="ok"] onAction
32     public void keyPressed(ActionEvent event) {
33         // handle the event here
34         if (event.getTarget() instanceof Button) {
35             if (event.getTarget() == del && !display.getText().isEmpty()) {
36                 delete();
37             } else if (event.getTarget() == ok) {
38                 validateCallback.call(display.getText());
39                 display.setText("");
40             } else if (event.getTarget() != del) {
41                 append(((Button)event.getTarget()).getText());
42             }
43             event.consume();
44         }
45     }
46
47     private void delete() {
48         display.setText(display.getText().substring(0, display.getText().length() -1));
49     }
50
51     private void append(String s) {
52         String text = display.getText();
53         if (text == null) text = "";
54         display.setText(text+s);
55     }
56
57     @Override // This method is called by the FXMLLoader when initialization is complete
58     public void initialize(URL fxmlFileLocation, ResourceBundle resources) {
59         assert del == null : "fx:id=\"del\" was not injected: check your FXML file ‘Keypad.fxml‘.";
60         assert ok != null : "fx:id=\"ok\" was not injected: check your FXML file ‘Keypad.fxml‘.";
61         assert display != null : "fx:id=\"password\" was not injected: check your FXML file ‘Keypad.fxml‘.";
62     }
63
64     void setValidateCallback(Callback<String,Boolean> validateCB) {
65         validateCallback = validateCB;
66     }
67
68 }
在这个类中,我们可知找到 keyPressed 方法,它就是前面 button控件中定义的事件方法。他的处理与android 中 布局文件里 android:onclick 属性类似。剩下的与swing中对事件处理的描述相似。
让我们向前看几行,找到
1     @FXML //  fx:id="del"
2     private Button del; // Value injected by FXMLLoader
3
4     @FXML //  fx:id="ok"
5     private Button ok; // Value injected by FXMLLoader
6
7     @FXML //  fx:id="display"
8     private PasswordField display; // Value injected by FXMLLoader
这里很明确的备注了 几行代码的意图。就是前面我们提到的 fx:id属性 在.java文件中的定义与引用。 想要在java文件中直接引用FXML里定义的控件必须使用@FXML标记来描述待定义的变量,并且变量名要与fxml文件中的fx:id 的值相同。如此一来就可以直接对控件进行操作了。
让我们在回到 unlock.fxml文件里找到 下面这一行代码
<Keypad fx:id="pad" layoutX="187.0" layoutY="68.0" styleClass="keypad" />
这个是一个自定义控件,keypad 是 Vbox的子类。
 1 public class Keypad extends VBox {
 2
 3     private final KeypadController controller;
 4     public Keypad() {
 5         controller = load();
 6     }
 7
 8     private KeypadController load() {
 9
10         final FXMLLoader loader = new FXMLLoader();
11
12         // fx:root is this node.
13         loader.setRoot(this);
14
15         // The FXMLLoader should use the class loader that loaded
16         // this class (Keypad).
17         loader.setClassLoader(this.getClass().getClassLoader());
18
19         // Keypad.fxml contains the configuration for ‘this‘
20         loader.setLocation(this.getClass().getResource("Keypad.fxml"));
21
22         try {
23             final Object root = loader.load();
24             assert root == this;
25         } catch (IOException ex) {
26             throw new IllegalStateException(ex);
27         }
28
29         final KeypadController keypadController = loader.getController();
30         assert keypadController != null;
31         return keypadController;
32     }
33
34     void setValidateCallback(Callback<String,Boolean> callback) {
35         controller.setValidateCallback(callback);
36     }
37 }
而这个子类在代码中并未声明控件而是加载了一个FXML文件,通过FXML来加载控件。也是这样让我们实现了一个类似于FXML嵌套的处理,所谓FXML的嵌套 实际上就是通过加载自定义控件,在代码中load FXML来完成的。在官方教程中并没有直接说明FXML可以嵌套处理也没有办法,不知道该如何处理。
剩下代码的可以通过官方DEMO自行查看与学习。
JavaFX 初学入门(一):FXML嵌套与原始控件继承,布布扣,bubuko.com
标签:des android style class blog code
原文地址:http://www.cnblogs.com/Wisp/p/3810050.html
