标签:
写这篇文章主要有三个目的:
1.使用高德地图api定位
2.获取天气数据
3.编程练手
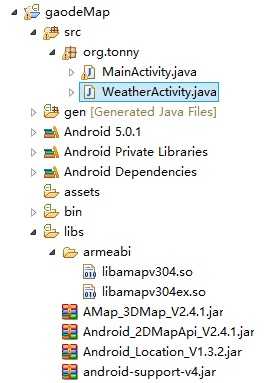
文件结构
清单文件信息说明:
<?xml version="1.0" encoding="utf-8"?>
<manifest xmlns:android="http://schemas.android.com/apk/res/android"
    package="org.tonny"
    android:versionCode="1"
    android:versionName="1.0" >

    <uses-sdk
        android:minSdkVersion="8"
        android:targetSdkVersion="21" />

    <uses-permission android:name="android.permission.INTERNET" />
    <uses-permission android:name="android.permission.WRITE_EXTERNAL_STORAGE" />
    <uses-permission android:name="android.permission.ACCESS_COARSE_LOCATION" />
    <uses-permission android:name="android.permission.ACCESS_NETWORK_STATE" />
    <uses-permission android:name="android.permission.ACCESS_FINE_LOCATION" />
    <uses-permission android:name="android.permission.READ_PHONE_STATE" />
    <uses-permission android:name="android.permission.CHANGE_WIFI_STATE" />
    <uses-permission android:name="android.permission.ACCESS_WIFI_STATE" />
    <uses-permission android:name="android.permission.CHANGE_CONFIGURATION" />
    <uses-permission android:name="android.permission.WRITE_SETTINGS" />

    <application
        android:allowBackup="true"
        android:icon="@drawable/ic_launcher"
        android:label="@string/app_name"
        android:theme="@style/AppTheme" >
        <meta-data
            android:name="com.amap.api.v2.apikey"
            android:value="****" />

        <activity
            android:name=".MainActivity"
            android:label="@string/app_name" >
            <intent-filter>
                <action android:name="android.intent.action.MAIN" />

                <category android:name="android.intent.category.LAUNCHER" />
            </intent-filter>
        </activity>
        <activity
            android:name=".WeatherActivity"
            android:label="@string/title_activity_weather" >
        </activity>
    </application>

</manifest>
定位代码:
package org.tonny;

import com.amap.api.location.AMapLocation;
import com.amap.api.location.AMapLocationListener;
import com.amap.api.location.LocationManagerProxy;
import com.amap.api.location.LocationProviderProxy;

import android.app.Activity;
import android.content.DialogInterface;
import android.content.DialogInterface.OnClickListener;
import android.content.Intent;
import android.location.Location;
import android.os.Bundle;
import android.util.Log;
import android.view.View;

public class MainActivity extends Activity implements AMapLocationListener
{
    LocationManagerProxy mLocationManagerProxy;

    @Override
    protected void onCreate(Bundle savedInstanceState)
    {
        super.onCreate(savedInstanceState);
        setContentView(R.layout.activity_main);

        mLocationManagerProxy = LocationManagerProxy.getInstance(MainActivity.this);

        /**
         * 第一个参数,使用定位的类型,混合模型,如网络,gps等 第二个参数,定位周期 第三个参数,移动多少距离的时候生效(只有GPS模式下有效)
         */
        mLocationManagerProxy.requestLocationData(LocationProviderProxy.AMapNetwork, 2 * 1000, 15, MainActivity.this);
    }

    public void onClick(View v)
    {
        Intent intent = new Intent(MainActivity.this, WeatherActivity.class);
        startActivity(intent);
    }

    @Override
    public void onLocationChanged(Location location)
    {
        // TODO Auto-generated method stub

    }

    @Override
    public void onStatusChanged(String provider, int status, Bundle extras)
    {
        // TODO Auto-generated method stub

    }

    @Override
    protected void onDestroy()
    {
        super.onDestroy();
        mLocationManagerProxy.destroy();
    }

    @Override
    public void onProviderEnabled(String provider)
    {
        // TODO Auto-generated method stub

    }

    @Override
    public void onProviderDisabled(String provider)
    {
        // TODO Auto-generated method stub

    }

    @Override
    public void onLocationChanged(AMapLocation location)
    {
        if (location != null && location.getAMapException().getErrorCode() == 0)
        {
            Log.e("Hello", location.toString());
        }
    }

}
相应的布局文件:
<RelativeLayout xmlns:android="http://schemas.android.com/apk/res/android"
    xmlns:tools="http://schemas.android.com/tools"
    android:layout_width="match_parent"
    android:layout_height="match_parent"
    tools:context="${relativePackage}.${activityClass}" >

    <TextView
        android:layout_width="wrap_content"
        android:layout_height="wrap_content"
        android:text="@string/hello_world" />

    <Button
        android:layout_width="wrap_content"
        android:layout_height="wrap_content"
        android:text="查看天气"
        android:onClick="onClick"/>

</RelativeLayout>
天气代码:
package org.tonny;

import com.amap.api.location.AMapLocalWeatherForecast;
import com.amap.api.location.AMapLocalWeatherListener;
import com.amap.api.location.AMapLocalWeatherLive;
import com.amap.api.location.LocationManagerProxy;

import android.app.Activity;
import android.os.Bundle;
import android.util.Log;

public class WeatherActivity extends Activity implements AMapLocalWeatherListener
{

    private LocationManagerProxy mLocationManagerProxy;

    @Override
    protected void onCreate(Bundle savedInstanceState)
    {
        super.onCreate(savedInstanceState);
        setContentView(R.layout.activity_weather);

        mLocationManagerProxy = LocationManagerProxy.getInstance(WeatherActivity.this);
        mLocationManagerProxy.requestWeatherUpdates(LocationManagerProxy.WEATHER_TYPE_LIVE, WeatherActivity.this);
    }

    @Override
    protected void onDestroy()
    {

    }

    @Override
    public void onWeatherForecaseSearched(AMapLocalWeatherForecast forecast)
    {

    }

    /*
     * (non-Javadoc)
     *
     * @see
     * com.amap.api.location.AMapLocalWeatherListener#onWeatherLiveSearched(
     * com.amap.api.location.AMapLocalWeatherLive)
     */
    @Override
    public void onWeatherLiveSearched(AMapLocalWeatherLive live)
    {
        Log.e("Weather", live.getCityCode());
        Log.e("Weather", live.getCity());
        Log.e("Weather", live.getTemperature());

        Log.e("Weather", live.getWindDir());
    }
}
相应的布局文件:
<RelativeLayout xmlns:android="http://schemas.android.com/apk/res/android"
    xmlns:tools="http://schemas.android.com/tools"
    android:layout_width="match_parent"
    android:layout_height="match_parent"
    tools:context="${relativePackage}.${activityClass}" >

    <TextView
        android:layout_width="wrap_content"
        android:layout_height="wrap_content"
        android:text="查看天气" />

</RelativeLayout>
标签:
原文地址:http://www.cnblogs.com/supertonny/p/4560027.html