标签:
Android中的四种基本布局
1.LinearLayout
LinearLayout称为线性布局,是一种常用的布局。修改activity_main.xml中的代码,如下所示:
<LinearLayout xmlns:android="http://schemas.android.com/apk/res/android"
    android:layout_width="match_parent"
    android:layout_height="match_parent"
    android:orientation="vertical" >

    <Button
        android:id="@+id/button1"
        android:layout_width="wrap_content"
        android:layout_height="wrap_content"
        android:text="@string/button1" />

    <Button
        android:id="@+id/button2"
        android:layout_width="wrap_content"
        android:layout_height="wrap_content"
        android:text="@string/button2" />

    <Button
        android:id="@+id/button3"
        android:layout_width="wrap_content"
        android:layout_height="wrap_content"
        android:text="@string/button3" />

</LinearLayout>
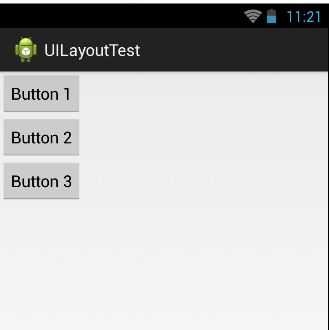
上述的代码中,指定了一个垂直的线性布局,而且在布局中添加了三个Button,每个Button的长度和宽度都是wrap_content,
其中android:orientation属性为LinearLayout中的控件排列方向,
android:orientation="horizontal" 表示水平方向
android:orientation="vertical" 表示垂直方向
如果不指定android:orientation属性的值,默认的排列方向就是horizontal。
运行程序得到下图的效果:
注意:如果LinearLayout的排列方向是horizontal,内部的控件就绝对不能将宽度指定为match_parent。
如果LinearLayout的排列方向是vertical,内部的控件就绝对不能将高度指定为match_parent。
android:layout_gravity用于指定控件在布局中的对齐方式。在Button中指定android:layout_gravity属性值,代码如下:
<LinearLayout xmlns:android="http://schemas.android.com/apk/res/android"
    android:layout_width="match_parent"
    android:layout_height="match_parent"
    android:orientation="horizontal" >

    <Button
        android:id="@+id/button1"
        android:layout_width="wrap_content"
        android:layout_height="wrap_content"
        android:layout_gravity="top"
        android:text="@string/button1" />

    <Button
        android:id="@+id/button2"
        android:layout_width="wrap_content"
        android:layout_height="wrap_content"
        android:layout_gravity="center_vertical"
        android:text="@string/button2" />

    <Button
        android:id="@+id/button3"
        android:layout_width="wrap_content"
        android:layout_height="wrap_content"
        android:layout_gravity="bottom"
        android:text="@string/button3" />

</LinearLayout>
上述的代码就是指定控件在布局中的对齐方式,需要注意的是:
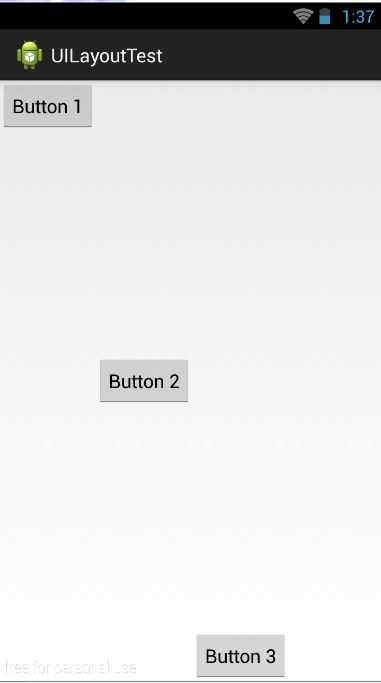
当LinearLayout的排列方向是horizontal时,只有垂直方向上的对齐方式才会生效,因为此时水平方向上的长度是不固定的。
当LinearLayout的排列方向是vertical时,只有水平方向上的对齐方式才会生效。
重新运行程序,效果如下图所示:
LinearLayout中有一个重要的属性,android:layout_weight。这个属性允许使用比例的方式来指定控件的大小。
下面的代码是编写一个消息发送的界面,需要一个文本编辑框和一个发送按钮,修改activity_main.xml中的代码,如下所示:
<LinearLayout xmlns:android="http://schemas.android.com/apk/res/android"
    android:layout_width="match_parent"
    android:layout_height="match_parent"
    android:orientation="horizontal" >

    <EditText
        android:id="@+id/input_message"
        android:layout_width="0dp"
        android:layout_height="wrap_content"
        android:layout_weight="1"
        android:hint="@string/input_message"/>

    <Button
        android:id="@+id/send"
        android:layout_width="0dp"
        android:layout_height="wrap_content"
        android:layout_weight="1"
        android:text="@string/send" />

</LinearLayout>
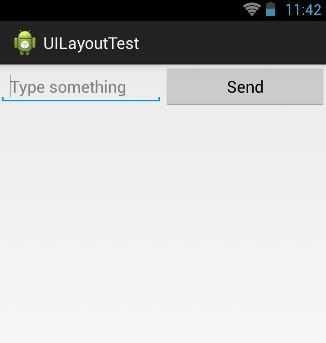
上述的代码中,在EditText和Button里都将android:layout_weight属性的值指定为1,这表示EditText和Button将在水平方向
平分宽度,重新运行程序,得到下图所示的效果:
为什么将android:layout_weight属性的值同时指定为1就会平分屏幕的?
原因是:系统会先把LinearLayout下所有控件指定的layout_weight相加,得到一个总值,
然后每个控件所占大小的比例就是用该控件的layout_weight值除以刚才算出的总值。
2.RelativeLayout
RelativeLayout又称为相对布局,也是一种常用的布局,修改activity_main.xml中的代码,如下所示:
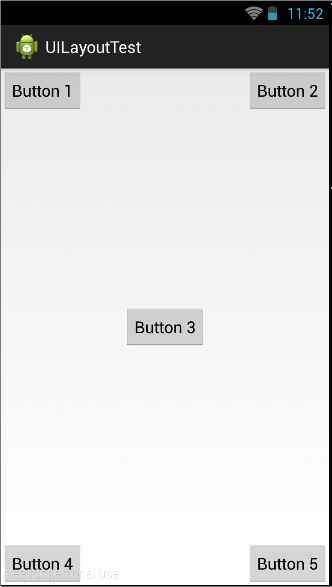
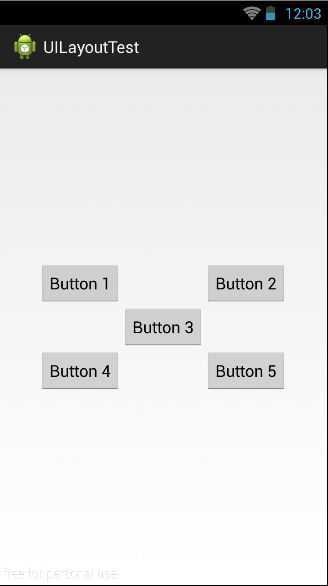
<RelativeLayout xmlns:android="http://schemas.android.com/apk/res/android"
    android:layout_width="match_parent"
    android:layout_height="match_parent" >

    <Button
        android:id="@+id/button1"
        android:layout_width="wrap_content"
        android:layout_height="wrap_content"
        android:layout_alignParentLeft="true"
        android:layout_alignParentTop="true"
        android:text="@string/button1" />

    <Button
        android:id="@+id/button2"
        android:layout_width="wrap_content"
        android:layout_height="wrap_content"
        android:layout_alignParentRight="true"
        android:layout_alignParentTop="true"
        android:text="@string/button2" />

    <Button
        android:id="@+id/button3"
        android:layout_width="wrap_content"
        android:layout_height="wrap_content"
        android:layout_centerInParent="true"
        android:text="@string/button3" />

    <Button
        android:id="@+id/button4"
        android:layout_width="wrap_content"
        android:layout_height="wrap_content"
        android:layout_alignParentBottom="true"
        android:layout_alignParentLeft="true"
        android:text="@string/button4" />

    <Button
        android:id="@+id/button5"
        android:layout_width="wrap_content"
        android:layout_height="wrap_content"
        android:layout_alignParentBottom="true"
        android:layout_alignParentRight="true"
        android:text="@string/button5" />


</RelativeLayout>
运行程序,得到如下图的效果:
上面的控件都是相对于父布局进行定位的,那控件相同于控件进行定位呢?修改代码,如下所示:
<RelativeLayout xmlns:android="http://schemas.android.com/apk/res/android"
    android:layout_width="match_parent"
    android:layout_height="match_parent" >

    <Button
        android:id="@+id/button3"
        android:layout_width="wrap_content"
        android:layout_height="wrap_content"
        android:layout_centerInParent="true"
        android:text="@string/button3" />

    <Button
        android:id="@+id/button1"
        android:layout_width="wrap_content"
        android:layout_height="wrap_content"
        android:layout_above="@id/button3"
        android:layout_toLeftOf="@id/button3"
        android:text="@string/button1" />

    <Button
        android:id="@+id/button2"
        android:layout_width="wrap_content"
        android:layout_height="wrap_content"
        android:layout_above="@id/button3"
        android:layout_toRightOf="@id/button3"
        android:text="@string/button2" />

    <Button
        android:id="@+id/button4"
        android:layout_width="wrap_content"
        android:layout_height="wrap_content"
        android:layout_below="@id/button3"
        android:layout_toLeftOf="@id/button3"
        android:text="@string/button4" />

    <Button
        android:id="@+id/button5"
        android:layout_width="wrap_content"
        android:layout_height="wrap_content"
        android:layout_below="@id/button3"
        android:layout_toRightOf="@id/button3"
        android:text="@string/button5" />

</RelativeLayout>
注意:当一个控件去引用另一个控件的id时,该控件一定要定义在引用控件的后面,不然会找不到id。重新运行程序,得到下图的效果:
3.FrameLayout
FrameLayout布局相对来说比较简单,该布局没有任何的定位方式,所有的控件都会摆放在布局的左上角。
4.TableLayout
TableLayout允许使用表格的方式来排列控件,在设计表格时尽量让每一行都拥有相同的列数。
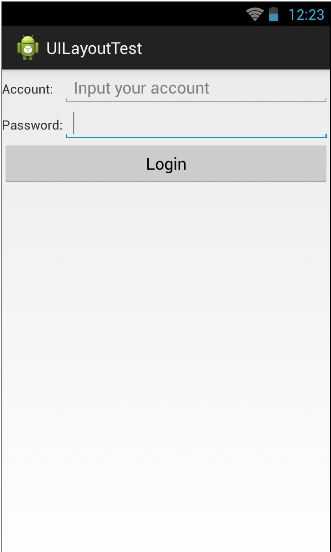
设计一个界面,允许用户输入帐号和密码后登录,修改activity_main.xml中的代码,如下所示:
<TableLayout xmlns:android="http://schemas.android.com/apk/res/android"
    android:layout_width="match_parent"
    android:layout_height="match_parent"
    android:stretchColumns="1" >


    <TableRow>

        <TextView
            android:id="@+id/text_view1"
            android:layout_height="wrap_content"
            android:text="@string/text_view1" />

        <EditText
            android:id="@+id/account"
            android:layout_height="wrap_content"
            android:hint="@string/account" />
    </TableRow>

    <TableRow>

        <TextView
            android:id="@+id/text_view2"
            android:layout_height="wrap_content"
            android:text="@string/text_view2" />

        <EditText
            android:id="@+id/password"
            android:layout_height="wrap_content"
            android:inputType="textPassword" />
    </TableRow>

    <TableRow>

        <Button
            android:id="@+id/login"
            android:layout_height="wrap_content"
            android:layout_span="2"
            android:text="@string/login" />
    </TableRow>

</TableLayout>
在TableLayout中每加入一个TableRow就表示在表格中添加一行,然后在TableRow中每加入一个控件,就表示在
该行中加入一列。
注意:TableRow中的控件是不能指定宽度的。
上面的代码中,第三行中使用android:layout_span="2"让登陆按钮占据两列的空间。
因为TableRow中不能指定宽度,就会不能充分利用屏幕,在TableLayout中使用android:stretchColumns="1"属性
可以达到自适应屏幕的目的。
上述的代码中将android:stretchColumns的值指定为1,表示如果表格不能完全占满屏幕宽度,就将第二列进行拉伸。
指定为1,就拉伸第二列;指定为0,就会拉伸第一列。运行代码,会得到下图的效果:
标签:
原文地址:http://www.cnblogs.com/glh199006/p/4562155.html