标签:
今天来看一下如何通过组合多个控件实现自定义标题栏
众所周知,标题栏是应用中必不可少的控件,为了避免多次重写,将其封装起来,供每个布局调用即可。
这里我们采用经典的左中右布局,也可以根据项目需要自行调整,比如在右侧再加一个控件,或者将标题偏左都可以
注:其中应用到了上一篇文章中的ButtonM控件,大家可以先简单了解一下。
还是先来看一下效果图:
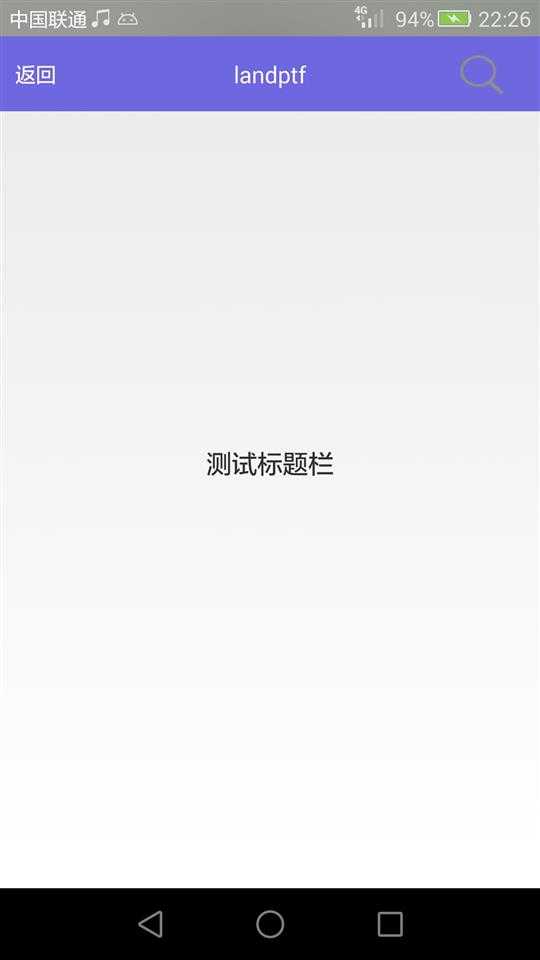

图一 初始状态 图二 按下了右侧的搜索按钮
下面来看代码实现,共四个文件两个java类,两个布局文件
1 TitleBarM.java
package landptf.control;

import android.content.Context;
import android.graphics.Color;
import android.util.AttributeSet;
import android.util.TypedValue;
import android.view.View;
import android.widget.RelativeLayout;
import android.widget.TextView;
/**
 * 继承RelativeLayout,自定义标题栏
 * @author landptf
 * @date 2015-6-10
 */
public class TitleBarM extends RelativeLayout{
    private Context context;
    //定义三个控件,
    private ButtonM btnLeft;
    private TextView tvTitle;
    private ButtonM btnRight;
    //定义左侧控件的接口
    private OnClickListenerL onClickListenerL = null;
    //定义右侧控件的接口
    private OnClickListenerR onClickListenerR = null;

    public interface OnClickListenerL{
        //定义一个方法
        public void onClick(View v);
    }

    public interface OnClickListenerR{
        //定义一个方法
        public void onClick(View v);
    }

    /**
     * 为左侧控件绑定事件
     * @param onClickListenerL
     */
    public void setOnClickLisenerL(OnClickListenerL onClickListenerL) {
        this.onClickListenerL = onClickListenerL;
    }

    /**
     * 为右侧控件绑定事件
     * @param onClickListenerR
     */
    public void setOnClickLisenerR(OnClickListenerR onClickListenerR) {
        this.onClickListenerR = onClickListenerR;
    }

    public TitleBarM(Context context) {
        this(context, null);
    }

    public TitleBarM(Context context, AttributeSet attrs) {
        this(context, attrs,0);
    }

    public TitleBarM(Context context, AttributeSet attrs, int defStyle) {
        super(context, attrs, defStyle);
        this.context = context;
        //设置RelativeLayout的布局
        setLayoutParams(new LayoutParams(LayoutParams.MATCH_PARENT,LayoutParams.MATCH_PARENT));
        //设置默认的背景色
        setBackgroundColor(Color.parseColor("#B674D2"));
        init();
    }

    private void init() {
        //初始化左侧ButtonM
        btnLeft = new ButtonM(context);
        RelativeLayout.LayoutParams lp=new RelativeLayout.LayoutParams(LayoutParams.WRAP_CONTENT,LayoutParams.WRAP_CONTENT);
        //垂直居中
        lp.addRule(RelativeLayout.CENTER_VERTICAL);
        //设置距离左侧10dp
        lp.leftMargin = dp2px(context, 10);
        btnLeft.setLayoutParams(lp);
        btnLeft.setTextSize(16);//设置字体大小,默认为16
        btnLeft.setTextColori(Color.WHITE);//默认字体颜色为白色
        btnLeft.setTextColorSelected("#909090");//按下后的字体颜色
        //定义其点击事件
        btnLeft.setOnClickListener(new OnClickListener() {
            @Override
            public void onClick(View v) {
                if (onClickListenerL != null) {
                    onClickListenerL.onClick(v);
                }
            }
        });
        //初始化中间标题控件
        tvTitle = new TextView(context);
        lp=new RelativeLayout.LayoutParams(LayoutParams.WRAP_CONTENT,LayoutParams.WRAP_CONTENT);
        //使其处于父控件的中间位置,也有一些APP的标题偏左,可根据项目需要自行调整,也可动态设置
        lp.addRule(RelativeLayout.CENTER_IN_PARENT);
        tvTitle.setLayoutParams(lp);
        //设置标题文字颜色
        tvTitle.setTextColor(Color.WHITE);
        //设置标题文字大小
        tvTitle.setTextSize(18);//默认为18
        //初始化右侧ButtonM
        btnRight = new ButtonM(context);
        lp=new RelativeLayout.LayoutParams(LayoutParams.WRAP_CONTENT,LayoutParams.WRAP_CONTENT);
        lp.rightMargin = dp2px(context, 10);
        //垂直居中
        lp.addRule(RelativeLayout.CENTER_VERTICAL);
        //居于父控件的右侧
        lp.addRule(RelativeLayout.ALIGN_PARENT_RIGHT);
        btnRight.setLayoutParams(lp);
        btnRight.setTextSize(16);//默认有16
        btnRight.setVisibility(View.GONE); //默认隐藏右侧控件
        btnRight.setTextColori(Color.WHITE);
        btnRight.setTextColorSelected("#909090");
        btnRight.setOnClickListener(new OnClickListener() {
            @Override
            public void onClick(View v) {
                if (onClickListenerR != null) {
                    onClickListenerR.onClick(v);
                }
            }
        });

        //分别将三个控件加入到容器中
        addView(btnLeft);
        addView(tvTitle);
        addView(btnRight);
    }

    /**
     * 设置标题栏的背景色 ,String
     * @param backColors
     */
    public void setBackColor(String backColors) {
        setBackgroundColor(Color.parseColor(backColors));
    }

    /**
     * 设置标题栏的背景色 ,int
     * @param backColori
     */
    public void setBackColor(int backColori) {
        setBackgroundColor(backColori);
    }

    /**
     * 设置左侧控件显示的文字
     * @param leftText
     */
    public void setLeftText(String leftText) {
        btnLeft.setText(leftText);
    }

    /**
     * 设置左侧控件的背景图
     * @param leftBackImage
     */
    public void setLeftBackImage(int leftBackImage) {
        if (leftBackImage != 0) {
            btnLeft.setBackGroundImage(leftBackImage);
        }
    }

    /**
     * 设置左侧控件选中的背景图
     * @param leftBackImageSeleted
     */
    public void setLeftBackImageSeleted(int leftBackImageSeleted) {
        if (leftBackImageSeleted != 0) {
            btnLeft.setBackGroundImageSeleted(leftBackImageSeleted);
        }
    }

    /**
     * 设置左侧控件显示属性,默认为显示
     * @param leftVisible
     */
    public void setLeftVisible(boolean leftVisible) {
        btnLeft.setVisibility(leftVisible ? View.VISIBLE : View.GONE);
    }

    /**
     * 设置左侧控件显示的字体大小
     * @param leftTextSize
     */
    public void setLeftTextSize(float leftTextSize) {
        btnLeft.setTextSize(leftTextSize);
    }

    /**
     * 设置中间控件显示属性,默认为显示
     * @param leftVisible
     */
    public void setTitleVisible(boolean titleVisible) {
        tvTitle.setVisibility(titleVisible ? View.VISIBLE : View.GONE);
    }

    /**
     * 设置中间控件的文字
     * @param titleText
     */
    public void setTitleText(String titleText) {
        tvTitle.setText(titleText);
    }

    /**
     * 设置中间控件的文字的大小
     * @param titleTextSize
     */
    public void setTitleTextSize(float titleTextSize) {
        tvTitle.setTextSize(titleTextSize);
    }

    /**
     * 设置右侧控件显示的文字
     * @param leftText
     */
    public void setRightText(String rightText) {
        btnRight.setText(rightText);
    }

    /**
     * 设置右侧控件的背景图
     * @param leftBackImage
     */
    public void setRightBackImage(int rightBackImage) {
        if (rightBackImage != 0) {
            btnRight.setBackGroundImage(rightBackImage);
        }
    }

    /**
     * 设置右侧控件选中的背景图
     * @param leftBackImageSeleted
     */
    public void setRightBackImageSeleted(int rightBackImageSeleted) {
        if (rightBackImageSeleted != 0) {
            btnRight.setBackGroundImageSeleted(rightBackImageSeleted);
        }
    }

    /**
     * 设置右侧控件显示的字体大小
     * @param leftTextSize
     */
    public void setRightTextSize(float rightTextSize) {
        btnRight.setTextSize(rightTextSize);
    }

    /**
     * 设置右侧控件显示属性,默认为隐藏
     * @param leftVisible
     */
    public void setRightVisible(boolean rightVisible) {
        btnRight.setVisibility(rightVisible ? View.VISIBLE : View.GONE);
    }

    //定义一个私有方法dp2px
    private int dp2px(Context context, float dpVal) {
        return (int) TypedValue.applyDimension(TypedValue.COMPLEX_UNIT_DIP,
                dpVal, context.getResources().getDisplayMetrics());
    }
}
以上定义了一些public方法,可根据具体项目需求扩展或减少。
2 child_titlebarm.xml 这里将标题栏单独写成一个布局文件,在其他布局文件中直接include即可
<?xml version="1.0" encoding="utf-8"?>
<LinearLayout xmlns:android="http://schemas.android.com/apk/res/android"
    android:layout_width="match_parent"
    android:layout_height="50dp"
    android:orientation="vertical" >

    <landptf.control.TitleBarM
        android:id="@+id/tbm_title"
        android:layout_width="match_parent"
        android:layout_height="match_parent" >
    </landptf.control.TitleBarM>

</LinearLayout>
这里标题栏的高低默认设成50dp
3 activity_titlebar.xml
<?xml version="1.0" encoding="utf-8"?>
<RelativeLayout xmlns:android="http://schemas.android.com/apk/res/android"
    xmlns:tools="http://schemas.android.com/tools"
    android:layout_width="match_parent"
    android:layout_height="match_parent"
    tools:ignore="HardcodedText" >

    <include
        android:id="@+id/title"
        layout="@layout/child_titlebarm" />

    <TextView
        android:id="@+id/tv_content"
        android:layout_width="wrap_content"
        android:layout_height="wrap_content"
        android:layout_centerInParent="true"
        android:text="测试标题栏"
        android:textSize="20sp" />

</RelativeLayout>
里面比较简单只include一个child_titlebarm.xml,又定义一个TextView就不做特别说明
4 TitleBarMActivity.java
package landptf.control;

import landptf.control.TitleBarM.OnClickListenerL;
import landptf.control.TitleBarM.OnClickListenerR;
import android.app.Activity;
import android.os.Bundle;
import android.view.View;
import android.widget.Toast;

/**
 * TitleBarM测试类
 * @author landptf
 * @date 2015-6-10
 */
public class TitleBarMActivity extends Activity{
    private TitleBarM tbTitle;

    @Override
    protected void onCreate(Bundle savedInstanceState) {
        super.onCreate(savedInstanceState);
        setContentView(R.layout.activity_titlebarm);
        initView();
    }

    private void initView() {
        //初始化控件
        tbTitle = (TitleBarM) findViewById(R.id.tbm_title);
        //先来设置一个背景色,当然你也可以用默认的背景色
        tbTitle.setBackColor("#7067E2");
        //设置左侧文字显示文字,也可设置背景图
        tbTitle.setLeftText("返回");
        //设置左侧控件点击事件
        tbTitle.setOnClickLisenerL(new OnClickListenerL() {
            @Override
            public void onClick(View v) {
                Toast.makeText(TitleBarMActivity.this, "你点击了返回", Toast.LENGTH_SHORT).show();
            }
        });
        //设置中间的标题
        tbTitle.setTitleText("landptf");
        //由于我们将右侧的控件默认为隐藏,在此显示出来
        tbTitle.setRightVisible(true);
        //设置右侧的控件的背景图,这里找了两张搜索的图片
        tbTitle.setRightBackImage(R.drawable.title_search);
        tbTitle.setRightBackImageSeleted(R.drawable.title_search_selected);
        tbTitle.setOnClickLisenerR(new OnClickListenerR() {
            @Override
            public void onClick(View v) {
                Toast.makeText(TitleBarMActivity.this, "你点击了搜索", Toast.LENGTH_SHORT).show();
            }
        });
    }
}
以上便是全部代码,其中使用了上一篇文章中介绍的ButtonM控件,大家也可以根据自己的需要使用其他控件实现。
这里只提供一种思路,不足之处互相交流学习。
标签:
原文地址:http://www.cnblogs.com/landptf/p/4567718.html