[root@localhost ~]# cat /etc/redhat-release
CentOS release 6.6 (Final)
[root@localhost ~]# uname -r
2.6.32-504.el6.x86_64
[root@localhost ~]# uname -m
x86_64
配置文件:
主配置文件:/etc/httpd/conf/httpd.conf
分段配置文件:/etc/httpd/conf.d/*.conf
服务脚本:
/etc/rc.d/init.d/httpd
模块文件目录:
/etc/httpd/modules--> /usr/lib64/httpd/modules
主程序文件:
/usr/sbin/httpd (prefork)
/usr/sbin/httpd.worker(worker)
/usr/sbin/httpd.event(event)
日志文件目录:
/var/log/httpd
access_log:访问日志文件
error_log:错误日志
站点文档目录:
/var/www/html
配置文件:
Directive Value
指令 值
配置文件分为三段
[root@localhost ~]# cd /etc/httpd/conf
[root@localhost conf]# grep "Section"httpd.conf
### Section 1: Global Environment
### Section 2: ‘Main‘ server configuration
### Section 3: Virtual Hosts
‘Main‘ server和VirtualHosts不能同时启用;默认启用的是‘Main‘ server;
Listen [IP:]80
Listen 80
IP省略时表示监听本机上所有可用的IP地址;
Listen指令可以出现多次
修改端口服务必须重启才可以生效
非持久连接:每个资源都是单独通过专用的连接进行获取。
持久连接:连接建立后,每个资源获取结束后不会断开连接,而继续等待其他资源完成传输。
如何断开?
数量限制:如100个
时间限制:如60秒
劣势:对并发访问量较大的服务器,开持久连接会有写请求得不到服务。
改进:减短,httpd-2.4支持毫秒级
KeepAlive    Off            #是否使用长连接  如果用户访问量小的话可以打开,on表示打开
MaxKeepAliveRequests 100  #设置长连接可以访问的资源,设置为0表示不断开,设置为100表示用户访问100个资源就断开
KeepAliveTimeout 15       #设置长连接断开时间
数量限制和时间限制,那个先到那个就先生效
验证:
使用telnet连接web服务器获取一个资源,如果获取到资源后立马断开了,说明没有启用长连接,如果启用长连接之后获取资源不会立马断开,而是等待获取到指定数量或者指定时间才会自动断开。
[root@localhost ~]# cp /etc/fstab /var/www/html/
[root@localhost ~]# telnet 172.16.4.102 80
Trying 172.16.4.102...
Connected to 172.16.4.102.
Escape character is ‘^]‘.
GET /fstab http/1.1     #获取一个服务器资源
Host:172.16.4.102      #获取的主机

HTTP/1.1 200 OK
Date: Thu, 23 Apr 2015 21:10:03 GMT
Server: Apache/2.2.15 (CentOS)
Last-Modified: Thu, 23 Apr 2015 21:07:40 GMT
ETag: "120b71-399-5146aab8c913b"
Accept-Ranges: bytes
Content-Length: 921
Content-Type: text/plain; charset=UTF-8

省略部分内容……
Connection closed by foreign host.
因为Linux不是原生态的支持线程,所以默认使用prefork
MPM:Multi Path Modules
Prefork:(一个请求用一个进程响应)
Worker:(一个请求用一个线程响应(启动多个进程,每个进程用一个线程响应))
Event:(一个进程处理多个请求)2.4以后版本的默认模块
[root@localhost ~]# ps aux | grep httpd
root     26547  0.0  0.3 184324 3840 ?        Ss   07:00  0:00 /usr/sbin/httpd   #表示启动的模型为prefork
apache   26550  0.0  0.2 184324 2460 ?        S    07:00  0:00 /usr/sbin/httpd
apache   26551  0.0  0.2 184324 2460 ?        S    07:00  0:00 /usr/sbin/httpd
apache   26552  0.0  0.2 184324 2460 ?        S    07:00  0:00 /usr/sbin/httpd
apache   26553  0.0  0.2 184324 2460 ?        S    07:00  0:00 /usr/sbin/httpd
apache   26554  0.0  0.2 184324 2460 ?        S    07:00  0:00 /usr/sbin/httpd
apache    26555  0.0 0.2 184324  2460 ?        S   07:00   0:00 /usr/sbin/httpd
apache   26556  0.0  0.2 184324 2460 ?        S    07:00  0:00 /usr/sbin/httpd
apache   26557  0.0  0.2 184324 2460 ?        S    07:00  0:00 /usr/sbin/httpd
root     26559  0.0  0.0 103256  840 pts/1    S+   07:00  0:00 grep httpd
修改/etc/sysconfig/httpd,取消HTTPD=/usr/sbin/httpd.worker行的注释,然后重启服务器,查看进程启动的就是worker进程了
[root@localhost ~]# vim /etc/sysconfig/httpd
HTTPD=/usr/sbin/httpd.worker
[root@localhost ~]# service httpd restart
[root@localhost ~]# ps aux | grep httpd
root     49621  0.0  0.4 184528 4052 ?        Ss   12:35  0:00 /usr/sbin/httpd.worker   #启动的模型为worker
apache   49624  0.0  0.5 528788 5348 ?        Sl   12:35  0:00 /usr/sbin/httpd.worker
apache   49625  0.0  0.5 528788 5352 ?        Sl   12:35  0:00 /usr/sbin/httpd.worker
apache   49626  0.0  0.5 594324 5356 ?        Sl   12:35  0:00 /usr/sbin/httpd.worker
root     49737  0.0  0.0 103252  832 pts/1    S+   12:36  0:00 grep httpd
<IfModule prefork.c>
StartServers      8    #服务器启动时启动多少空闲进程
MinSpareServers   5    #最少响应进程,最少保证要有多少空闲进程响应用户请求(如果不够就启动)
MaxSpareServers  20    #最大空闲进程
ServerLimit      256   #指定MaxClients的上限值,(如果需要调大,那么必须重新启动服务器)
MaxClients      256    #限制最多有多少用户请求连接进来,不能超过ServerLimit的上限
MaxRequestsPerChild  4000  #限制一个进程最多响应多少此用户请求,如果达到限制次数,那么会结束进程,并且重新生成一个进程响应
</IfModule>
<IfModule worker.c>
StartServers         4  #默认启动多少进程
MaxClients        300   #最多允许多少用户请求连接进来
MinSpareThreads    25   #最小空闲线程
MaxSpareThreads    75   #最大空闲线程
ThreadsPerChild    25   #每一个进程最多生成多少线程
MaxRequestsPerChild  0   #一个服务器的最大请求数,0表示没有限制
</IfModule>
配置模块加载:
修改httpd配置文件,按照如下格式修改即可:
LoadModule <module_name> <module_path>
查看系统加载的模块:
[root@localhost ~]# grep ^LoadModule/etc/httpd/conf/httpd.conf
LoadModule auth_basic_modulemodules/mod_auth_basic.so
LoadModule auth_digest_modulemodules/mod_auth_digest.so
LoadModule authn_file_modulemodules/mod_authn_file.so
LoadModule authn_alias_modulemodules/mod_authn_alias.so
LoadModule authn_anon_modulemodules/mod_authn_anon.so
LoadModule authn_dbm_modulemodules/mod_authn_dbm.so
LoadModule authn_default_modulemodules/mod_authn_default.so
LoadModule authz_host_modulemodules/mod_authz_host.so
LoadModule authz_user_modulemodules/mod_authz_user.so
LoadModule authz_owner_modulemodules/mod_authz_owner.so
LoadModule authz_groupfile_modulemodules/mod_authz_groupfile.so
省略部分内容…………
用到什么模块只需要使用loadmodule加载,如果不用#注释即可
补充:
httpd –l:查看静态编译的模块
httpd –M:查看所有模块,包括静态编译和动态装卸载的模块
DocumentRoot指令
示例:
DocumentRoot "/var/www/html"
文档路径映射:
DocumentRoot指向的路径为URL起始的位置
/var/www/html/images/1.jpg
默认direction配置
<Directory "/var/www/html">       #定义区域的开始
    OptionsIndexes FollowSymLinks   # options配置
   AllowOverride None
    Orderallow,deny
    Allowfrom all
</Directory>     #定义区域的结束
Options选项:
Indexes #允许索引目录,去掉表示不允许
Includes #允许支持服务器端包含(SSI)
FollowSymLink #跟随符号连接(如果有软连接和硬连接,但是不在web目录是否允许访问)
SymLinksifOwnerMatch #允许符号连接,但是属组必须和httpd进程用户一致
ExecCG #运行运行CGI脚本
MultiViews #内容协商机制
None #不支持任何选项
ALL #表示所有选项(千万不要开启)
Order allow,deny或者Order deny,allow可以根据客户端地址或ip地址来决定是否允许客户端访问。
Order:设置限制顺序
Allow,deny:先允许,后拒绝,默认拒绝所有为明确允许的客户机地址
Deny,allow:先拒绝,后允许,默认允许所有为明确拒绝的客户机地址
Allow和deny设置地址限制
Denyfrom address1 address2……
Allowfrom address1 address2……
From后可更上的地址格式:
IP地址
网络地址
172.16
172.16.0.0
172.16.0.0/16
172.16.0.0/255.255.0.0
默认设置
<Directory "/var/www/html">
    Options-Indexes FollowSymLinks
   AllowOverride None
    Orderallow,deny   #表示先运行后拒绝
    Allowfrom all     #允许所有
</Directory>
设置只允许192.168.100.254访问,其他地址拒绝
<Directory "/var/www/html">
    Options-Indexes FollowSymLinks
   AllowOverride None
    Orderallow,deny
    Allowfrom 192.168.100.254
</Directory>
设置拒绝192.168.100.254访问,其他地址允许
<Directory "/var/www/html">
    Options-Indexes FollowSymLinks
   AllowOverride None
    Orderdeny,allow
    deny from192.168.100.254
</Directory>
AllowOverride AuthConfig:使用认证配置
AuthType Basic :设置文件认证类型
AuthName "test":设置保护区域名称
AuthUserFile “/etc/httpd/conf/htpasswd”:设置运行登录的文件列表
AuthGroupFile “”
require valid-user :表示允许认证文件中所有用户登录,可以是user 后面跟用户名,表示只能是指定用户登录
htpasswd 设置认证文件的命令
-c:表示创建认证文件(只限第一次使用,如果是第二次还使用就会覆盖文件)
-m:表示使用md5的方式加密密码
-D:删除一个用户
htpasswd -c -m /etc/httpd/conf/htpasswd zhangsan
修改httpd配置文件支持用户授权访问
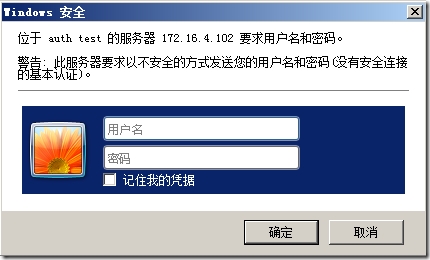
<Directory "/var/www/html">
    Options IndexesFollowSymLinks
   AllowOverride None
    Orderallow,deny
    Allowfrom all
    AuthName "auth test"
    AuthType Basic
    AuthUserFile /etc/httpd/conf/.htpasswd
    require valid-user
</Directory>
设置授权认证用户
[root@localhost ~]# htpasswd -c -m /etc/httpd/conf/.htpasswdzhangsan
New password:
Re-type new password:
Adding password for user zhangsan
[root@localhost ~]# htpasswd  -m /etc/httpd/conf/.htpasswd lisi  #注意没有加-c选项
New password:
Re-type new password:
Adding password for user lisi
[root@localhost ~]# cat /etc/httpd/conf/.htpasswd
zhangsan:$apr1$TkQKWnSw$PsZR741ikw6fSnqrbgEDG1
lisi:$apr1$rZJbTBLa$2L/J0Zhps46SAByXsIMqv1
设置完成重启服务,访问web就看到如下提示,输入用户名和密码即可访问
DirectoryIndex index.html index.html.var
表示记录的用户为主机名,如果记录为主机名就会反解,效率底下,不推荐使用
HostnameLookups Off
错误日志位置
ErrorLog logs/error_log
错误日志记录级别
LogLevel warn
访问日志格式:
LogFormat "%h %l %u %t \"%r\"%>s %b \"%{Referer}i\" \"%{User-Agent}i\"" combined #混合模式
LogFormat "%h %l %u %t \"%r\"%>s %b" common   #通用模式
LogFormat "%{Referer}i -> %U"referer    #只记录客户端来源
LogFormat "%{User-agent}i" agent         #只记录浏览器类型
记录访问日志的,类型和格式
CustomLog logs/access_log combined
日志记录参数说明:
%h:客户端主机
%l:客户端用户通过identd登录时使用的名称;-表示为空
%u:用户认证登录的名字,无登录机制为-
%t:收到客户端请求时的时间
\”:显示引号本身,而不作为引用符号
%r:表示请求报文的首行
%>s:显示响应报文的状态码
%b:响应报文的大小,单位为字节;不包含首部信息
%{Referer}i:记录http首部referer对应的值;即访问入口,从那个页面跳转至此页面
%{User-Agent}i:记录http首部User-Agent对应的值,及浏览器的类型
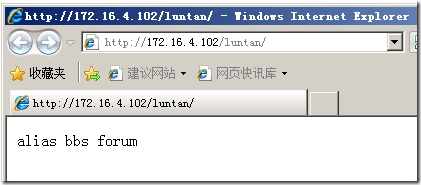
修改apache配置文件,设置别名,当访问luntan的时候就访问/bbs/forum
Alias /luntan "/bbs/forum"
设置文档目录
[root@localhost ~]# mkdir -pv /bbs/forum
[root@localhost ~]# vim /bbs/forum/index.html
alias bbs forum
验证:访问luntan的时候访问到了/bbs/forum中的默认首页
AddDefaultCharset UTF-8
常用字符集:GBK, GB2312, GB18030
创建虚拟主机相关目录
[root@localhost ~]# mkdir –p /vhost/{a.com,b.org,c.net}/htdocs
[root@localhost ~]# tree /vhost/
/vhost/
├── a.com
│  └── htdocs
├── b.org
│  └── htdocs
└── c.net
└── htdocs
[root@localhost ~]# echo "www.a.com">/vhost/a.com/htdocs/index.html
[root@localhost ~]# echo "www.b.org">/vhost/b.org/htdocs/index.html
[root@localhost ~]# echo "www.c.net">/vhost/c.net/htdocs/index.html<VirtualHost 172.16.4.1:80> ServerName www.a.com DocumentRoot /vhost/a.com/htdocs/ </VirtualHost> <VirtualHost 172.16.4.2:80> ServerName www.b.org DocumentRoot /vhost/b.org/htdocs/ </VirtualHost> <VirtualHost 172.16.4.3:80> ServerName www.c.net DocumentRoot /vhost/c.net/htdocs/ </VirtualHost>
配置多个ip地址
[root@localhost ~]# ip addr add 172.16.4.1 dev eth0
[root@localhost ~]# ip addr add 172.16.4.2 dev eth0
[root@localhost ~]# ip addr add 172.16.4.3 dev eth0
[root@localhost ~]# ip addr show dev eth0
2: eth0: <BROADCAST,MULTICAST,UP,LOWER_UP>mtu 1500 qdisc pfifo_fast state UP qlen 1000
   link/ether 00:0c:29:04:65:26 brd ff:ff:ff:ff:ff:ff
    inet172.16.4.102/16 brd 172.16.255.255 scope global eth0
    inet172.16.4.1/32 scope global eth0
    inet172.16.4.2/32 scope global eth0
    inet172.16.4.3/32 scope global eth0
    inet6fe80::20c:29ff:fe04:6526/64 scope link
      valid_lft forever preferred_lft forever
注意:本机要配置上所有IP地址并能够用于通信;
验证:

定义监听的端口
Listen 80
Listen 808
Listen 8080
修改配置文件
<VirtualHost 172.16.4.1:80>
   ServerName www.a.com
   DocumentRoot /vhost/a.com/htdocs/
</VirtualHost>

<VirtualHost 172.16.4.1:808>
   ServerName www.b.org
   DocumentRoot /vhost/b.org/htdocs/
</VirtualHost>

<VirtualHost 172.16.4.1:8080>
   ServerName www.c.net
   DocumentRoot /vhost/c.net/htdocs/
</VirtualHost>
重启服务,查看监听的端口
[root@localhost ~]# netstat -tnlp | grep httpd
tcp       0      0 :::808                      :::*                        LISTEN      27624/httpd
tcp       0      0 :::8080                     :::*                        LISTEN      27624/httpd
tcp       0      0 :::80                       :::*                        LISTEN      27624/httpd
验证:访问不同端口,出现不同页面内容

NameVirtualHost 172.16.4.1:80
<VirtualHost 172.16.4.1:80>
   ServerName www.a.com
   DocumentRoot /vhost/a.com/htdocs/
</VirtualHost>

<VirtualHost 172.16.4.1:80>
   ServerName www.b.org
   DocumentRoot /vhost/b.org/htdocs/
</VirtualHost>

<VirtualHost 172.16.4.1:80>
   ServerName www.c.net
   DocumentRoot /vhost/c.net/htdocs/
</VirtualHost>
验证:
客户端主机修改hosts文件
hosts文件位置C:\Windows\System32\drivers\etc
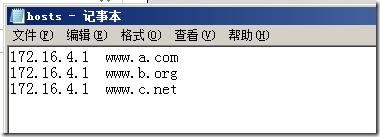
访问结果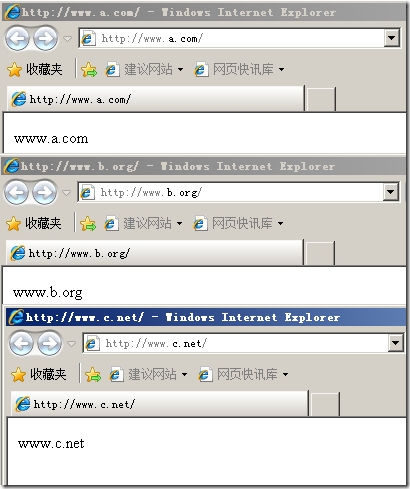
在配置文件,加入如下内容
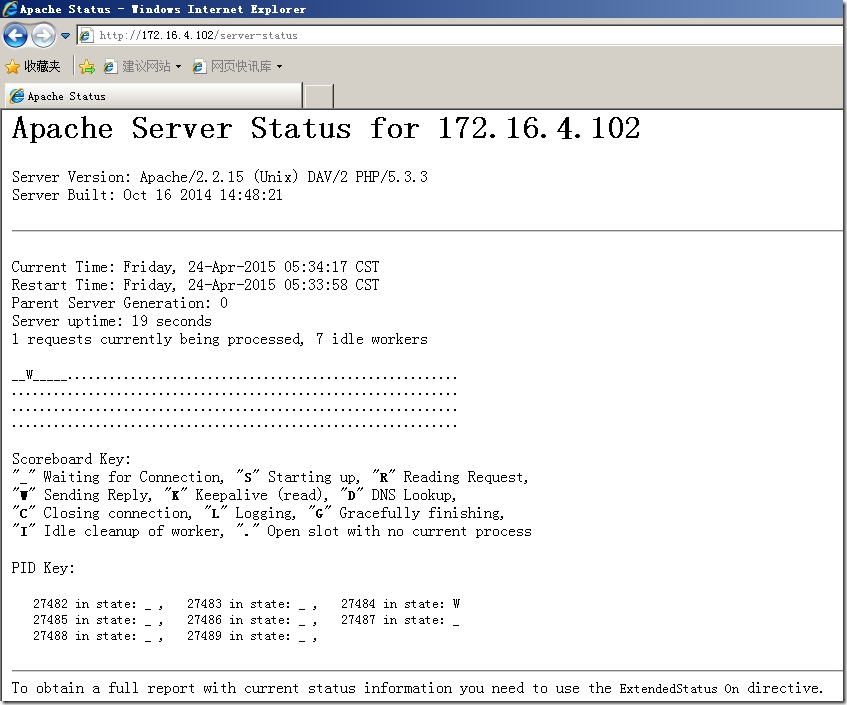
<Location /server-status>
    SetHandler server-status
    Order allow,deny
    allow from all
</Location>
使用http://网址/server-status 访问
curl是基于URL语法在命令行方式下工作的文件传输工具,它支持FTP, FTPS, HTTP, HTTPS, GOPHER, TELNET, DICT, FILE及LDAP等协议。curl支持HTTPS认证,并且支持HTTP的POST、PUT等方法, FTP上传, kerberos认证,HTTP上传,代理服务器, cookies, 用户名/密码认证, 下载文件断点续传,上载文件断点续传,,http代理服务器管道( proxytunneling), 甚至它还支持IPv6, socks5代理服务器,,通过http代理服务器上传文件到FTP服务器等等,功能十分强大。
语法:curl [options] [URL...]
curl的常用选项:
-A/--user-agent<string> 设置用户代理发送给服务器,模拟自己成为指定服务器
示例:没有使用-A选项
[root@localhost ~]# curl http://172.16.4.1
www.a.com
[root@localhost ~]# tail -1/var/log/httpd/access_log
172.16.4.1 - - [24/Apr/2015:11:55:43 +0800]"GET / HTTP/1.1" 200 10 "-" "curl/7.19.7(x86_64-redhat-linux-gnu) libcurl/7.19.7 NSS/3.15.3 zlib/1.2.3 libidn/1.18libssh2/1.4.2"
使用了-A选项,模拟浏览器为chrom
[root@localhost ~]# curl -A "chrom 40"http://172.16.4.1
www.a.com
[root@localhost ~]# tail -1/var/log/httpd/access_log
172.16.4.1 - - [24/Apr/2015:11:57:01 +0800]"GET / HTTP/1.1" 200 10 "-" "chrom40"
-basic 使用HTTP基本认证(如果服务器设置了basic认证可以使用此选项结合-u进行认证)
-u/--user <user[:password]>设置服务器的用户和密码
--tcp-nodelay 使用TCP_NODELAY选项
-e/--referer<URL> 来源网址
示例:默认成从百度访问过来的
[root@localhost ~]# curl -A "chrom 40" -e"http://www.baidu.com" http://172.16.4.1
www.a.com
[root@localhost ~]# tail -1/var/log/httpd/access_log
172.16.4.1 - - [24/Apr/2015:12:03:21 +0800]"GET / HTTP/1.1" 200 10 "http://www.baidu.com" "chrom40"
--cacert <file> CA证书 (SSL)
--compressed 要求返回是压缩的格式
-H/--header <line>自定义头信息传递给服务器
-I/--head 只显示响应报文首部信息
[root@localhost ~]# curl -I http://172.16.4.1
HTTP/1.1 200 OK
Date: Fri, 24 Apr 2015 04:18:15 GMT
Server: Apache/2.2.15 (CentOS)
Last-Modified: Thu, 23 Apr 2015 21:39:57 GMT
ETag: "12000b-a-5146b1ef67f05"
Accept-Ranges: bytes
Content-Length: 10
Content-Type: text/html; charset=UTF-8
--limit-rate <rate> 设置传输速度
-0/--http1.0 使用HTTP 1.0
另一个工具:elinks
elinks[OPTION]... [URL]...
-dump:不进入交互式模式,而直接将URL的内容输出至标准输出;
Gzip的思想就是把文件现在服务器端进行压缩,然后在传输。这样显著减少文件传输的大小。传输完毕后浏览器会重新对压缩过的内容进行解压缩,没特殊情况,所有的文本内容都应该被gzip压缩:html(php),js,css,xml,txt……,因为首页上还有很多广告代码投放的js,这些广告代码拥有者的网站js没有经过gzip压缩,是由于需要每次加载进而统计来访信息。
适用场景:
(1)节约带宽,额外消耗CPU;同时,可能有些较老浏览器不支持;
(2)压缩适于压缩的资源,例如文件文件;
设置方法
SetOutputFilter DEFLATE   #启用压缩

# mod_deflate configuration

# Restrict compression to these MIME types
AddOutputFilterByType DEFLATE text/plain     #设置压缩类型
AddOutputFilterByType DEFLATE text/html
AddOutputFilterByType DEFLATE application/xhtml+xml
AddOutputFilterByType DEFLATE text/xml
AddOutputFilterByType DEFLATE application/xml
AddOutputFilterByType DEFLATEapplication/x-javascript
AddOutputFilterByType DEFLATE text/javascript
AddOutputFilterByType DEFLATE text/css

# Level of compression (Highest 9 - Lowest 1)
DeflateCompressionLevel 9  #压缩等级,压缩越大效率越高,耗C也越高

# Netscape 4.x has some problems.
BrowserMatch ^Mozilla/4 gzip-only-text/html

# Netscape 4.06-4.08 have some more problems
BrowserMatch ^Mozilla/4\.0[678] no-gzip

# MSIE masquerades as Netscape, but it is fine
BrowserMatch \bMSI[E] !no-gzip !gzip-only-text/html
访问验证:出现Content-Encoding:gzip表示压缩设置成功
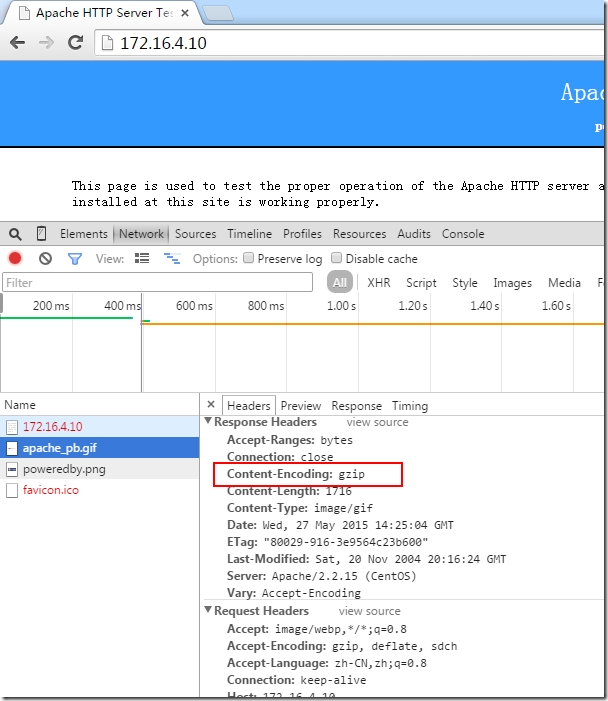
Curl验证:使用-I选项输出首部信息包含Vary: Accept-Encoding就是启用了压缩
[root@localhost ~]# curl -I 172.16.4.10
HTTP/1.1 403 Forbidden       #这里访问的是默认测试页面,所以是403
Date: Wed, 27 May 2015 14:31:17 GMT
Server: Apache/2.2.15 (CentOS)
Accept-Ranges: bytes
Vary: Accept-Encoding   #表示启用了压缩功能
Content-Length: 4954
Connection: close
Content-Type: text/html; charset=UTF-8
Mod_expires允许通过apache配置文件控制http的“Expires”和”cache-Control“头内容,这个模块控制服务器应答时的expires头内容和cache-Control头的max-age指令。有效期可以设置为相当源文件的最后修改时刻或者客户端的访问时刻。
这些HTTP头向客户端表明了内容的有效性和持久性。如果客户端本地有缓存,则内容就可以从缓存(除非已经过期),而不是从服务器读取,然后客户端会检查缓存中的副本,查看是否过期或者失效,已决定是否从新服务器获得内容更新。
设置方法
   ExpiresActive on                 #激活expires功能
   ExpiresDefault "access plus 12 month"  #缺省配置为访问的时间+12个月
   ExpiresByType text/html "access plus 12 months"  #下面的都是缓存的类型,全部为12个月
   ExpiresByType text/css "access plus 12 months"
   ExpiresByType image/gif "access plus 12 months"
   ExpiresByType image/jpeg "access plus12  12 months"
   ExpiresByType image/jpg "access plus 12 months"
   ExpiresByType image/png "access plus 12 months"
   EXpiresByType application/x-shockwave-flash "access plus 12 months"
   EXpiresByType application/x-javascript "access plus 12 months"
   ExpiresByType video/x-flv "access plus 12 months"
验证:访问httpd的首部信息中出现了Expires就设置成功了,而且从日期来看缓存时间为1年
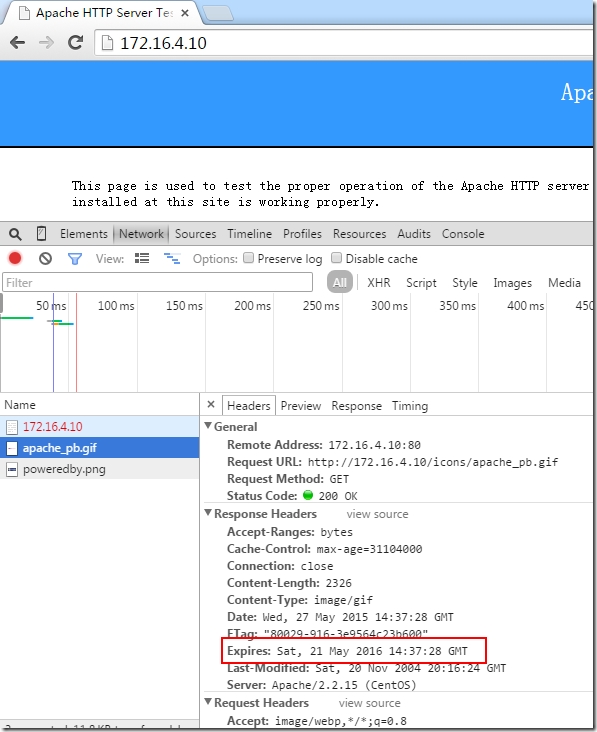
使用curl验证:出现了Expires而且过期时间是1年
[root@localhost ~]# curl -I 172.16.4.10/1.jpg
HTTP/1.1 200 OK
Date: Wed, 27 May 2015 14:41:48 GMT
Server: Apache/2.2.15 (CentOS)
Last-Modified: Sun, 07 Mar 2010 03:46:02 GMT
ETag: "80102-197b4-4812dc98fd280"
Accept-Ranges: bytes
Content-Length: 104372
Cache-Control: max-age=31104000
Expires: Sat, 21 May 2016 14:41:48 GMT
Connection: close
Content-Type: image/jpeg
htpasswd: basic认证基于文件实现时,用到的账号密码文件生成工具;
apachectl:httpd自带的服务控制脚本,支持start, stop;
apxs:由httpd-devel包提供的,扩展httpd使用第三方模块的工具;
rotatelogs:日志滚动工具;
access.log-->
access.log,access.1.log
access.log,access.1.log, access.2.log
suexec:
访问某些有特殊权限配置的资源时,临时切换至指定用户运行;
ab [OPTIONS] URL
-n:总的请求数
-c:模拟的并发数
-k:以持久连接模式测试
ulimit -n #: 调整当前用户所同时打开的文件数;如果需要并发超过1024就调整次值,最大可调整为65535
并发10个请求,一共请求100个测试
[root@localhost ~]# ab -c 10 -n 100www.test.com/index.html
This is ApacheBench, Version 2.3 <$Revision:1430300 $>
Copyright 1996 Adam Twiss, Zeus Technology Ltd,http://www.zeustech.net/
Licensed to The Apache Software Foundation,http://www.apache.org/

Benchmarking www.test.com (be patient).....done


Server Software:        Apache/2.4.6   #服务器端软件
Server Hostname:        www.test.com   #测试的主机名称
Server Port:            80             #测试的主机端口

Document Path:          /index.html    #测试的页面
Document Length:        14 bytes        #测试页面的大小

Concurrency Level:      10             #并发级别
Time taken for tests:   0.090 seconds   #响应时间(第一个请求到最后一个请求)
Complete requests:      100            #成功的请求
Failed requests:        0              #失败的请求
Write errors:           0              #失败的写入次数
Total transferred:      27400 bytes    #服务器响应的整体数据大小
HTML transferred:       1400 bytes     #html传输大小
Requests per second:    1114.44 [#/sec] (mean)  #每秒钟完成的请求数
Time per request:       8.973 [ms] (mean)   #一批请求平均花费的时间
Time per request:       0.897 [ms] (mean, across all concurrentrequests)  #单个请求平均花费的时间
Transfer rate:          298.20 [Kbytes/sec] received   #传输速率,大概每秒传输了多少个字节

Connection Times (ms)
             min  mean[+/-sd] median   max   min:最短  mean:平均时间 median:中值 max最大
Connect:       0    1   0.5     1       3   #建立连接使用的时间
Processing:    3    7   3.0     7      17   #处理过程
Waiting:       3    6   3.2     7      17   #等待
Total:         4    8   3.0     8      19   #总共

Percentage of the requests served within a certaintime (ms)
  50%      8
  66%      8
  75%      9
  80%      9
  90%     14
  95%     15
  98%     18
  99%     19
 100%     19 (longest request)
[root@localhost ~]#
请求大页面测试
创建一个3M的页面,并且把并发提升到2000个,连接提升到10000个来测试
[root@localhost ~]# dd if=/dev/zeroof=/var/www/html/test.html bs=1M count=3
[root@localhost ~]# ab -r -c 2000 -n 10000www.test.com/test.html
This is ApacheBench, Version 2.3 <$Revision:1430300 $>
Copyright 1996 Adam Twiss, Zeus Technology Ltd,http://www.zeustech.net/
Licensed to The Apache Software Foundation,http://www.apache.org/

Benchmarking www.test.com (be patient)
Completed 1000 requests
Completed 2000 requests
Completed 3000 requests
Completed 4000 requests
Completed 5000 requests
Completed 6000 requests
Completed 7000 requests
Completed 8000 requests
Completed 9000 requests
Completed 10000 requests
Finished 10000 requests


Server Software:        Apache/2.4.6
Server Hostname:        www.test.com
Server Port:            80

Document Path:          /test.html
Document Length:        207 bytes

Concurrency Level:      2000
Time taken for tests:   39.051 seconds
Complete requests:      10000
Failed requests:        243
   (Connect:0, Receive: 0, Length: 243, Exceptions: 0)
Write errors:           0
Non-2xx responses:      9757
Total transferred:      3775959 bytes
HTML transferred:       2019699 bytes
Requests per second:    256.08 [#/sec] (mean)
Time per request:       7810.210 [ms] (mean)
Time per request:       3.905 [ms] (mean, across all concurrentrequests)
Transfer rate:          94.43 [Kbytes/sec] received

Connection Times (ms)
             min  mean[+/-sd] median   max
Connect:       0 1075 1334.5   1007    7254
Processing:   11 1436 5012.6    159   32903
Waiting:      11  831 3368.7    147  30212
Total:        95 2511 5143.9   1160   33447

Percentage of the requests served within a certaintime (ms)
  50%   1160
  66%   1461
  75%   2104
  80%   3149
  90%   3839
  95%   7905
  98%  27144
  99%  28082
 100%  33447 (longest request)
本文出自 “梅花香自苦寒来” 博客,请务必保留此出处http://ximenfeibing.blog.51cto.com/8809812/1660572
http2.2常用配置(虚拟主机,访问控制,压缩,缓存,压力测试)
原文地址:http://ximenfeibing.blog.51cto.com/8809812/1660572