标签:
上一次的文章,我们讲解了如何用JAVA访问MySql数据库,对数据进行增加删除修改查询。那么这次我们把具体的页面的数据库操作结合在一起,进行一次简单的学生信息操作案例。
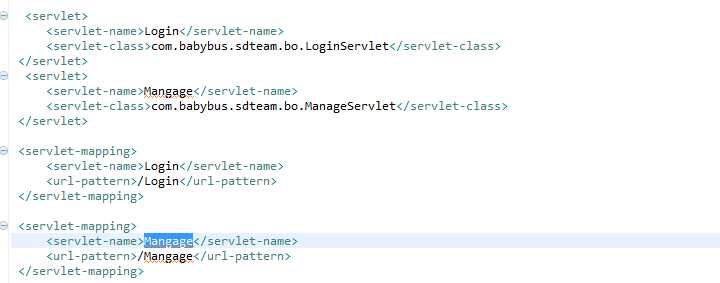
首先我们创建一个专门用于学生管理的ManageServlet。

接着我们需要一个展现数据的页面,也就是 UserList.jsp
<%@page import="com.babybus.sdteam.vo.Student"%>
<%@ page language="java" import="java.util.*" pageEncoding="GB18030"%>
<%
  String path = request.getContextPath();
  String basePath = request.getScheme()+"://"+request.getServerName()+":"+request.getServerPort()+path+"/";
%>
<!DOCTYPE HTML PUBLIC "-//W3C//DTD HTML 4.01 Transitional//EN">
<html>
  <head>
    <base href="<%=basePath%>">
    <title>学生信息管理</title>
	<meta http-equiv="pragma" content="no-cache">
	<meta http-equiv="cache-control" content="no-cache">
	<meta http-equiv="expires" content="0">
	<meta http-equiv="keywords" content="keyword1,keyword2,keyword3">
	<meta http-equiv="description" content="This is my page">
	<link rel="stylesheet" type="text/css" href="styles.css">
  </head>
<body>
 <%=basePath %>
 <table border="1" width="100%" >
 <tr><th>uid</th><th>学生姓名</th><th>年龄</th><th>班级</th><th>操作</th></tr>
 <%
 // 获取学生列表数据
 List<Student> lsUser=(List)request.getAttribute("students");
 if(lsUser==null||lsUser.size()==0){
   pageContext.setAttribute("theUser","1");
 }else{
    // 遍历列表生成表格数据
   for(int i=0;i<lsUser.size();i++){
     pageContext.setAttribute("theUser",lsUser.get(i));
 %>
 <tr>
 <td>${theUser.id} </td><td>${theUser.studentname} </td><td>${theUser.age} </td><td>${theUser.classname} </td>
 <td><a href="AddUser.jsp?id=${theUser.id}">修改<a/>|
 <a href="Mangage?method=del&userid=${theUser.id}" onclick="return confirm(‘确定要删除么?‘)" }>删除</a></td>
 </tr>
 <%
   }
 }
 %>
 </table>
               <a href="AddUser.jsp">增加<a/>
  </body>
</html>
接下来我们需要一个进行增加修改的页面AddUser.jsp
<%@page import="com.babybus.sdteam.bo.ManageServlet"%>
<%@page import="com.babybus.sdteam.vo.Student"%>
<%@page import="com.babybus.sdteam.bo.LoginServlet"%>
<%@ page language="java" import="java.util.*" pageEncoding="UTF-8"%>
<%
	String path = request.getContextPath();
	String basePath = request.getScheme()+"://"+request.getServerName()+":"+request.getServerPort()+path+"/";
	response.setContentType("text/html;charset=UTF-8");
	request.setCharacterEncoding("UTF-8");
%>

<!DOCTYPE HTML PUBLIC "-//W3C//DTD HTML 4.01 Transitional//EN">
<html>
  <head>
    <base href="<%=basePath%>">

    <title>My JSP ‘AddUser.jsp‘ starting page</title>

	<meta http-equiv="pragma" content="no-cache">
	<meta http-equiv="cache-control" content="no-cache">
	<meta http-equiv="expires" content="0">
	<meta http-equiv="keywords" content="keyword1,keyword2,keyword3">
	<meta http-equiv="description" content="学生信息管理">
	<link rel="stylesheet" type="text/css" href="styles.css">
  </head>
  <body>


<%
   String id= request.getParameter("id");
   if(id!=null){
   	    ManageServlet loginServlet =new ManageServlet();
   	    Student student = loginServlet.getStudentById(id);
   	    pageContext.setAttribute("theUser",student);
   	    pageContext.setAttribute("method","update");
   	    pageContext.setAttribute("title","修改");
	}
	else{
		pageContext.setAttribute("method","add");
		pageContext.setAttribute("title","添加");
	}
%>
<form action="Mangage?method=${method}" method="post" >
<input type="hidden" name="userid" value="${theUser.id}">
<table width="100%" height="200px" border="1">
<tr>
<td colspan="2">${title}</td>
</tr>
<tr>
<td align="right">学生名</td>
<td> <input type="text" name="studentname" value="${theUser.studentname}"></td></tr>
<tr>
<td align="right">年龄:</td>
<td> <input type="text" name="age" value="${theUser.age}"></td></tr>
<td align="right">班级:</td>
<td> <input type="text" name="classname" value="${theUser.classname}"></td></tr>
<tr>
<td colspan=‘2‘ align="center"><input type="submit" value="保存" name="btnSubmit">   <input type="reset" value="重置" name="btnCancel"></td>
</tr>
</table>
</form></body>
</html>
有了页面支撑,我们需要后台的Servlet进行数据处理转发
/**
* 业务处理
* @param req
* @param rep
* @throws IOException
* @throws ServletException
*/
public void process(HttpServletRequest req,HttpServletResponse rep) throws ServletException, IOException
{
  String method = req.getParameter("method");
  System.out.println("操作:" + method);
  Student student = new Student();
  if(!"del".equals(method))
  {
    // 进行编码转换,避免中文乱码
    String studentname = new String(req.getParameter("studentname").getBytes("ISO-8859-1"),"utf-8");
    int            age = Integer.parseInt(req.getParameter("age"));
    String   classname = new String(req.getParameter("classname").getBytes("ISO-8859-1"),"utf-8");
    student.setStudentname(studentname);
    student.setAge(age);
    student.setClassname(classname);
  }

  StudentDao dao = new StudentDao();
  // 修改
  if("update".equals(method))
  {
    String id = req.getParameter("userid");
    student.setId(Integer.parseInt(id));
    try {
      dao.updateStudent(student);
    } catch (SQLException e) {
      e.printStackTrace();
    }
  }
  // 增加
  else if("add".equals(method))
  {
    try {
    dao.insertStudent(student);
    } catch (SQLException e) {
      e.printStackTrace();
    }
  }
  // 删除
  else if("del".equals(method))
  {
    try {
      String id = req.getParameter("userid");
      dao.deleteStudent(Integer.parseInt(id));
    } catch (SQLException e) {
      e.printStackTrace();
    }
  }
  ManageServlet manageservlet = new ManageServlet();
  // 获取全部列表
  List<Student> resultlist = manageservlet.getStudentByCondition(null);
  req.setAttribute("students", resultlist);
  RequestDispatcher dispatcher = req.getRequestDispatcher("UserList.jsp");
  dispatcher.forward(req, rep);
}
上面就是全部的增加删除修改的代码。下面给出两个页面的截图效果


通过上面的例子我们就可以很好的掌握了J2EE的入门
结语

本站文章为 宝宝巴士 SD.Team 原创,转载务必在明显处注明:(作者官方网站: 宝宝巴士 )
转载自【宝宝巴士SuperDo团队】 原文链接: http://www.cnblogs.com/superdo/p/4579275.html
[JavaWeb基础] 004.用JSP + SERVLET 进行简单的增加删除修改
标签:
原文地址:http://www.cnblogs.com/superdo/p/4579275.html