标签:des style blog http java color
这一篇我们将学习一个新的控件Navigation Controller,很多时候Navigation Controller是和Table View紧密结合在一起的,因此在学习Navigation Controller的同时,我们还将继续学习Table View其他一些特性,毕竟Navigation Controller还是相对来说毕竟简单的,没有什么太大的花头,它的主要作用就是一个view的切换,切来切去,而Table View的花头就比较多了,这次我们将这2个控件结合在一起进行学习。
再多说一些关于Navigation Controller,Navigation Controller相信大家都见到过,打开你的iphone,在设置(Settings)里,选择通用(General),最最上面的就是Navigation Controller,它的左边是一个按钮(称之为Navigation Button),点击按钮切换到前一个view,中间有一个title,显示当前view的title,Navigation Controller的下面就是一个Table View。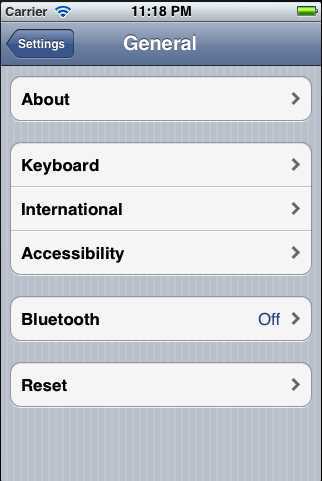
Navigation Controller对view的切换是有前后顺序的,即从哪个view切换过来,然后切换回去的时候还是这个view,他们之间的顺序是不变的,你可以理解Navigation Controller就像一个栈(Stack)先进后出,对比与之前在第11篇中学习的Tab Bar,Tab Bar也是用来控制view之间的切换的,但是它是任意切换,各个view之间没有前后关系。Navigation Controller的view的组织结构也和Tab Bar是很相似的,它也有一个根view(root view)用来控制其他的views,好了,下面开始我们这次的学习内容。
1)创建一个工程,选择Empty Application,将工程名命名为“Nav”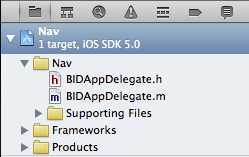
2)创建Top-Level View Controller(root view controller)
选中Project navigator中的Nav文件夹,单击鼠标右键,选择“New File...”,或者使用快捷键command+N,或者使用菜单栏File>New>New File...,在弹出的窗口中,左边选择Cocoa Touch,右边选择Objective-C class,点击Next按钮,在下一个窗口中将class命名为BIDFirstLevelController,Subclass of命名为UITableViewController
点击Next按钮,完成创建。
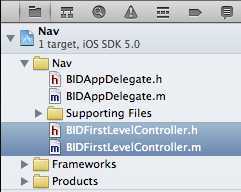
BIDFirstLevelController是一个root view controller,用来控制其他的view,也是程序启动时,第一个载入的view。
下面打开BIDAppDelegate.h,添加如下代码
#import <UIKit/UIKit.h>

@interface BIDAppDelegate : UIResponder <UIApplicationDelegate>

@property (strong, nonatomic) UIWindow *window;
@property (strong, nonatomic) UINavigationController *navController;

@end
我们添加了一个UINavigationController的对象,接着打开BIDAppDelegate.m,添加如下code
#import "BIDAppDelegate.h"
#import "BIDFirstLevelController.h"

@implementation BIDAppDelegate

@synthesize window = _window;
@synthesize navController;

- (BOOL)application:(UIApplication *)application didFinishLaunchingWithOptions:(NSDictionary *)launchOptions
{
    self.window = [[UIWindow alloc] initWithFrame:[[UIScreen mainScreen] bounds]];
    // Override point for customization after application launch.

    BIDFirstLevelController *first = [[BIDFirstLevelController alloc] initWithStyle:UITableViewStylePlain];
    self.navController = [[UINavigationController alloc] initWithRootViewController:first];
    [self.window addSubview:navController.view];

    self.window.backgroundColor = [UIColor whiteColor];
    [self.window makeKeyAndVisible];
    return YES;
}
这里主要解释application:didFinishLauchingWithOptions方法中新添加的3行代码:
BIDFirstLevelController *first = [[BIDFirstLevelController alloc] initWithStyle:UITableViewStylePlain];
创建一个BIDFirstLevelController的对象,BIDFirstLevelController继承自UITableViewController,因此它可以使用UITableViewController中的方法,包括声明时用到的initWithStyle:UITableViewStylePlain(UITableViewStylePlain之前的章节讲到过,table view的2中表现形式plain和grouped)
self.navController = [[UINavigationController alloc] initWithRootViewController:first];
接着,创建UINavigationController的对象,使用的初始化的方式是initWithRootViewController,然后参数是first。这个初始化的意思是当载入程序时,在navigator下显示的第一个view(root view)是什么(navigator总是需要一个view和它配合着一起工作,否则孤零零的一个navigator在那边,下面什么都没有,就没有意义了),这里指定的root view是BIDFirstLevelController的对象。
[self.window addSubview:navController.view];
将navController的view添加到window中用于程序启动时显示(之前的文章应该讲到过,iphone有且只有一个window,我个人觉得可以认为就是iphone的屏幕,且只有一个,然后一个程序运行时需要显示,这时候必须告诉iphone的window那个view是第一个显示的,第一个显示的view也叫root view),在这里就是告诉iphone的window,第一个显示的view是navController的view。
简单的总结一下上面3句话的含义,就是程序启动后在iphone的window中首先显示navController的view,然后在navController的view中显示BIDFirstLevelController。Navigator Controller的view有2部分组成,最上面的navigator bar和下面的内容view(在这个例子中,下面的内容view我们指定为BIDFirstLevelController)
至此,我们整个的程序结构已经搭建完毕了,接下来需要做的就是实现BIDFirstLevelController中的内容,然后添加其他的table view用于view的切换,但是这些操作都是基于这个结构的,理解了上面的内容,下面的内容学习起来就会游刃有余了。
我们编译运行一下code,看看效果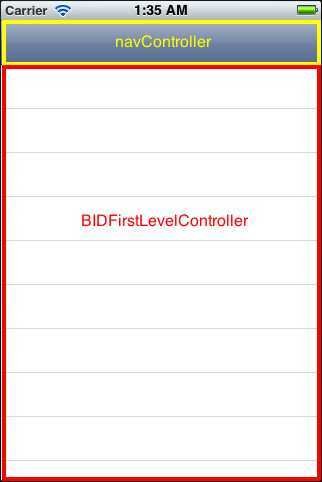
发现除了最上面的navController和下面的BIDFirstLevelController,其他什么都没有,但是你要知道这些东西是怎么来的,他们之间的关系是什么就可以了。
3)实现BIDSecondLevelViewController
我们新添加一个类,叫做BIDSecondLevelViewController,这个类继承自UITableViewController,是所有subtableview的基类。
选中Project navigator中的Nav文件夹,单击鼠标右键,选择“New File...”,在弹出的窗口中,左边选择Cocoa Touch,右边选择Objective-C class,点击Next按钮,在下一个窗口中将class命名为BIDSecondLevelViewController,Subclass of命名为UITableViewController,点击Next按钮,完成创建。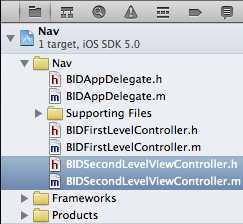
打开BIDSecondLevelViewController.h,添加如下代码
#import <UIKit/UIKit.h>

@interface BIDSecondLevelViewController : UITableViewController

@property (strong, nonatomic) UIImage *rowImage;

@end
打开BIDSecondLevelViewController.m
#import "BIDSecondLevelViewController.h"

@implementation BIDSecondLevelViewController

@synthesize rowImage;

@end
我们仅仅在代码中添加了一个UIImage,这样,当所有的subtableview继承BIDSecondLevelViewController后,他们也就有了UIImage属性,而不必每个subtableview定义各自的UIImage了。
4)实现BIDFirstLevelController
打开BIDFirstLevelController.h,添加如下代码
#import <UIKit/UIKit.h>

@interface BIDFirstLevelController : UITableViewController

@property (strong, nonatomic) NSArray *controllers;

@end
这里仅仅添加了一个NSArray,它将保存所有的子table view
BIDFirstLevelController.m,添加如下代码
#import "BIDFirstLevelController.h"
#import "BIDSecondLevelViewController.h"

@implementation BIDFirstLevelController
@synthesize controllers;

- (void)viewDidLoad {
    [super viewDidLoad];
    self.title = @"First Level";
    NSMutableArray *array = [[NSMutableArray alloc] init];
    self.controllers = array;
}

- (void)viewDidUnload {
    [super viewDidUnload];
    self.controllers = nil;
}

#pragma mark -
#pragma mark Table Data Source Methods
- (NSInteger)tableView:(UITableView *)tableView numberOfRowsInSection:(NSInteger)section {
    return [self.controllers count];
}

- (UITableViewCell *)tableView:(UITableView *)tableView cellForRowAtIndexPath:(NSIndexPath *)indexPath {
    static NSString *FirstLevelCell = @"FirstLevelCell";
    UITableViewCell *cell = [tableView dequeueReusableCellWithIdentifier:FirstLevelCell];

    if(cell == nil) {
        cell = [[UITableViewCell alloc]
                initWithStyle:UITableViewCellStyleDefault
                reuseIdentifier:FirstLevelCell];
    }

    //configure the cell
    NSUInteger row = [indexPath row];
    BIDSecondLevelViewController *controller = [controllers objectAtIndex:row];
    cell.textLabel.text = controller.title;
    cell.imageView.image = controller.rowImage;
    cell.accessoryType = UITableViewCellAccessoryDisclosureIndicator;
    return cell;
}

#pragma mark -
#pragma mark Table View Delegate Methods
- (void)tableView:(UITableView *)tableView didSelectRowAtIndexPath:(NSIndexPath *)indexPath {
    NSUInteger row = [indexPath row];
    BIDSecondLevelViewController *nextController = [self.controllers objectAtIndex:row];
    [self.navigationController pushViewController:nextController animated:YES];
}

@end
首先引入BIDSecondLevelViewController的头文件,这样BIDFirstLevelController就可以对它的对象进行操作(可以对rowImage进行操作)。
viewDidLoad方法:
self.title = @"First Level"; //对title进行赋值,navigator controller会很聪明的知道当前显示的table view的title是什么,并把这个title显示在自己的上面(刚才上面运行的画面,navigator controller上面是空的,什么都没有,这个是因为刚才还没有实现BIDFirstLevelController,现在如果再运行程序,你会发现navigator controller上面会显示“First Level”)。
NSMutableArray *array = [[NSMutableArrayalloc] init]; //声明一个NSMutableArray对象,之后我们将把每一个实现的子table view添加到这个对象中,因此我们这里声明的是mutableArray,我们需要对其进行添加操作(之前有例子我们声明为immutable,我们不需要对其进行添加删除操作)
tableView:numberOfRowsInSection方法就不解释了,作用和之前几篇的例子一样。
tableView:cellForRowAtIndexPath方法的前半部分是和之前的例子是一样的,后半部分,从array中取出一个subtableview(每个subtableview都继承自BIDSecondLevelViewController,因此可以将其类型转换为其基类类型),获取其title和rowImage并赋值给cell的textLabel和imageView,最后定义cell的accessoryType。
tableView:didSelectRowAtIndexPath方法,当我们点击table view的某一行是,会触发这个方法,这里实现的功能是点击后,切换到当前cell对应的subtableview。
NSUInteger row = [indexPath row]; //获取当前点击的是哪一行
BIDSecondLevelViewController *nextController = [self.controllers objectAtIndex:row]; //根据点击的行,获得array中相应的subtableview
[self.navigationController pushViewController:nextController animated:YES]; //将对应subtableview推入栈
还好,上面的实现总的来说还算简单,我们在此编译运行一下程序,效果如下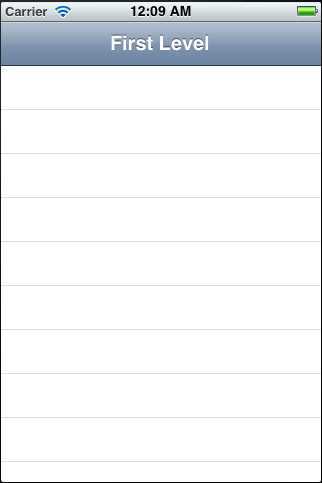
最最主要的变化就是navigator上面显示了当前table view的title“First Level”,其他的变化似乎还不是很大,但是其后面的变化已经很巨大,接下来我们将添加5个subtableview,逐渐完成这个程序。
(先下载这里的图标Nav_Image,解压缩后拖到Project navigator中的Nav文件夹下,直接拖进去就可以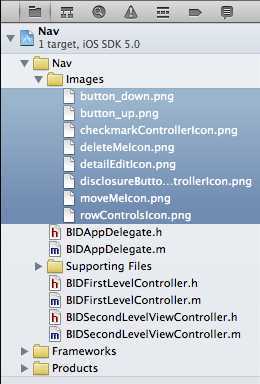 )
)
5)第一个subtableview:The Disclosure Button View
所谓disclosure button,就是指table view中的蓝色圆圈箭头按钮,如下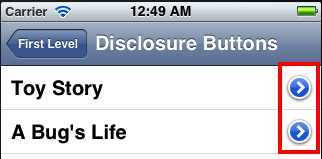
点击这个按钮后,会转向下一个table view。
简单说一下这个例子,首先会在root view中有一个cell与之关联,点击该行cell会转到该table view,然后这个table view中有很多cell,每一个cell都有一个textLabel和一个disclosure button,点击cell(不点击disclosure button)会有一个警告框弹出,点击disclosure button,会转到下一个table view显示详细内容。
好了,现在开始这个例子,首先选中Project navigator中的Nav文件夹,单击鼠标右键,选择“New File...”,在弹出的窗口中,左边选择Cocoa Touch,右边选择Objective-C class,点击Next按钮,在下一个窗口中将class命名为BIDDisclosureButtonController,Subclass of命名为BIDSecondLevelViewController,点击Next按钮,完成创建。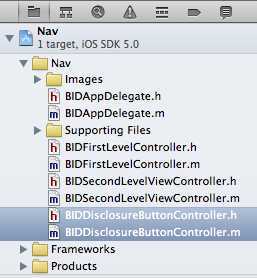
BIDDisclosureButtonController上面会放置很多个cell,每个cell都有一个textLabel和一个disclosure button
再次选中Project navigator中的Nav文件夹,单击鼠标右键,选择“New File...”,在弹出的窗口中,左边选择Cocoa Touch,右边选择Objective-C class,点击Next按钮,在下一个窗口中将class命名为BIDDisclosureDetailController,Subclass of命名为UIViewController,点击Next按钮,完成创建。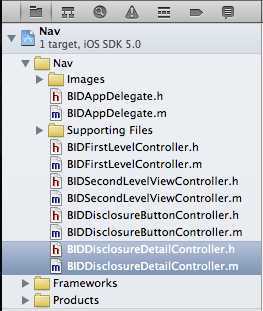
当点击BIDDisclosureButtonController上的disclosure button后,会转到BIDDisclosureDetailController,显示详细内容。
打开BIDDisclosureDetailController.h,添加如下代码
#import <UIKit/UIKit.h>

@interface BIDDisclosureDetailController : UIViewController

@property (strong, nonatomic) IBOutlet UILabel *label;
@property (copy, nonatomic) NSString *message;

@end
我们定义了一个outlet,用来指向UILabel,之后我们会添加一个xib,xib上会拖入一个Label控件,这个outlet就是指向xib上的Label控件的。我们还定义了一个NSString用于保存字符串,这个字符串会显示在label上。
这里有一个问题,为什么还需要另外定义一个message,而不是直接赋值诶label,这个是因为UILabel是xib上的一个控件,当view没有载入的时候,这个UILabel是不存在的,我们没有办法为其赋值,所以我们就暂时保存在一个变量中,然后当xib载入后,再赋值给label,曲线救国嘛,
打开BIDDisclosureDetailController.m,添加如下代码
#import "BIDDisclosureDetailController.h"

@implementation BIDDisclosureDetailController
@synthesize label;
@synthesize message;

- (void)viewWillAppear:(BOOL)animated {
    label.text = message;
    [super viewWillAppear:animated];
}

- (void)viewDidUnload {
    self.label = nil;
    self.message = nil;
    [super viewDidUnload];
}

@end
注意,我们这里使用了viewWillAppear,而不是通常使用的viewDidLoad,viewDidLoad只有在第一次载入view的时候才会被调用到,如果这个view被反复的载入,那么之后的载入过程,viewDidLoad将不会被调用,而viewWillAppear则不用,每次view的载入,这个方法都会被调用到,在这里例子中,我们将多次载入xib,而且每次xib显示的内容会根据之前一个table view中cell的不同而不同,因此每次都需要更新内容,所以在这种情况下,使用viewWillAppear是比较恰当的选择。
选中Project navigator中的Nav文件夹,单击鼠标右键,选择“New File...”,在弹出的窗口中,左边选择User Interface,右边选择View,点击Next按钮,Device Family选择iphone,点击Next按钮,命名为BIDDisclosureDetail.xib,点击Create按钮,完成创建。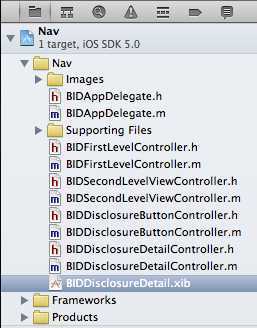
选择Project navigator中的BIDDisclosureDetail.xib,然后点击File‘s Owner,打开Identity inspcetor,将Class指定为BIDDisclosureDetailController
然后control-drag File‘s Owner到Objects中的View上,在弹出的框中选择view,完成关联。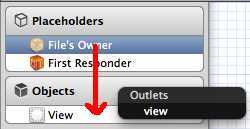
从Library中拖一个UILabel放在view的正中间,然后拉伸UILabel的宽度到左右两边,将label的文字对其方式设置为居中,然后control-drag File‘s Owner到label,在弹出的框中选择label,完成关联。
打开BIDDisclosureButtonController.h,添加如下代码
#import "BIDSecondLevelViewController.h"

@interface BIDDisclosureButtonController : BIDSecondLevelViewController
@property (strong, nonatomic) NSArray *list;
@end
代码中仅仅定义了一个NSArray,用于保存在table view中的每一行的内容
打开BIDDisclosureButtonController.m,添加如下代码
#import "BIDDisclosureButtonController.h"
#import "BIDAppDelegate.h"
#import "BIDDisclosureDetailController.h"

@interface BIDDisclosureButtonController()
@property (strong, nonatomic) BIDDisclosureDetailController *childController;
@end

@implementation BIDDisclosureButtonController

@synthesize list;
@synthesize childController;

- (void)viewDidLoad {
    [super viewDidLoad];
    NSArray *array = [[NSArray alloc] initWithObjects:@"Toy Story",
                                       @"A Bug‘s Life", @"Toy Story 2", @"Monsters, Inc.",
                                       @"Finding Nemo", @"The Incredibles", @"Cars",
                                       @"Ratatouille", @"WALL-E", @"Up", @"Toy Story 3",
                                       @"Cars 2", @"Brave", nil];
    self.list = array;
}

- (void)viewDidUnload {
    [super viewDidUnload];
    self.list = nil;
    self.childController = nil;
}

#pragma mark -
#pragma mark Table Data Source Methods
- (NSInteger)tableView:(UITableView *)tableView numberOfRowsInSection:(NSInteger)section {
    return [list count];
}

- (UITableViewCell *)tableView:(UITableView *)tableView cellForRowAtIndexPath:(NSIndexPath *)indexPath {
    static NSString *DisclosureButtonCellIdentifier = @"DisclosureButtonCellIdentifier";

    UITableViewCell *cell = [tableView dequeueReusableCellWithIdentifier:DisclosureButtonCellIdentifier];

    if (cell == nil) {
        cell = [[UITableViewCell alloc]
                initWithStyle:UITableViewCellStyleDefault
                reuseIdentifier:DisclosureButtonCellIdentifier];
    }

    NSUInteger row = [indexPath row];
    NSString *rowString = [list objectAtIndex:row];
    cell.textLabel.text = rowString;
    cell.accessoryType = UITableViewCellAccessoryDetailDisclosureButton;
    return cell;
}

#pragma mark -
#pragma makr Table Delegate Methods
- (void)tableView:(UITableView *)tableView didSelectRowAtIndexPath:(NSIndexPath *)indexPath {
    UIAlertView *alert = [[UIAlertView alloc] initWithTitle:@"Hey, do you see the disclosure button?"
                                                    message:@"If you‘re trying to drill down, touch that instead"
                                                   delegate:nil
                                          cancelButtonTitle:@"Won‘t happen again"
                                          otherButtonTitles:nil];
    [alert show];
}

- (void)tableView:(UITableView *)tableView accessoryButtonTappedForRowWithIndexPath:(NSIndexPath *)indexPath {
    if (childController == nil) {
        childController = [[BIDDisclosureDetailController alloc] initWithNibName:@"BIDDisclosureDetail" bundle:nil];
    }
    childController.title = @"Disclosure Button Pressed";
    NSUInteger row = [indexPath row];
    NSString *selectdMovie = [list objectAtIndex:row];
    NSString *detailMessage = [[NSString alloc] initWithFormat:@"You pressed the disclosure button for %@.",selectdMovie];
    childController.message = detailMessage;
    childController.title = selectdMovie;
    [self.navigationController pushViewController:childController animated:YES];
}

@end
代码的开头有一个很少见的@interface,这是Objective-C的一种语法现象,用于对类的扩展,称之为class extension,意思是就某些情况下,单独的对一个已存在的类进行扩展(这里是添加了一个BIDDisclosureDetailController对象),而这个扩展只对当前类有用,其他地方调用相同的类,里面不会有扩展的内容。(好吧,其实我也对Objective-C不是很熟悉,要详细了解Objective-C大家还是找一本书看看比较好)
viewDidLoad中,创建了一个字符串数组,里面保存了table view中显示的cell的内容。
tableview:numberOfRowsInSection和tableView:cellForRowAtIndexPath都是很常见的实现,和之前例子中的一样。
tableView:didSelectRowAtIndexPath方法,当点击tableview的row时,会调用该方法。
tableView:accessoryButtonTappedForRowWithIndexPath方法,当点击row右边的disclosure button时,会调用该方法。在该方法中,首先判断childController是否被创建过,如果没有,就根据xib文件名创建一个,之后的代码应该都可以读懂是什么意思。
最后一步,修改BIDFirstLevelController,将BIDDisclosureButtonController添加进去,打开BIDFirstLevelController.m,添加如下代码
#import "BIDFirstLevelController.h"
#import "BIDSecondLevelViewController.h"
#import "BIDDisclosureButtonController.h"

......

- (void)viewDidLoad {
    [super viewDidLoad];
    self.title = @"First Level";
    NSMutableArray *array = [[NSMutableArray alloc] init];

    // Disclosure Button
    BIDDisclosureButtonController *disclosureButtonController = [[BIDDisclosureButtonController alloc] initWithStyle:UITableViewStylePlain];
    disclosureButtonController.title = @"Disclosure Buttons";
    disclosureButtonController.rowImage = [UIImage imageNamed:@"disclosureButtonControllerIcon.png"];
    [array addObject:disclosureButtonController];

    self.controllers = array;
}
首先引入BIDDisclosureButtonController.h头文件,然后在viewDidLoad方法中,创建一个BIDDisclosureButtonController对象,设置title和image,最后把它加入到array中,ok,我们第一个table view的操作到底结束,下面编译运行一下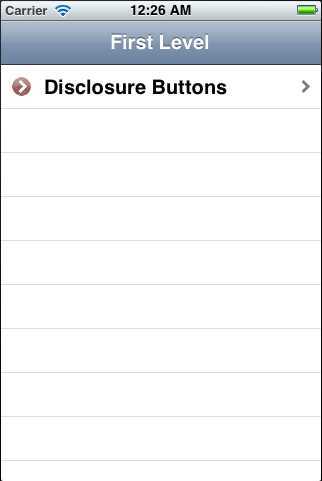
程序运行后的第一个画面,多了一行cell,cell的最左边是我们添加的rowImage,然后是下一个table view的title,最右边是一个向右的箭头,点击第一个的cell,我们就进入到与之对应的下一个table view:BIDDisclosureButtonController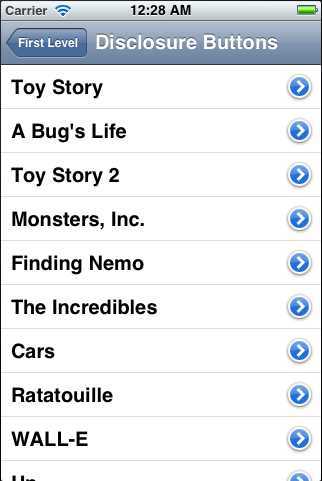
在navigator中显示了当前table view的title(整个title是在BIDFirstLevelController的viewDidLoad中设定的),navigator左边的按钮上显示了上一层table view的title,表示点击这个按钮可以返回到哪一个table view。点击table view中任意一个cell(不要点最右边的圆圈箭头按钮,否则会切换到再下一层的table view),一个警告框弹出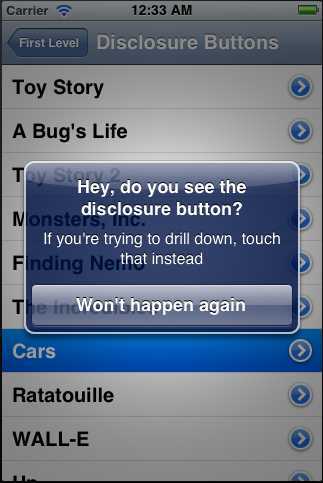
这个就是调用了tableView:didSelectRowAtIndexPath方法,点击最右边的圆圈箭头按钮,转到再下一层的table view(BIDDisclosureDetailController)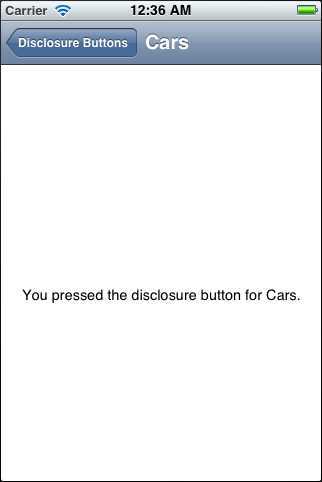
上面显示了这个detail view的内容
好了,整个的程序就是这样,有点小小的复杂,不过如果你弄懂了其中的关系,实现起来还是不难的,不过需要很仔细。
6)第二个subtableview:The Checklist
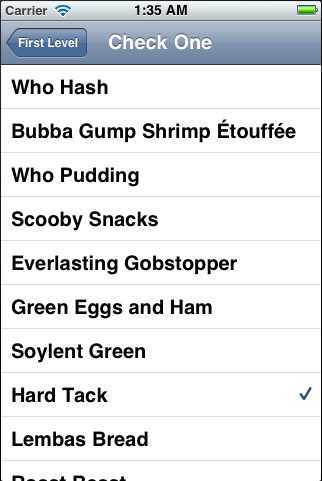
这个例子相对简单一些,就是点击table view中的cell,然后cell的右边会出现一个对勾,表示选中的状态,当选择另一行的cell时,这个对勾会出现在这一个cell上,而之前的对勾会消失。
好了,开始工作,选中Project navigator中的Nav文件夹,单击鼠标右键,选择“New File...”,在弹出的窗口中,左边选择Cocoa Touch,右边选择Objective-C class,点击Next按钮,在下一个窗口中将class命名为BIDCheckListController,Subclass of命名为BIDSecondLevelViewController,点击Next按钮,完成创建。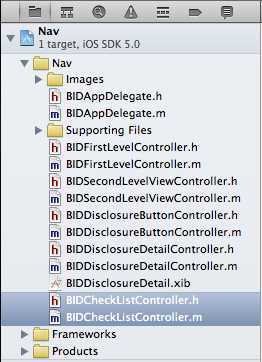
打开BIDCheckListController.h,添加如下代码
#import "BIDSecondLevelViewController.h"

@interface BIDCheckListController : BIDSecondLevelViewController

@property (strong, nonatomic) NSArray *list;
@property (strong, nonatomic) NSIndexPath *lastIndexPath;

@end
NSArray用于保存cells的内容,由于我们只允许一行cell被选中,因此我们需要记录上一次选中的是哪行cell,当选择新的一行cell时,把上一次选中的cell的对勾去掉,创建一个NSIndexPath变量,用来保存最后一次选中的cell。
打开BIDCheckListController.m,添加如下代码
#import "BIDCheckListController.h"

@implementation BIDCheckListController
@synthesize list;
@synthesize lastIndexPath;

- (void)viewDidLoad {
    [super viewDidLoad];
    NSArray *array = [[NSArray alloc] initWithObjects:@"Who Hash",
                      @"Bubba Gump Shrimp Étouffée", @"Who Pudding", @"Scooby Snacks",
                      @"Everlasting Gobstopper", @"Green Eggs and Ham", @"Soylent Green",
                      @"Hard Tack", @"Lembas Bread", @"Roast Beast", @"Blancmange", nil];
    self.list = array;
}

- (void)viewDidUnload {
    [super viewDidUnload];
    self.list = nil;
    self.lastIndexPath = nil;
}

#pragma mark -
#pragma mark Table Data Source Methods
- (NSInteger)tableView:(UITableView *)tableView numberOfRowsInSection:(NSInteger)section {
    return [list count];
}

- (UITableViewCell *)tableView:(UITableView *)tableView cellForRowAtIndexPath:(NSIndexPath *)indexPath {
    static NSString *CheckMarkCellIdentifier = @"CheckMarkCellIdentifier";

    UITableViewCell *cell = [tableView dequeueReusableCellWithIdentifier:CheckMarkCellIdentifier];

    if (cell == nil) {
        cell = [[UITableViewCell alloc]
                initWithStyle:UITableViewCellStyleDefault
                reuseIdentifier:CheckMarkCellIdentifier];
    }

    NSUInteger row = [indexPath row];
    NSUInteger oldRow = [lastIndexPath row];
    cell.textLabel.text = [list objectAtIndex:row];
    cell.accessoryType = (row == oldRow && lastIndexPath != nil) ? UITableViewCellAccessoryCheckmark : UITableViewCellAccessoryNone;

    return cell;
}

#pragma mark -
#pragma mark Table Delegate Methods
- (void)tableView:(UITableView *)tableView didSelectRowAtIndexPath:(NSIndexPath *)indexPath {
    int newRow = [indexPath row];
    int oldRow = (lastIndexPath != nil) ? [lastIndexPath row] : -1;

    if(newRow != oldRow) {
        UITableViewCell *newCell = [tableView cellForRowAtIndexPath:indexPath];
        newCell.accessoryType = UITableViewCellAccessoryCheckmark;

        UITableViewCell *oldCell = [tableView cellForRowAtIndexPath:lastIndexPath];
        oldCell.accessoryType = UITableViewCellAccessoryNone;
        lastIndexPath = indexPath;
    }
    [tableView deselectRowAtIndexPath:indexPath animated:YES];
}

@end
有几个地方需要解释一下
tableView:cellForRowAtIndexPath方法中:
cell.accessoryType = (row == oldRow && lastIndexPath != nil) ? UITableViewCellAccessoryCheckmark : UITableViewCellAccessoryNone;
看选中的行和之前选中的行是否一样而起lastIndexPath必须存在,这样的话,在新选中的行上显示对勾,UITableViewCellAccessoryCheckmark会在cell上显示对勾(我认为这个判断是在已经选中过cell,然后选中navigator上的返回按钮返回到上一层的view,之后在此进入这个view的时候,做一个这样的判断,看看在view载入的时候,是否需要对某一个cell进行选择)
tableView:didSelectRowAtIndexPath方法,我觉得里面实现的方式还是很直观的,直接读代码应该可以看懂里面的意思。
最后一步,修改BIDFirstLevelController,将BIDCheckListController添加进去,打开BIDFirstLevelController.m,添加如下代码
#import "BIDFirstLevelController.h"
#import "BIDSecondLevelViewController.h"
#import "BIDDisclosureButtonController.h"
#import "BIDCheckListController.h"

@implementation BIDFirstLevelController
@synthesize controllers;

- (void)viewDidLoad {
    [super viewDidLoad];
    self.title = @"First Level";
    NSMutableArray *array = [[NSMutableArray alloc] init];

    // Disclosure Button
    BIDDisclosureButtonController *disclosureButtonController = [[BIDDisclosureButtonController alloc] initWithStyle:UITableViewStylePlain];
    disclosureButtonController.title = @"Disclosure Buttons";
    disclosureButtonController.rowImage = [UIImage imageNamed:@"disclosureButtonControllerIcon.png"];
    [array addObject:disclosureButtonController];

    //Checklist
    BIDCheckListController *checkListController = [[BIDCheckListController alloc] initWithStyle:UITableViewStylePlain];
    checkListController.title = @"Check One";
    checkListController.rowImage = [UIImage imageNamed:@"checkmarkControllerIcon.png"];
    [array addObject:checkListController];

    self.controllers = array;
}
这个就不解释了,和之前的一样,编译运行程序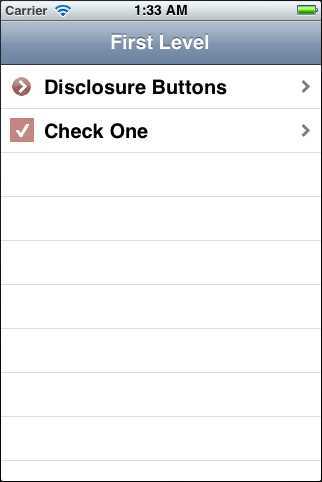
多了一行Check One,选中该行天转到BIDCheckListController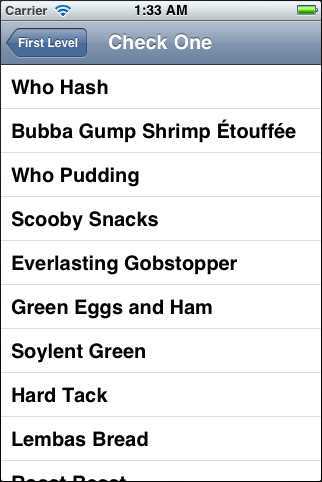
随便选哪一行,会有一个对勾出现,如果选中另一行,对勾会出现在另一行上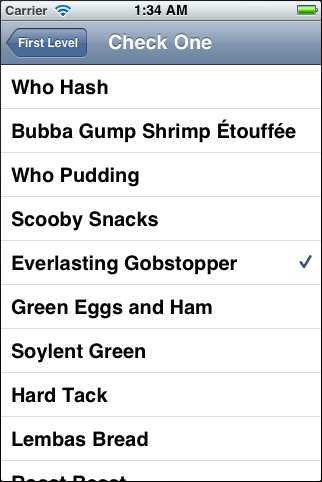
7)未完待续
这篇就暂时到这里,我们还将添加其他3个subtableview,会在下一篇中进行介绍,谢谢!
从零开始学ios开发(十四):Navigation Controllers and Table Views(上),布布扣,bubuko.com
从零开始学ios开发(十四):Navigation Controllers and Table Views(上)
标签:des style blog http java color
原文地址:http://www.cnblogs.com/lovewx/p/3816906.html