标签:
做了个类似美团app的一个效果
当一个浮动layout的滑动到顶部时,这个浮动layout就悬停下来,当屏幕往下滑动时,浮动layout也跟着往下移动。
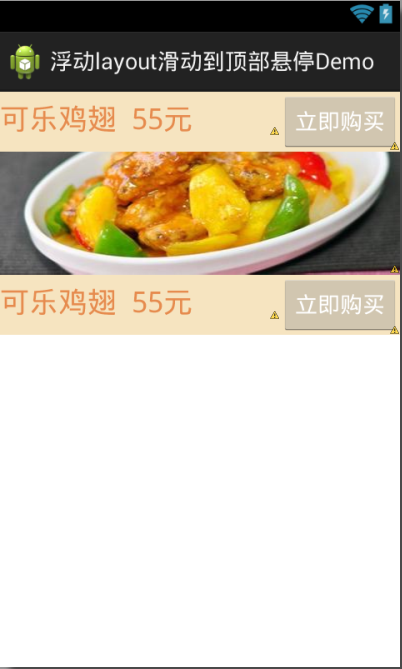
因此,我特意也写了一个:浮动layuot滑动到顶部悬停demo,下图:(妈蛋上传图片不能超过200k,只能把图片阉割成这样,凑合着看吧)

原理
好,看完效果图之后,我们来看一下这个效果的设计原理。
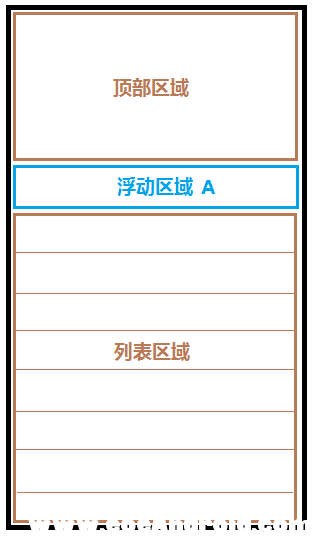
首先,我们来看一张整体的设计图:


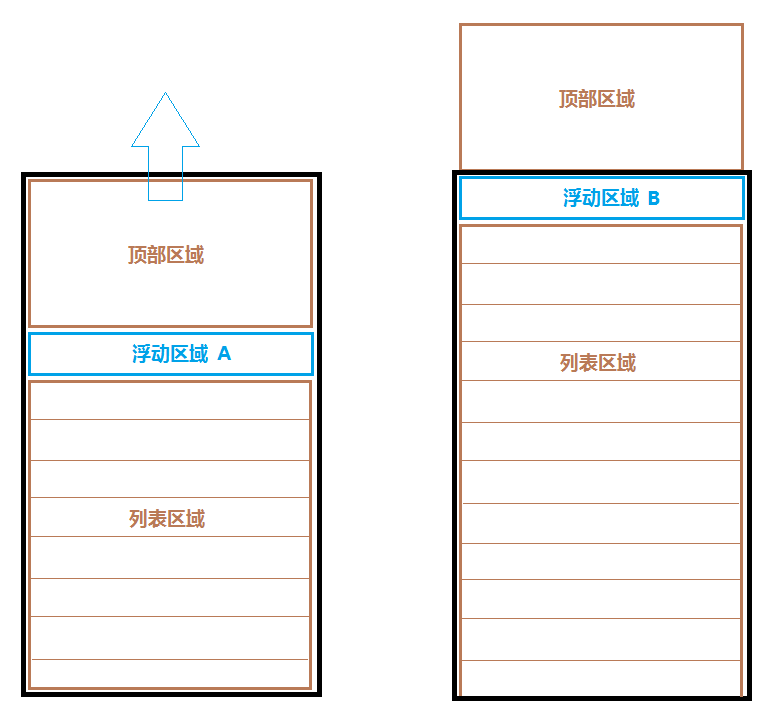
设计效果图是分为三个部分:顶部区域、浮动区域A、列表区域。
1.当屏幕往上面滑动的时候,互动区域A也跟着滑动;
2.当浮动区域A滑动到顶部的时候,浮动区域A停留在顶部(上右图);
3.当屏幕往下滑动的时候,浮动区域A也跟着往下滑动。
这是整个滑动的效果流程。
那么,这时问题来了。怎么能让浮动区域A停在顶部,而且不影响其他内容的滑动呢?
在这里我们可以写多一个和浮动区域A界面效果一模一样的浮动区域B。在布局的时候,先把浮动区域B的可见性设置为gone,即隐藏起来。当浮动区域A滑动到顶部的时候,就把浮动区域B的可见性设置为VISIBLE,即可见。这时浮动区域B会覆盖在整个屏幕的上面,即使整个屏幕在滑动的时候也不会影响浮动区域B的位置,那么看起来就好像浮动区域A是停留在顶部位置不动了,见下图。

(此时,设置浮动区域B的可见性为VISIBLE,即可见)
同理,当整个屏幕往下滑动的时候,再把浮动区域B的可见性设置为GONE,那么看起来的效果就好像浮动区域A又重新滑动起来了。
这个原理大家应该可以理解吧!
实现过程
说完原理之后,让我们来看看在代码里面是怎么实现这个过程的。
我们先看看布局文件activity_main.xml
<RelativeLayout xmlns:android="http://schemas.android.com/apk/res/android"
xmlns:tools="http://schemas.android.com/tools"
android:layout_width="match_parent"
android:layout_height="match_parent"
tools:context=".MainActivity" >
<com.jimstin.topfloatdemo.view.MyScrollView
android:id="@+id/scroll_view"
android:layout_width="match_parent"
android:layout_height="match_parent">
<LinearLayout
android:layout_width="match_parent"
android:layout_height="wrap_content"
android:orientation="vertical">
<ImageView
android:id="@+id/image_view"
android:layout_width="match_parent"
android:layout_height="wrap_content"
android:background="@drawable/pic01"/>
<LinearLayout
android:layout_width="match_parent"
android:layout_height="wrap_content"
android:orientation="horizontal"
android:background="#f6e4c0">
<TextView
android:layout_width="0dp"
android:layout_height="wrap_content"
android:layout_weight="1"
android:textSize="10pt"
android:text="可乐鸡翅 55元"
android:textColor="#e68b4e"/>
<Button
android:layout_width="wrap_content"
android:layout_height="wrap_content"
android:text="立即购买"
android:textColor="#ffffff"/>
</LinearLayout>
<ListView
android:id="@+id/list_view"
android:layout_width="match_parent"
android:layout_height="0dp"
android:layout_weight="1">
</ListView>
</LinearLayout>
</com.jimstin.topfloatdemo.view.MyScrollView>
<LinearLayout
android:id="@+id/flow_llay"
android:layout_width="match_parent"
android:layout_height="wrap_content"
android:orientation="horizontal"
android:background="#f6e4c0"
android:visibility="gone">
<TextView
android:layout_width="0dp"
android:layout_height="wrap_content"
android:layout_weight="1"
android:textSize="10pt"
android:text="可乐鸡翅 55元"
android:textColor="#e68b4e"/>
<Button
android:layout_width="wrap_content"
android:layout_height="wrap_content"
android:text="立即购买"
android:textColor="#ffffff"/>
</LinearLayout>
</RelativeLayout>
布局文件效果

顶部的“可乐鸡翅”就是刚刚所说的浮动区域B,中间的“可乐鸡翅”则是浮动区域A,布局文件应该不难理解。
那么我们怎么知道何时隐藏、显示顶部的浮动layout呢?

由于整体的布局内容都是放在一个自定义的ScrollView里面。所以,只要我们在ScrollView里面判断:
当Scrollview向上滑动的距离大于等于顶部区域的高度时,也就是浮动区域A的顶边贴到屏幕顶部的时候,这是将浮动区域B的可见性设置为VISIBLE即可,否则设置为GONE即可。
这样就实现了我们想要的效果了。
关键代码:
@Override
protected void onScrollChanged(int l, int t, int oldl, int oldt) {
super.onScrollChanged(l, t, oldl, oldt);
if(mTopView != null) {
if(t >= mTopView.getHeight()) {
mFlowView.setVisibility(View.VISIBLE);
} else {
mFlowView.setVisibility(View.GONE);
}
}
}
代码的意思是,当ScrollView向上滚动的高度大于等于mTopView顶部区域的高度时,那么就将mFlowView浮动layout的可见性设置为VISIBLE,否则设置为GONE。
那么这个判读是在哪里的呢?
其实这个方法是在自定义的ScrollView里面的,可能这里就有人疑问,为什么要自定义ScrollView?因为onScrollChange方法是一个protected的方法,直接使用ScrollView是使用不了该方法的。
好的,今天的分享就到此为止!
如果大家喜欢就请多多支持我博客的文章,我会尽量抽时间来分享干货!!嫩们的支持是仁家的动力!!!
这是在我的博客点击率最高的两篇文章,看来大家还是对赚钱感兴趣啊,有需要的朋友可以去看看,不用谢,我是雷锋,嘻嘻!!!
标签:
原文地址:http://my.oschina.net/u/2352823/blog/467424