标签:
Pist转模型详细介绍
关于Plist转模型在iOS开发中是非常常见的,每开一一个项目或者实现一个功能都要用到它,所以今天就给大家讲讲Plist怎么转成模型数据,
前提:必须有一个Plist文件或者通过一定的方式返回的plist数据
一:直接加载Plist数据

1 //定义一个数组属性 2 @property (nonatomic, assign) NSArray *apps;
获取Plist文件
1 //懒加载plist文件,返回一个apps数据,后面直接使用旧可以
2 -(NSArray *)apps
3 {
4     if (_apps == nil) {
5         _apps = [NSArray arrayWithContentsOfFile:[[NSBundle mainBundle] pathForResource:@"iCocos.plist" ofType:nil]];
6     }
7     return _apps;
8 }
加载Plsit中的数据
 1         //取出数组中对应的数据放到一个字典里面
 2         NSDictionary *dic = self.apps[i];
 3
 4
 5         //创建一个UIImageView
 6         UIImageView *icon = [[UIImageView alloc] initWithFrame:CGRectMake(0, 0, iW, 50)];
 7         /**
 8          取出字典中的icon
 9         */
10          icon.image = [UIImage imageNamed:dic[@"icon"]];
11
12         [view addSubview:icon];
13
14
15
16         //创建一个Label
17         UILabel *l = [[UILabel alloc] initWithFrame:CGRectMake(0, CGRectGetMaxY(icon.frame), iW, 20)];
18         /**
19          取出字典中的label
20          */
21         l.text = dic[@"label"];
22
23         [view addSubview:l];
24
25
26
27         //创建一个按钮
28         UIButton *btn = [[UIButton alloc] initWithFrame:CGRectMake(0, CGRectGetMaxY(l.frame), iW, 20)];
29         /**
30          取出字典中的btn
31          */
32         [btn setTitle:dic[@"btn"] forState:UIControlStateNormal];
33
34         [view addSubview:btn];
二:使用简单的模型加载Plist数据

1 //定义一个数组属性 2 @property (nonatomic, assign) NSArray *apps;
在模型中定义模型对应的属性
1 @property (nonatomic, copy) NSString *icon;
2
3
4 @property (nonatomic, copy) NSString *label;
5
6
7 @property (nonatomic, copy) NSString *btn;
模型方法
1 /**
2  模型数据方法
3  */
4 + (instancetype)messageWithDict:(NSDictionary *)dict;
5
6
7 - (instancetype)initWithDict:(NSDictionary *)dict;
模型的实现文件
 1 /**
 2  模型数据方法的实现
 3  */
 4
 5 + (instancetype)messageWithDict:(NSDictionary *)dict
 6 {
 7     return [[self alloc] initWithDict:dict];
 8 }
 9
10 - (instancetype)initWithDict:(NSDictionary *)dict
11 {
12     if (self = [super init]) {
13         [self setValuesForKeysWithDictionary:dict];
14     }
15     return self;
16 }
实用模型加载Plist文件
 1 /**
 2  模型数据的加载,返回arry以后我们就只要使用array就能使用这个模型类里面的数据也就是使用plist数据
 3  */
 4 //懒加载plist文件,返回一个apps数据,后面直接使用旧可以
 5 -(NSMutableArray *)apps
 6 {
 7     if (_apps == nil) {
 8         NSArray *array = [NSArray arrayWithContentsOfFile:[[NSBundle mainBundle] pathForResource:@"iCocos.plist" ofType:nil]];
 9
10         NSMutableArray *arrayApps = [NSMutableArray array];
11
12         for (NSDictionary *dic in array) {
13             appsModel *model = [[appsModel alloc] init];
14             model.label = dic[@"label"];
15             model.btn = dic[@"btn"];
16             model.icon = dic[@"icon"];
17
18             [arrayApps addObject:model];
19         }
20         _apps = arrayApps;
21     }
22     return _apps;
23 }
加载模型中对应的plist数据
 1
 2         //取出数组中对应的数据放到一个字典里面
 3         appsModel *app = self.apps[i];
 4
 5
 6         //创建一个UIImageView
 7         UIImageView *icon = [[UIImageView alloc] initWithFrame:CGRectMake(0, 0, iW, 50)];
 8         /**
 9          取出字典中的icon
10          */
11         icon.image = [UIImage imageNamed:app.icon];
12         [view addSubview:icon];
13
14
15
16         //创建一个Label
17         UILabel *l = [[UILabel alloc] initWithFrame:CGRectMake(0, CGRectGetMaxY(icon.frame), iW, 20)];
18         /**
19          取出字典中的label
20          */
21         l.text = app.label;
22         [view addSubview:l];
23
24
25
26         //创建一个按钮
27         UIButton *btn = [[UIButton alloc] initWithFrame:CGRectMake(0, CGRectGetMaxY(l.frame), iW, 20)];
28         /**
29          取出字典中的btn
30          */
31         [btn setTitle:app.btn forState:UIControlStateNormal];
32         [view addSubview:btn];
注:上面是plist中的属性和模型中定义的属性一一对应的时候的,如果不是一一对应我们就要将模型一个一个的赋值与实现
 1 - (instancetype)initWithDict:(NSDictionary *)dict
 2 {
 3     self = [super init];
 4     if (self) {
 5         self.label = dict[@"label"];
 6         self.btn = dict[@"btn"];
 7         self.icon = dict[@"icon"];
 8
 9 //        [self setValue:dict[@"label"] forKeyPath:@"label"];
10
11         //封装
12         [self setValuesForKeysWithDictionary:dict];
13     }
14
15     return self;
16 }
 1 /**
 2  模型数据的加载,返回arry以后我们就只要使用array就能使用这个模型类里面的数据也就是使用plist数据
 3  */
 4 //懒加载plist文件,返回一个apps数据,后面直接使用旧可以
 5 -(NSMutableArray *)apps
 6 {
 7     if (_apps == nil) {
 8         NSArray *array = [NSArray arrayWithContentsOfFile:[[NSBundle mainBundle] pathForResource:@"iCocos.plist" ofType:nil]];
 9
10         NSMutableArray *arrayApps = [NSMutableArray array];
11
12         for (NSDictionary *dic in array) {
13 //            appsModel *model = [[appsModel alloc] initWithDict:dic];
14             appsModel *model = [appsModel appsWithDict:dic];
15
16             [arrayApps addObject:model];
17         }
18         _apps = arrayApps;
19     }
20     return _apps;
21 }
我们也可以讲加载模型的代码进行封装,这样更加简单的实现模式数据的的使用
在模型中定义并且实现一个模型封装的方法
 1 +(NSArray *)appList
 2 {
 3         NSArray *array = [NSArray arrayWithContentsOfFile:[[NSBundle mainBundle] pathForResource:@"iCocos.plist" ofType:nil]];
 4
 5         NSMutableArray *arrayApps = [NSMutableArray array];
 6
 7         for (NSDictionary *dic in array) {
 8             //            appsModel *model = [[appsModel alloc] initWithDict:dic];
 9             appsModel *model = [appsModel appsWithDict:dic];
10
11             [arrayApps addObject:model];
12     }
13     return arrayApps;
14
15 }
实用的时候只要直接使用封装好的模型方法就可以:
 1 /**
 2  模型数据的加载,返回arry以后我们就只要使用array就能使用这个模型类里面的数据也就是使用plist数据
 3  */
 4 //懒加载plist文件,返回一个apps数据,后面直接使用旧可以
 5 -(NSArray *)apps
 6 {
 7     if (_apps == nil) {
 8
 9         _apps = [appsModel appList];
10     }
11     return _apps;
12 }
三:复杂Plist转模型
有的时候我们会遇到Plist中还有更小一级的节点和属性这个时候我们就需要更复杂的模型来加载,但是实用起来并不复杂
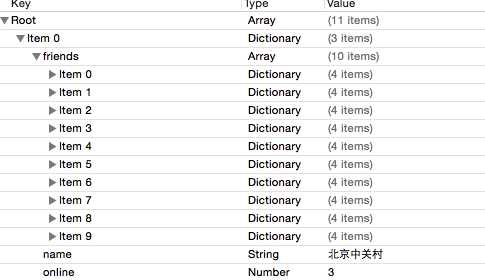
比如Plist中海油一个friends这歌子模型

那么我转模型的时候就可以根据plist中的数据进行处理,
首先我们一一般都是从子模型开始,我们就先定义子模型
 1 /**
 2  根据plist里面存在的子列中的数据再创建一个模型数据
 3  */
 4
 5 /**
 6  设置子模型数据的属性
 7  */
 8
 9 @property (nonatomic, assign) NSString *icon;
10
11 @property (nonatomic, assign) NSString *intro;
12
13 @property (nonatomic, assign) NSString *name;
14
15 @property (nonatomic, assign, getter=isVip)BOOL vip;
16
17
18 /**
19  子模型数据的方法
20  */
21 + (instancetype)friendWithDict:(NSDictionary *)dict;
22
23 - (instancetype)initWithDict:(NSDictionary *)dict;
子模型的实现
 1 /**
 2  子模型数据的方法de实现
 3  */
 4
 5 + (instancetype)friendWithDict:(NSDictionary *)dict
 6 {
 7     return [[self alloc] initWithDict:dict];
 8 }
 9
10 - (instancetype)initWithDict:(NSDictionary *)dict
11 {
12     if (self = [super init]) {
13         [self setValuesForKeysWithDictionary:dict];
14     }
15     return self;
16 }
然后就是根模型
 1 /**
 2  根据plist中的数据创建一个模型数据
 3  */
 4
 5 /**
 6  设置模型数据的中的属性
 7  */
 8
 9 @property (nonatomic, assign) NSArray *friends;
10
11 @property (nonatomic, copy) NSString *name;
12
13 @property (nonatomic, assign) NSNumber *online;
14
15 /**
16  模型数据的方法
17  */
18
19 + (instancetype)groupWithDict:(NSDictionary *)dict;
20
21
22 - (instancetype)initWithDict:(NSDictionary *)dict;
根模型的实现,这里只需要在根模型加载需要实现的子模型酒可以
 1 /**
 2  模型数据的方法的实现
 3  */
 4
 5 + (instancetype)groupWithDict:(NSDictionary *)dict
 6 {
 7     return [[self alloc] initWithDict:dict];
 8 }
 9
10 - (instancetype)initWithDict:(NSDictionary *)dict
11 {
12     if (self = [super init]) {
13         [self setValuesForKeysWithDictionary:dict];
14
15         NSMutableArray *friendArray = [NSMutableArray array];
16         for (NSDictionary *dict in self.friends) {
17             FriendsPlistChildren *friend = [FriendsPlistChildren friendWithDict:dict];
18             [friendArray addObject:friend];
19         }
20         self.friends = friendArray;
21     }
22     return self;
23 }
使用模型数据,方法还是和之前一样的,不需要去处理子模型,因为我们在跟模型里面已经处理好了
 1 /**
 2  加载模型数据的方法
 3  */
 4
 5 - (NSArray *)groups
 6 {
 7     if (_groups == nil) {
 8         NSArray *dictArray = [NSArray arrayWithContentsOfFile:[[NSBundle mainBundle] pathForResource:@"friends.plist" ofType:nil]];
 9
10         NSMutableArray *groupArray = [NSMutableArray array];
11         for (NSDictionary *dict in dictArray) {
12             FirendsPlistRoot *group = [FirendsPlistRoot groupWithDict:dict];
13             [groupArray addObject:group];
14         }
15
16         _groups = groupArray;
17     }
18     return _groups;
19 }
四:使用第三份库
在iOS届有一个神人不知道大家知不知道————他叫李明杰,他(MJ)不仅技术牛逼,而且对天朝iOS界的贡献也是无法用语言来形容的,如果你是老一辈的iOS开发者倒是很正常,如果你只是刚开始学习iOS或者学习iOS不久你都不知道或者没有听过这个名字那么就可以说明你真的out了,甚至说你你根本没有用心在学,关于这个神人我就不做多介绍了,如果你想知道更多,请点击www.520it.com
今天我就使用他的一个NB的框架来实现plist转模型数据,这个框架使用起来非常简单,一行代码就可以搞定你想的功能,
首先你需要去github上面下载这个框架:https://github.com/CoderMJLee/MJExtension
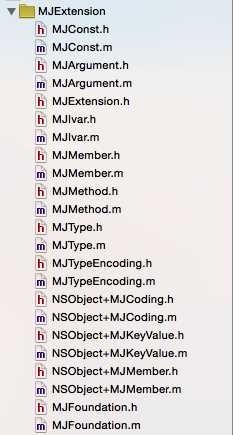
下载好了之后直接讲MJExtension拖到你的项目

首先根据plist数据新建对应的模型数据
这里我一新浪微博中的小部分做测试
#import "User.h"
#import "Status.h"
#import "StatusResult.h"
 1 /**
 2  *  微博文本内容
 3  */
 4 @property (copy, nonatomic) NSString *text;
 5
 6 /**
 7  *  微博作者
 8  */
 9 @property (strong, nonatomic) User *user;
10
11 /**
12  *  转发的微博
13  */
14 @property (strong, nonatomic) Status *retweetedStatus;
 1 /**
 2  *  存放着某一页微博数据(里面都是Status模型)
 3  */
 4 @property (strong, nonatomic) NSMutableArray *statuses;
 5
 6 /**
 7  *  总数
 8  */
 9 @property (assign, nonatomic) NSNumber *totalNumber;
10
11 /**
12  *  上一页的游标
13  */
14 @property (assign, nonatomic) long long previousCursor;
15
16 /**
17  *  下一页的游标
18  */
19 @property (assign, nonatomic) long long nextCursor;
1 /**
2  *  名称
3  */
4 @property (copy, nonatomic) NSString *name;
5
6 /**
7  *  头像
8  */
9 @property (copy, nonatomic) NSString *icon;
下面就是证明去使用这个框架实现你想要的功能了,这里介绍了几乎你开发中需要用到的所有方法和例子,
  1 /**
  2  MJ友情提醒:
  3  1.MJExtension是一套“字典和模型之间互相转换”的轻量级框架
  4  2.MJExtension能完成的功能
  5  * 字典 --> 模型
  6  * 模型 --> 字典
  7  * 字典数组 --> 模型数组
  8  * 模型数组 --> 字典数组
  9  3.具体用法主要参考 main.m中各个函数 以及 "NSObject+MJKeyValue.h"
 10  4.希望各位大神能用得爽
 11  */
 12
 13 #import <Foundation/Foundation.h>
 14 #import "MJExtension.h"
 15 #import "User.h"
 16 #import "Status.h"
 17 #import "StatusResult.h"
 18
 19 /**
 20  *  简单的字典 -> 模型
 21  */
 22 void keyValues2object()
 23 {
 24     // 1.定义一个字典
 25     NSDictionary *dict = @{
 26                            @"name" : @"Jack",
 27                            @"icon" : @"lufy.png",
 28                            };
 29
 30     // 2.将字典转为User模型
 31     User *user = [User objectWithKeyValues:dict];
 32
 33     // 3.打印User模型的属性
 34     NSLog(@"name=%@, icon=%@", user.name, user.icon);
 35 }
 36
 37 /**
 38  *  复杂的字典 -> 模型 (模型里面包含了模型)
 39  */
 40 void keyValues2object2()
 41 {
 42     // 1.定义一个字典
 43     NSDictionary *dict = @{
 44                            @"text" : @"是啊,今天天气确实不错!",
 45
 46                            @"user" : @{
 47                                    @"name" : @"Jack",
 48                                    @"icon" : @"lufy.png"
 49                                    },
 50
 51                            @"retweetedStatus" : @{
 52                                    @"text" : @"今天天气真不错!",
 53
 54                                    @"user" : @{
 55                                            @"name" : @"Rose",
 56                                            @"icon" : @"nami.png"
 57                                            }
 58                                    }
 59                            };
 60
 61     // 2.将字典转为Status模型
 62     Status *status = [Status objectWithKeyValues:dict];
 63
 64     // 3.打印status的属性
 65     NSString *text = status.text;
 66     NSString *name = status.user.name;
 67     NSString *icon = status.user.icon;
 68     NSLog(@"text=%@, name=%@, icon=%@", text, name, icon);
 69
 70     // 4.打印status.retweetedStatus的属性
 71     NSString *text2 = status.retweetedStatus.text;
 72     NSString *name2 = status.retweetedStatus.user.name;
 73     NSString *icon2 = status.retweetedStatus.user.icon;
 74     NSLog(@"text2=%@, name2=%@, icon2=%@", text2, name2, icon2);
 75 }
 76
 77 /**
 78  *  复杂的字典 -> 模型 (模型的数组属性里面又装着模型)
 79  */
 80 void keyValues2object3()
 81 {
 82     // 1.定义一个字典
 83     NSDictionary *dict = @{
 84                            @"statuses" : @[
 85                                    @{
 86                                        @"text" : @"今天天气真不错!",
 87
 88                                        @"user" : @{
 89                                                @"name" : @"Rose",
 90                                                @"icon" : @"nami.png"
 91                                                }
 92                                        },
 93
 94                                    @{
 95                                        @"text" : @"明天去旅游了",
 96
 97                                        @"user" : @{
 98                                                @"name" : @"Jack",
 99                                                @"icon" : @"lufy.png"
100                                                }
101                                        },
102
103                                    @{
104                                        @"text" : @"嘿嘿,这东西不错哦!",
105
106                                        @"user" : @{
107                                                @"name" : @"Jim",
108                                                @"icon" : @"zero.png"
109                                                }
110                                        }
111
112                                    ],
113
114                            @"totalNumber" : @"2014",
115
116                            @"previousCursor" : @"13476589",
117
118                            @"nextCursor" : @"13476599"
119                            };
120
121     // 2.将字典转为StatusResult模型
122     StatusResult *result = [StatusResult objectWithKeyValues:dict];
123
124     // 3.打印StatusResult模型的简单属性
125     NSLog(@"totalNumber=%d, previousCursor=%lld, nextCursor=%lld", result.totalNumber, result.previousCursor, result.nextCursor);
126
127     // 4.打印statuses数组中的模型属性
128     for (Status *status in result.statuses) {
129         NSString *text = status.text;
130         NSString *name = status.user.name;
131         NSString *icon = status.user.icon;
132         NSLog(@"text=%@, name=%@, icon=%@", text, name, icon);
133     }
134 }
135
136 /**
137  *  字典数组 -> 模型数组
138  */
139 void keyValuesArray2objectArray()
140 {
141     // 1.定义一个字典数组
142     NSArray *dictArray = @[
143                            @{
144                                @"name" : @"Jack",
145                                @"icon" : @"lufy.png",
146                                },
147
148                            @{
149                                @"name" : @"Rose",
150                                @"icon" : @"nami.png",
151                                },
152
153                            @{
154                                @"name" : @"Jim",
155                                @"icon" : @"zero.png",
156                                }
157                            ];
158
159     // 2.将字典数组转为User模型数组
160     NSArray *userArray = [User objectArrayWithKeyValuesArray:dictArray];
161
162     // 3.打印userArray数组中的User模型属性
163     for (User *user in userArray) {
164         NSLog(@"name=%@, icon=%@", user.name, user.icon);
165     }
166 }
167
168 /**
169  *  模型 -> 字典
170  */
171 void object2keyValues()
172 {
173     // 1.新建模型
174     User *user = [[User alloc] init];
175     user.name = @"Jack";
176     user.icon = @"lufy.png";
177
178     Status *status = [[Status alloc] init];
179     status.user = user;
180     status.text = @"今天的心情不错!";
181
182     // 2.将模型转为字典
183     //    NSDictionary *dict = [status keyValues];
184     NSDictionary *dict = status.keyValues;
185     NSLog(@"%@", dict);
186 }
187
188 /**
189  *  模型数组 -> 字典数组
190  */
191 void objectArray2keyValuesArray()
192 {
193     // 1.新建模型数组
194     User *user1 = [[User alloc] init];
195     user1.name = @"Jack";
196     user1.icon = @"lufy.png";
197
198     User *user2 = [[User alloc] init];
199     user2.name = @"Rose";
200     user2.icon = @"nami.png";
201
202     User *user3 = [[User alloc] init];
203     user3.name = @"Jim";
204     user3.icon = @"zero.png";
205
206     NSArray *userArray = @[user1, user2, user3];
207
208     // 2.将模型数组转为字典数组
209     NSArray *dictArray = [User keyValuesArrayWithObjectArray:userArray];
210     NSLog(@"%@", dictArray);
211 }
212
213 int main(int argc, const char * argv[])
214 {
215     @autoreleasepool {
216         // 简单的字典 -> 模型
217         keyValues2object();
218
219         // 复杂的字典 -> 模型 (模型里面包含了模型)
220         keyValues2object2();
221
222         // 复杂的字典 -> 模型 (模型的数组属性里面又装着模型)
223         keyValues2object3();
224
225         // 字典数组 -> 模型数组
226         keyValuesArray2objectArray();
227
228         // 模型转字典
229         object2keyValues();
230
231         // 模型数组 -> 字典数组
232         objectArray2keyValuesArray();
233     }
234     return 0;
235 }
标签:
原文地址:http://www.cnblogs.com/iCocos/p/4589560.html