标签:
小项目就要趁胜追击,这次是实现短信的发送功能,东西很简单,但那时也是值得学习的。
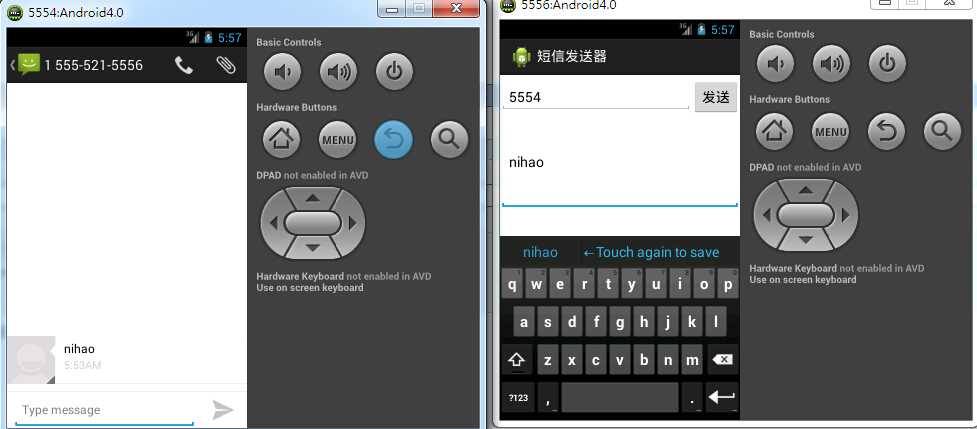
效果图如下:

具体步骤:
1.首先,编写页面,代码如下,没有什么重点。在LinearLayout布局中有个weight(权重),按比例分配大小
 1 <RelativeLayout xmlns:android="http://schemas.android.com/apk/res/android"
 2     xmlns:tools="http://schemas.android.com/tools"
 3     android:layout_width="match_parent"
 4     android:layout_height="match_parent"
 5     tools:context=".MainActivity" >
 6     <LinearLayout
 7         android:id="@+id/linear_layout"
 8         android:layout_width="match_parent"
 9         android:layout_height="wrap_content"
10         android:orientation="horizontal"
11         android:paddingTop="5dip"
12         >
13         <EditText
14         android:id="@+id/edit_number"
15         android:layout_width="0dip"
16         android:layout_height="wrap_content"
17         android:layout_weight="1"
18         android:hint="@string/contact_number"
19         android:inputType="phone"/>
20     <Button
21         android:id="@+id/btn_send"
22         android:layout_width="wrap_content"
23         android:layout_height="wrap_content"
24         android:text="@string/btn_send_sms"/>
25     </LinearLayout>
26
27
28     <EditText
29         android:id="@+id/edit_content"
30         android:layout_width="match_parent"
31         android:layout_height="wrap_content"
32         android:lines="5"
33         android:layout_below="@id/linear_layout"
34         android:hint="@string/sms_content"/>
35 </RelativeLayout>
2.再看看java代码
 1 public class MainActivity extends Activity implements OnClickListener{
 2
 3     private EditText editContent;
 4     private EditText editNumber;
 5
 6     @Override
 7     protected void onCreate(Bundle savedInstanceState) {
 8         super.onCreate(savedInstanceState);
 9         setContentView(R.layout.activity_main);
10         editContent = (EditText) findViewById(R.id.edit_content);
11         editNumber = (EditText) findViewById(R.id.edit_number);
12
13         findViewById(R.id.btn_send).setOnClickListener(this);
14     }
15
16     @Override
17     public void onClick(View view) {
18         switch (view.getId()) {
19         case R.id.btn_send:
20             //短信管理器
21             SmsManager manager=SmsManager.getDefault();
22             String number=editNumber.getText().toString();
23             String content=editContent.getText().toString();
24
25             manager.sendTextMessage(number, null, content, null, null);
26             break;
27
28         default:
29             break;
30         }
31     }
32 }
短信这边没有像拨号器那样调用系统自带的,直接调用SmsManager短信管理器来发送短信,其中sendTextMessage(String destinationAddress, String scAddress, String text, PendingIntent sentIntent, PendingIntent deliveryIntent)方法的四个参数,第一个参数是一个字符串类型,直接翻译就是目标地址,其实就是收信人的手机号码,第二个参数也是一个字符串类型,是短信服务中心,一般为null,就是用当前默认的短信服务中心(没去了解)。第三个参数也是短信的内容了,第四个参数是一个PendingIntent,当消息发出时,成功或者失败的信息报告通过PendingIntent来广播,暂时就为null。第四个参数也是个PendingIntent,当消息发送到收件人时,该PendingIntent会被广播,暂时也为null。
3.最后就是给应用发送短信的权限,在清单文件中添加如下代码
<uses-permission android:name="android.permission.SEND_SMS"/>
完了,可以试试看,无论在真机还是模拟器上,代码不复杂,这也是学到点东西的,功能还可以更好的完善,那是以后学习中在添加了。
也请大家多多指教!!!!
标签:
原文地址:http://www.cnblogs.com/zzqhfuf/p/4596080.html