标签:
Although you can instantiate new Preference objects at runtime, you should define your list of settings in XML with a hierarchy of Preference objects. Using an XML file to define your collection of settings is preferred because the file provides an easy-to-read structure that‘s simple to update. Also, your app‘s settings are generally pre-determined, although you can still modify the collection at runtime.
Each Preference subclass can be declared with an XML element that matches the class name, such as<CheckBoxPreference>.
You must save the XML file in the res/xml/ directory. Although you can name the file anything you want, it‘s traditionally named preferences.xml. You usually need only one file, because branches in the hierarchy (that open their own list of settings) are declared using nested instances of PreferenceScreen.
Note: If you want to create a multi-pane layout for your settings, then you need separate XML files for each fragment.
The root node for the XML file must be a <PreferenceScreen> element. Within this element is where you add each Preference. Each child you add within the <PreferenceScreen> element appears as a single item in the list of settings.
For example:
<?xml version="1.0" encoding="utf-8"?>
<PreferenceScreen xmlns:android="http://schemas.android.com/apk/res/android">
    <CheckBoxPreference
        android:key="pref_sync"
        android:title="@string/pref_sync"
        android:summary="@string/pref_sync_summ"
        android:defaultValue="true" />
    <ListPreference
        android:dependency="pref_sync"
        android:key="pref_syncConnectionType"
        android:title="@string/pref_syncConnectionType"
        android:dialogTitle="@string/pref_syncConnectionType"
        android:entries="@array/pref_syncConnectionTypes_entries"
        android:entryValues="@array/pref_syncConnectionTypes_values"
        android:defaultValue="@string/pref_syncConnectionTypes_default" />
</PreferenceScreen>
In this example, there‘s a CheckBoxPreference and a ListPreference. Both items include the following three attributes:
android:keySharedPreferences.
The only instances in which this attribute is not required is when the preference is a PreferenceCategoryor PreferenceScreen, or the preference specifies an Intent to invoke (with an <intent> element) or aFragment to display (with an android:fragment attribute).
android:titleandroid:defaultValueSharedPreferences file. You should supply a default value for all settings.For information about all other supported attributes, see the Preference (and respective subclass) documentation.
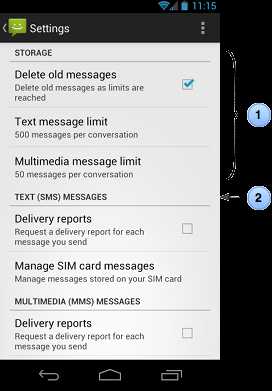
Figure 2. Setting categories with titles.
1. The category is specified by the<PreferenceCategory> element.
2. The title is specified with the android:titleattribute.
When your list of settings exceeds about 10 items, you might want to add titles to define groups of settings or display those groups in a separate screen. These options are described in the following sections.
If you present a list of 10 or more settings, users may have difficulty scanning, comprehending, and processing them. You can remedy this by dividing some or all of the settings into groups, effectively turning one long list into multiple shorter lists. A group of related settings can be presented in one of two ways:
You can use one or both of these grouping techniques to organize your app‘s settings. When deciding which to use and how to divide your settings, you should follow the guidelines in Android Design‘s Settings guide.
If you want to provide dividers with headings between groups of settings (as shown in figure 2), place each group ofPreference objects inside a PreferenceCategory.
For example:
<PreferenceScreen xmlns:android="http://schemas.android.com/apk/res/android">
    <PreferenceCategory
        android:title="@string/pref_sms_storage_title"
        android:key="pref_key_storage_settings">
        <CheckBoxPreference
            android:key="pref_key_auto_delete"
            android:summary="@string/pref_summary_auto_delete"
            android:title="@string/pref_title_auto_delete"
            android:defaultValue="false"... />
        <Preference
            android:key="pref_key_sms_delete_limit"
            android:dependency="pref_key_auto_delete"
            android:summary="@string/pref_summary_delete_limit"
            android:title="@string/pref_title_sms_delete"... />
        <Preference
            android:key="pref_key_mms_delete_limit"
            android:dependency="pref_key_auto_delete"
            android:summary="@string/pref_summary_delete_limit"
            android:title="@string/pref_title_mms_delete" ... />
    </PreferenceCategory>
    ...
</PreferenceScreen>
If you want to place groups of settings into a subscreen (as shown in figure 3), place the group of Preferenceobjects inside a PreferenceScreen.
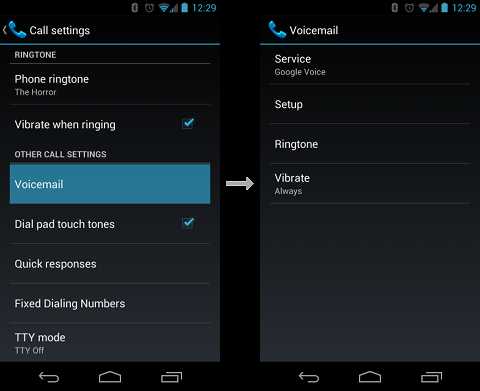
Figure 3. Setting subscreens. The <PreferenceScreen> element creates an item that, when selected, opens a separate list to display the nested settings.
For example:
<PreferenceScreen  xmlns:android="http://schemas.android.com/apk/res/android">
    <!-- opens a subscreen of settings -->
    <PreferenceScreen
        android:key="button_voicemail_category_key"
        android:title="@string/voicemail"
        android:persistent="false">
        <ListPreference
            android:key="button_voicemail_provider_key"
            android:title="@string/voicemail_provider" ... />
        <!-- opens another nested subscreen -->
        <PreferenceScreen
            android:key="button_voicemail_setting_key"
            android:title="@string/voicemail_settings"
            android:persistent="false">
            ...
        </PreferenceScreen>
        <RingtonePreference
            android:key="button_voicemail_ringtone_key"
            android:title="@string/voicemail_ringtone_title"
            android:ringtoneType="notification" ... />
        ...
    </PreferenceScreen>
    ...
</PreferenceScreen>
In some cases, you might want a preference item to open a different activity instead of a settings screen, such as a web browser to view a web page. To invoke an Intent when the user selects a preference item, add an<intent> element as a child of the corresponding <Preference> element.
For example, here‘s how you can use a preference item to open a web page:
<Preference android:title="@string/prefs_web_page" >
    <intent android:action="android.intent.action.VIEW"
            android:data="http://www.example.com" />
</Preference>
You can create both implicit and explicit intents using the following attributes:
| android:action | The action to assign, as per the setAction() method. |
| android:data | The data to assign, as per the setData() method. |
| android:mimeType | The MIME type to assign, as per the setType() method. |
| android:targetClass | The class part of the component name, as per the setComponent() method. |
| android:targetPackage | The package part of the component name, as per the setComponent() method. |
标签:
原文地址:http://www.cnblogs.com/cocl/p/4620988.html