标签:
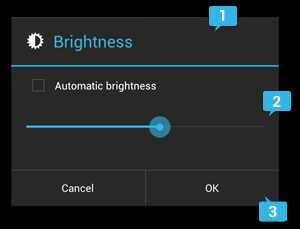
The AlertDialog class allows you to build a variety of dialog designs and is often the only dialog class you‘ll need. As shown in figure 2, there are three regions of an alert dialog:

Figure 2. The layout of a dialog.
This is optional and should be used only when the content area is occupied by a detailed message, a list, or custom layout. If you need to state a simple message or question (such as the dialog in figure 1), you don‘t need a title.
This can display a message, a list, or other custom layout.
There should be no more than three action buttons in a dialog.
The AlertDialog.Builder class provides APIs that allow you to create an AlertDialog with these kinds of content, including a custom layout.
To build an AlertDialog:
// 1. Instantiate anAlertDialog.Builderwith its constructor
AlertDialog.Builder builder = new AlertDialog.Builder(getActivity());
// 2. Chain together various setter methods to set the dialog characteristics
builder.setMessage(R.string.dialog_message)
.setTitle(R.string.dialog_title);
// 3. Get theAlertDialogfromcreate()
AlertDialog dialog = builder.create();
The following topics show how to define various dialog attributes using the AlertDialog.Builder class.
To add action buttons like those in figure 2, call the setPositiveButton() and setNegativeButton()methods:
AlertDialog.Builder builder = new AlertDialog.Builder(getActivity());
// Add the buttons
builder.setPositiveButton(R.string.ok, new DialogInterface.OnClickListener() {
           public void onClick(DialogInterface dialog, int id) {
               // User clicked OK button
           }
       });
builder.setNegativeButton(R.string.cancel, new DialogInterface.OnClickListener() {
           public void onClick(DialogInterface dialog, int id) {
               // User cancelled the dialog
           }
       });
// Set other dialog properties
...

// Create the AlertDialog
AlertDialog dialog = builder.create();
The set...Button() methods require a title for the button (supplied by a string resource) and aDialogInterface.OnClickListener that defines the action to take when the user presses the button.
There are three different action buttons you can add:
You can add only one of each button type to an AlertDialog. That is, you cannot have more than one "positive" button.
There are three kinds of lists available with theAlertDialog APIs:

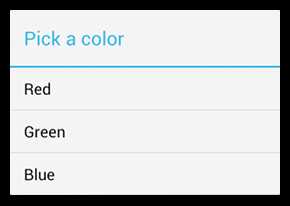
Figure 3. A dialog with a title and list.
To create a single-choice list like the one in figure 3, use the setItems() method:
@Override
public Dialog onCreateDialog(Bundle savedInstanceState) {
    AlertDialog.Builder builder = new AlertDialog.Builder(getActivity());
    builder.setTitle(R.string.pick_color)
           .setItems(R.array.colors_array, new DialogInterface.OnClickListener() {
               public void onClick(DialogInterface dialog, int which) {
               // The ‘which‘ argument contains the index position
               // of the selected item
           }
    });
    return builder.create();
}
Because the list appears in the dialog‘s content area, the dialog cannot show both a message and a list and you should set a title for the dialog with setTitle(). To specify the items for the list, call setItems(), passing an array. Alternatively, you can specify a list using setAdapter(). This allows you to back the list with dynamic data (such as from a database) using a ListAdapter.
If you choose to back your list with a ListAdapter, always use a Loader so that the content loads asynchronously. This is described further in Building Layouts with an Adapter and the Loaders guide.
Note: By default, touching a list item dismisses the dialog, unless you‘re using one of the following persistent choice lists.
To add a list of multiple-choice items (checkboxes) or single-choice items (radio buttons), use thesetMultiChoiceItems() orsetSingleChoiceItems() methods, respectively.

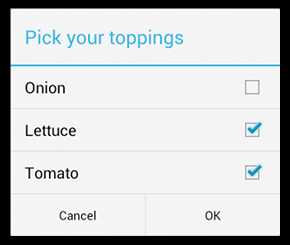
Figure 4. A list of multiple-choice items.
For example, here‘s how you can create a multiple-choice list like the one shown in figure 4 that saves the selected items in an ArrayList:
@Override
public Dialog onCreateDialog(Bundle savedInstanceState) {
    mSelectedItems = new ArrayList();  // Where we track the selected items
    AlertDialog.Builder builder = new AlertDialog.Builder(getActivity());
    // Set the dialog title
    builder.setTitle(R.string.pick_toppings)
    // Specify the list array, the items to be selected by default (null for none),
    // and the listener through which to receive callbacks when items are selected
           .setMultiChoiceItems(R.array.toppings, null,
                      new DialogInterface.OnMultiChoiceClickListener() {
               @Override
               public void onClick(DialogInterface dialog, int which,
                       boolean isChecked) {
                   if (isChecked) {
                       // If the user checked the item, add it to the selected items
                       mSelectedItems.add(which);
                   } else if (mSelectedItems.contains(which)) {
                       // Else, if the item is already in the array, remove it
                       mSelectedItems.remove(Integer.valueOf(which));
                   }
               }
           })
    // Set the action buttons
           .setPositiveButton(R.string.ok, new DialogInterface.OnClickListener() {
               @Override
               public void onClick(DialogInterface dialog, int id) {
                   // User clicked OK, so save the mSelectedItems results somewhere
                   // or return them to the component that opened the dialog
                   ...
               }
           })
           .setNegativeButton(R.string.cancel, new DialogInterface.OnClickListener() {
               @Override
               public void onClick(DialogInterface dialog, int id) {
                   ...
               }
           });

    return builder.create();
}
Although both a traditional list and a list with radio buttons provide a "single choice" action, you should usesetSingleChoiceItems() if you want to persist the user‘s choice. That is, if opening the dialog again later should indicate what the user‘s current choice is, then you create a list with radio buttons.

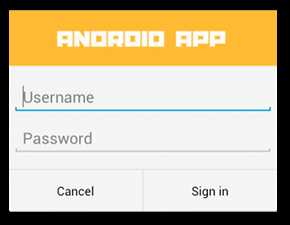
Figure 5. A custom dialog layout.
If you want a custom layout in a dialog, create a layout and add it to an AlertDialog by calling setView() on your AlertDialog.Builder object.
By default, the custom layout fills the dialog window, but you can still use AlertDialog.Builder methods to add buttons and a title.
For example, here‘s the layout file for the dialog in Figure 5:
res/layout/dialog_signin.xml
<LinearLayout xmlns:android="http://schemas.android.com/apk/res/android"
    android:orientation="vertical"
    android:layout_width="wrap_content"
    android:layout_height="wrap_content">
    <ImageView
        android:src="@drawable/header_logo"
        android:layout_width="match_parent"
        android:layout_height="64dp"
        android:scaleType="center"
        android:background="#FFFFBB33"
        android:contentDescription="@string/app_name" />
    <EditText
        android:id="@+id/username"
        android:inputType="textEmailAddress"
        android:layout_width="match_parent"
        android:layout_height="wrap_content"
        android:layout_marginTop="16dp"
        android:layout_marginLeft="4dp"
        android:layout_marginRight="4dp"
        android:layout_marginBottom="4dp"
        android:hint="@string/username" />
    <EditText
        android:id="@+id/password"
        android:inputType="textPassword"
        android:layout_width="match_parent"
        android:layout_height="wrap_content"
        android:layout_marginTop="4dp"
        android:layout_marginLeft="4dp"
        android:layout_marginRight="4dp"
        android:layout_marginBottom="16dp"
        android:fontFamily="sans-serif"
        android:hint="@string/password"/>
</LinearLayout>
Tip: By default, when you set an EditText element to use the "textPassword" input type, the font family is set to monospace, so you should change its font family to "sans-serif" so that both text fields use a matching font style.
To inflate the layout in your DialogFragment, get a LayoutInflater with getLayoutInflater() and callinflate(), where the first parameter is the layout resource ID and the second parameter is a parent view for the layout. You can then call setView() to place the layout in the dialog.
@Override
public Dialog onCreateDialog(Bundle savedInstanceState) {
    AlertDialog.Builder builder = new AlertDialog.Builder(getActivity());
    // Get the layout inflater
    LayoutInflater inflater = getActivity().getLayoutInflater();

    // Inflate and set the layout for the dialog
    // Pass null as the parent view because its going in the dialog layout
    builder.setView(inflater.inflate(R.layout.dialog_signin, null))
    // Add action buttons
           .setPositiveButton(R.string.signin, new DialogInterface.OnClickListener() {
               @Override
               public void onClick(DialogInterface dialog, int id) {
                   // sign in the user ...
               }
           })
           .setNegativeButton(R.string.cancel, new DialogInterface.OnClickListener() {
               public void onClick(DialogInterface dialog, int id) {
                   LoginDialogFragment.this.getDialog().cancel();
               }
           });
    return builder.create();
}
Tip: If you want a custom dialog, you can instead display an Activity as a dialog instead of using the DialogAPIs. Simply create an activity and set its theme to Theme.Holo.Dialog in the <activity> manifest element:
<activity android:theme="@android:style/Theme.Holo.Dialog" >
That‘s it. The activity now displays in a dialog window instead of fullscreen.
Android Dialogs(3)警示Dialog教程[创建,单选,复选,自定义]等等
标签:
原文地址:http://www.cnblogs.com/cocl/p/4622887.html