标签:
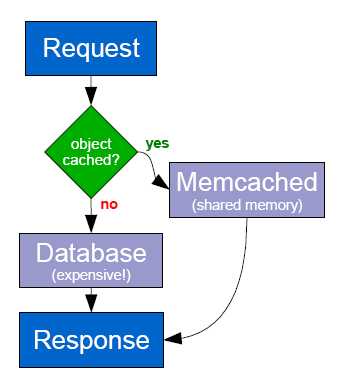
1.1 memcached 的使用场景1.2 memcached 的特点1.3 memcached 的工作流程
2.1 安装 memcached2.2 启动memcached
3.1 通过nc写入,获取,删除3.2 通过telnet 写入,获取,删除3.3 libmemcached工具(memcached的管理工具)
[root@memcached ~]# memcached -vv -u memcached ==>部分截图slab class 1: chunk size 96 perslab 10922slab class 2: chunk size 120 perslab 8738slab class 3: chunk size 152 perslab 6898slab class 4: chunk size 192 perslab 5461
[root@memcached ~]# /usr/local/bin/memcached -d -u root[root@memcached ~]# ss -tnlState Recv-Q Send-Q Local Address:Port Peer Address:PortLISTEN 0 128 :::58888 :::*LISTEN 0 128 *:58888 *:*LISTEN 0 1024 :::11211 :::*LISTEN 0 1024 *:11211 *:*
[root@memcached ~]# yum install nc[root@memcached ~]# echo "stats settings" | nc localhost 11211STAT maxbytes 67108864STAT maxconns 1024STAT tcpport 11211STAT udpport 11211STAT inter NULLSTAT verbosity 0STAT oldest 0STAT evictions onSTAT domain_socket NULLSTAT umask 700STAT growth_factor 1.25STAT chunk_size 48STAT num_threads 4STAT num_threads_per_udp 4STAT stat_key_prefix :STAT detail_enabled noSTAT reqs_per_event 20STAT cas_enabled yesSTAT tcp_backlog 1024STAT binding_protocol auto-negotiateSTAT auth_enabled_sasl noSTAT item_size_max 1048576STAT maxconns_fast noSTAT hashpower_init 0STAT slab_reassign noSTAT slab_automove 0STAT lru_crawler noSTAT lru_crawler_sleep 100STAT lru_crawler_tocrawl 0STAT tail_repair_time 0STAT flush_enabled yesSTAT hash_algorithm jenkinsSTAT lru_maintainer_thread noSTAT hot_lru_pct 32STAT warm_lru_pct 32STAT expirezero_does_not_evict noEND
[root@memcached ~]# printf "set mykey01 0 0 10\r\n1234567891\r\n"|nc 127.0.0.1 11211 ==>命令的字节是10。否则添加不成功STORED[root@memcached ~]# printf "get mykey01\r\n"|nc 127.0.0.1 11211VALUE mykey01 0 101234567891END[root@memcached ~]# printf "delete mykey01\r\n"|nc 127.0.0.1 11211DELETED[root@memcached ~]# printf "get mykey\r\n"|nc 127.0.0.1 11211END
[root@memcached ~]# telnet localhost 11211Trying ::1...Connected to localhost.Escape character is ‘^]‘.set mykey 0 600 11hello worldSTOREDget mykeyVALUE mykey 0 11hello worldENDdelete mykeyDELETEDget mykeyENDstatsSTAT pid 4834STAT uptime 871STAT time 1436249757STAT version 1.4.24STAT libevent 1.4.13-stableSTAT pointer_size 64STAT rusage_user 0.036994STAT rusage_system 0.119981STAT curr_connections 10STAT total_connections 37STAT connection_structures 11STAT reserved_fds 20STAT cmd_get 10STAT cmd_set 4STAT cmd_flush 0STAT cmd_touch 0STAT get_hits 4 ==>命中数量STAT get_misses 2 丢失数量STAT get_misses 6STAT delete_misses 0STAT delete_hits 3STAT incr_misses 0STAT incr_hits 0STAT decr_misses 0STAT decr_hits 0STAT cas_misses 0STAT cas_hits 0STAT cas_badval 0STAT touch_hits 0STAT touch_misses 0STAT auth_cmds 0STAT auth_errors 0STAT bytes_read 622STAT bytes_written 1091STAT limit_maxbytes 67108864STAT accepting_conns 1STAT listen_disabled_num 0STAT threads 4STAT conn_yields 0STAT hash_power_level 16STAT hash_bytes 524288STAT hash_is_expanding 0STAT malloc_fails 0STAT bytes 0STAT curr_items 0 ==>当前数据库中的条目STAT total_items 2 总共多少条数据STAT total_items 4STAT expired_unfetched 0STAT evicted_unfetched 0STAT evictions 0STAT reclaimed 0STAT crawler_reclaimed 0STAT crawler_items_checked 0STAT lrutail_reflocked 0END
yum install libmemcached -y[root@memcached ~]# printf "set mykey01 0 0 10\r\n1234567891\r\n"|nc 127.0.0.1 11211STORED[root@memcached ~]# memcat --server=127.0.0.1:11211 mykey011234567891[root@memcached ~]# memstat --server=127.0.0.1:11211Listing 1 ServerServer: 127.0.0.1 (11211)pid: 4834uptime: 1350time: 1436250236version: 1.4.24pointer_size: 64rusage_user: 0.71989rusage_system: 0.174973curr_items: 1total_items: 5bytes: 83curr_connections: 10total_connections: 42connection_structures: 11cmd_get: 13cmd_set: 5get_hits: 5get_misses: 8evictions: 0bytes_read: 83bytes_written: 83limit_maxbytes: 67108864threads: 4
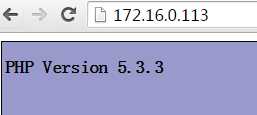
# 4.1 编译php连接memcached的驱动是要用到gcc和zlib-develyum install nginx php-fpm gcc zlib-devel -y# 4.2 修改配置文件nginx-1.0.15-11.el6.x86_6cat > /etc/nginx/conf.d/default.conf << EOFserver {listen 80 default_server;server_name _;include /etc/nginx/default.d/*.conf;location / {root /usr/share/nginx/html;index index.php index.html index.htm;}error_page 404 /404.html;location = /404.html {root /usr/share/nginx/html;}error_page 500 502 503 504 /50x.html;location = /50x.html {root /usr/share/nginx/html;}location ~ \.php$ {root html;fastcgi_pass 127.0.0.1:9000;fastcgi_index index.php;fastcgi_param SCRIPT_FILENAME /usr/share/nginx/html\$fastcgi_script_name;include fastcgi_params;}}EOF# 4.3 添加测试文件cat > /usr/share/nginx/html/index.php << EOF<?phpphpinfo();?>EOF# 4.4 重新加载nginx服务/etc/init.d/nginx reload
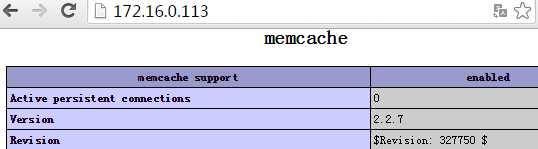
# 4.6 下载php的扩展插件memcachewget http://pecl.php.net/get/memcache-2.2.7.tgzgzip -d memcache-2.2.7.tgztar -xf memcache-2.2.7.tarcp -r memcache-2.2.7 /usr/local/ln -sv /usr/local/memcache-2.2.7/ /usr/local/memcache# 4.7 编译memcache生成php的模块yum install php-develcd /usr/local/memcachephpize./configuremake && make install# 4.8 将模块路径添加入php配置文件cat >> /etc/php.ini << EOF;start by test 20150707extension = /usr/lib64/php/modules/memcache.so;end by test 20150707EOF- # 4.9 重新加载 nginx 和 php-fpm
- /etc/init.d/php-fpm reload
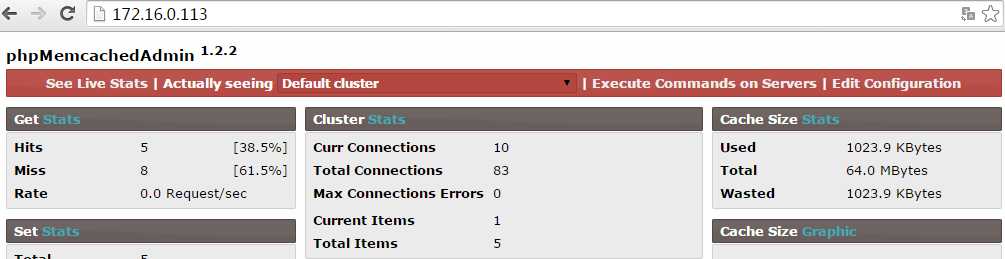
# 5.1 安装phpMemcachedAdminyum install phpMemcachedAdmin# 5.2 通过查询的到index.php的路径rpm -ql phpMemcachedAdmin/usr/share/phpMemcachedAdmin/index.php# 5.3 修改nginx配置文件cat > /etc/nginx/conf.d/default.conf << EOFserver {listen 80 default_server;server_name _;include /etc/nginx/default.d/*.conf;location / {#root /usr/share/nginx/html;root /usr/share/phpMemcachedAdmin;index index.php index.html index.htm;}error_page 404 /404.html;location = /404.html {root /usr/share/nginx/html;}error_page 500 502 503 504 /50x.html;location = /50x.html {root /usr/share/nginx/html;}location ~ \.php$ {root html;fastcgi_pass 127.0.0.1:9000;fastcgi_index index.php;#fastcgi_param SCRIPT_FILENAME /usr/share/nginx/html$fastcgi_script_name;fastcgi_param SCRIPT_FILENAME /usr/share/phpMemcachedAdmin\$fastcgi_script_name;include fastcgi_params;}}EOF# 5.4 重启nginx/etc/init.d/nginx restart
标签:
原文地址:http://www.cnblogs.com/kwstars/p/4627244.html